How to make collars & leashes
This page contains the basics of making collars & leashes. Advanced topics are contained in their own pages: sewing faster with a Juki LK-1900 bartack machine & cutting web faster with a cutting hot-knife (page coming).
Collars
I make collars in five widths. I make each width in two lengths for greater range of fitment:
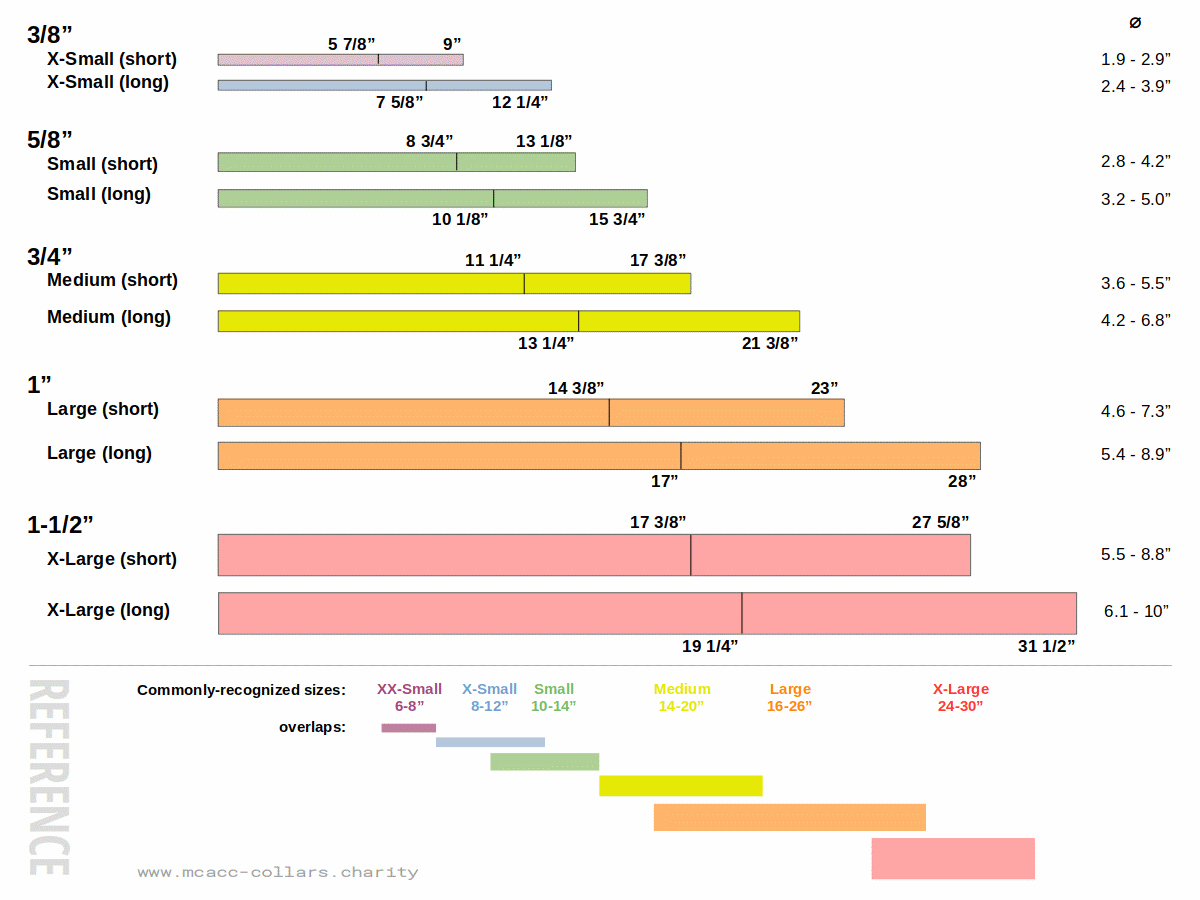
See the shelter page for more info about that chart.
Materials
The following part #s refer to PetHardware.com's products.[1]
| Collars | Part #s | |||||
|---|---|---|---|---|---|---|
| Width | Length | Webbing | Tri-glide | Loop | Buckle | Ring |
| 3/8" (X-Small) | short | WE10/B | 202 PL/10 | L8A PL/10 | 507 PL/10 | 4520/10 NP |
| long | ||||||
| 5/8" (Small) | short | WE15/B | 202 PL/17 | L8A PL/16 | 507 PL/17 | 4520/16 NP |
| long | ||||||
| 3/4" (Medium) | short | WE20/B | 202 PL/20 | 408 PL/20 | 507 PL/20 | 4520/20 NP |
| long | ||||||
| 1" (Large) | short | WE25/B | 202 PL/25 | L8A PL/25 | 507 PL/25 | 4520/24 NP |
| long | 408 PL/25 | |||||
| 1-1/2" (X-Large) | short | WE40/B | 202 PL/40 | L8A PL/40 | 507 PL/40 | 4520/40 NP |
| long | ||||||
I use two different loops for the 1" collar: round (L8A) & square (408). Neither fit the 1" webbing perfectly. The round is a little tight. The square a little loose. I use the round loop on the -Short collar, the square (which is stronger) on the -Long. I may end up using the square for both.
For 3/4" collars I use the square (408) loops. That webbing is thick. The round loop doesn't fit.
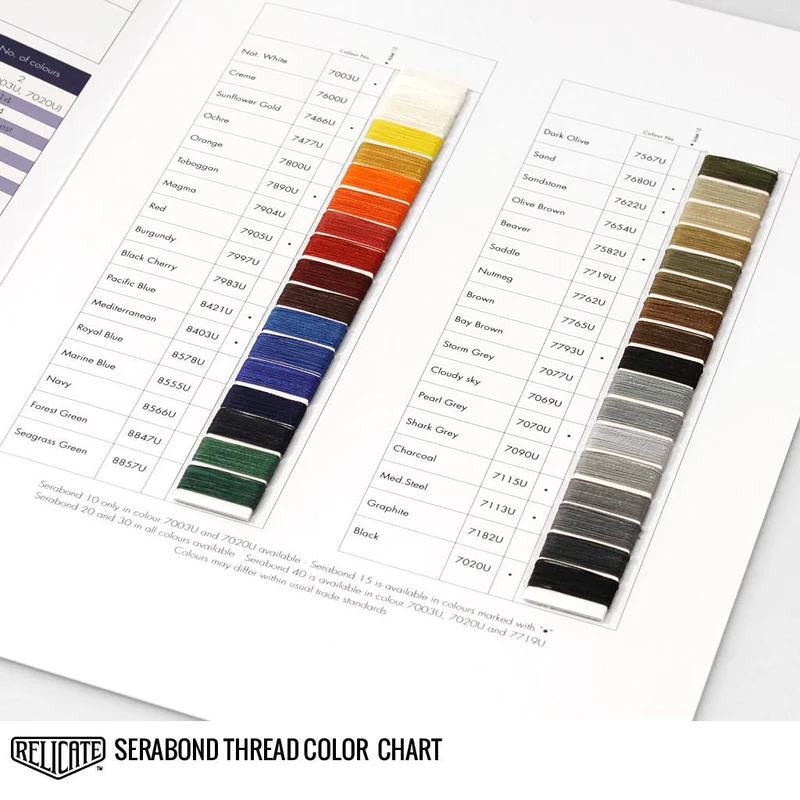
Thread
I use Tex-70 polyester thread for the 3/8" to 3/4" webbing. I use Tex 90 for 1" & 1-1/2". (Tex 70 is strong enough for the larger collars. Compensate by sewing a few more stitches). I use Amann "Outdoor Pro" or "Serabond." (It seems like the former is replacing the latter.). You can find this thread at Wawak or Relicate.
I use white (7003) for the top thread; black (7020) for the bottom (bobbin). To use different colors like this you have to get your thread tension balanced (or the white will pull through to the black side which won't look good). Even then, occasionally the white thread will pull through. Use a Sharpie pen to blot that out.
You can use black thread on both sides, but I like the stitches to be visible on the inside so the sturdiness of the collar can be seen. Gray thread would be better. It wouldn't show as brightly if it pulls through to the black-thread side. (I still use white because I started that way & have it dialed in.).
This color chart shows the Serabond & Outdoor Pro colors.
Order of assembly
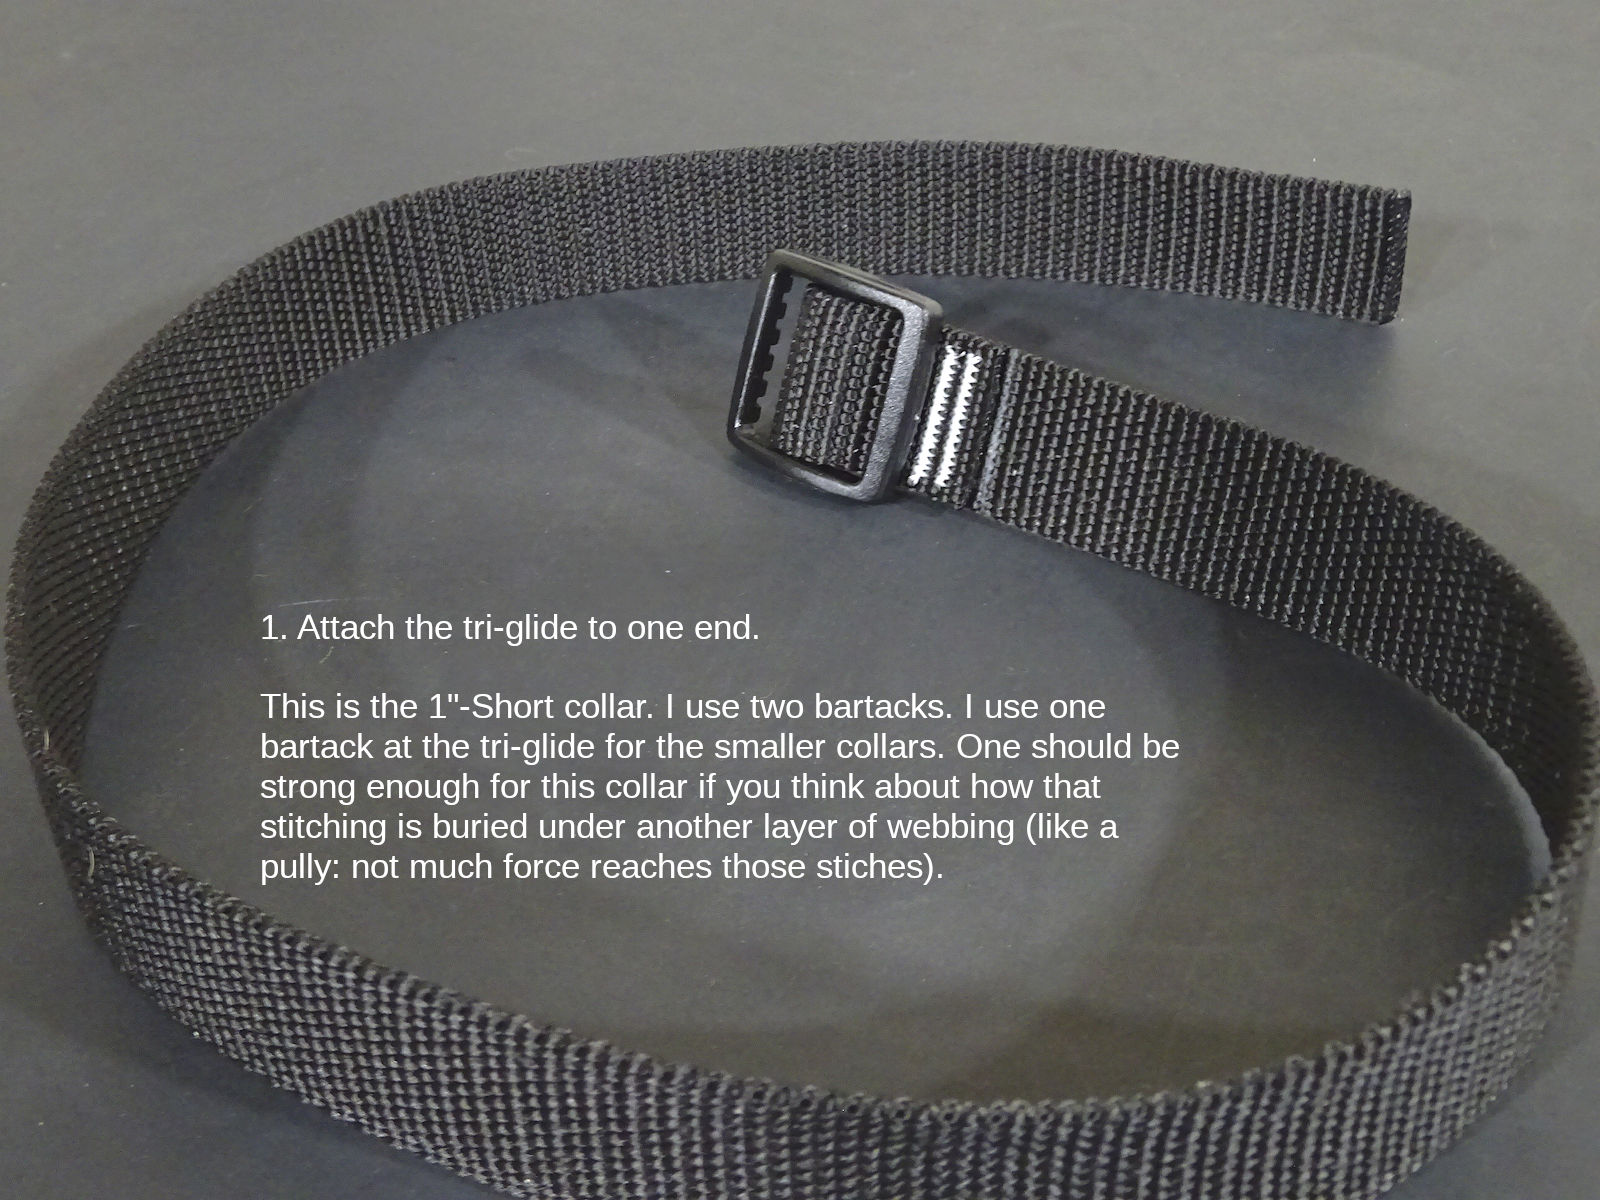
1. Sew one end onto the tri-glide:
2. Thread the webbing through a) the loop, b) bottom-slot of the male buckle, c) top-slot, d) the loop again, and e) the tri-glide:
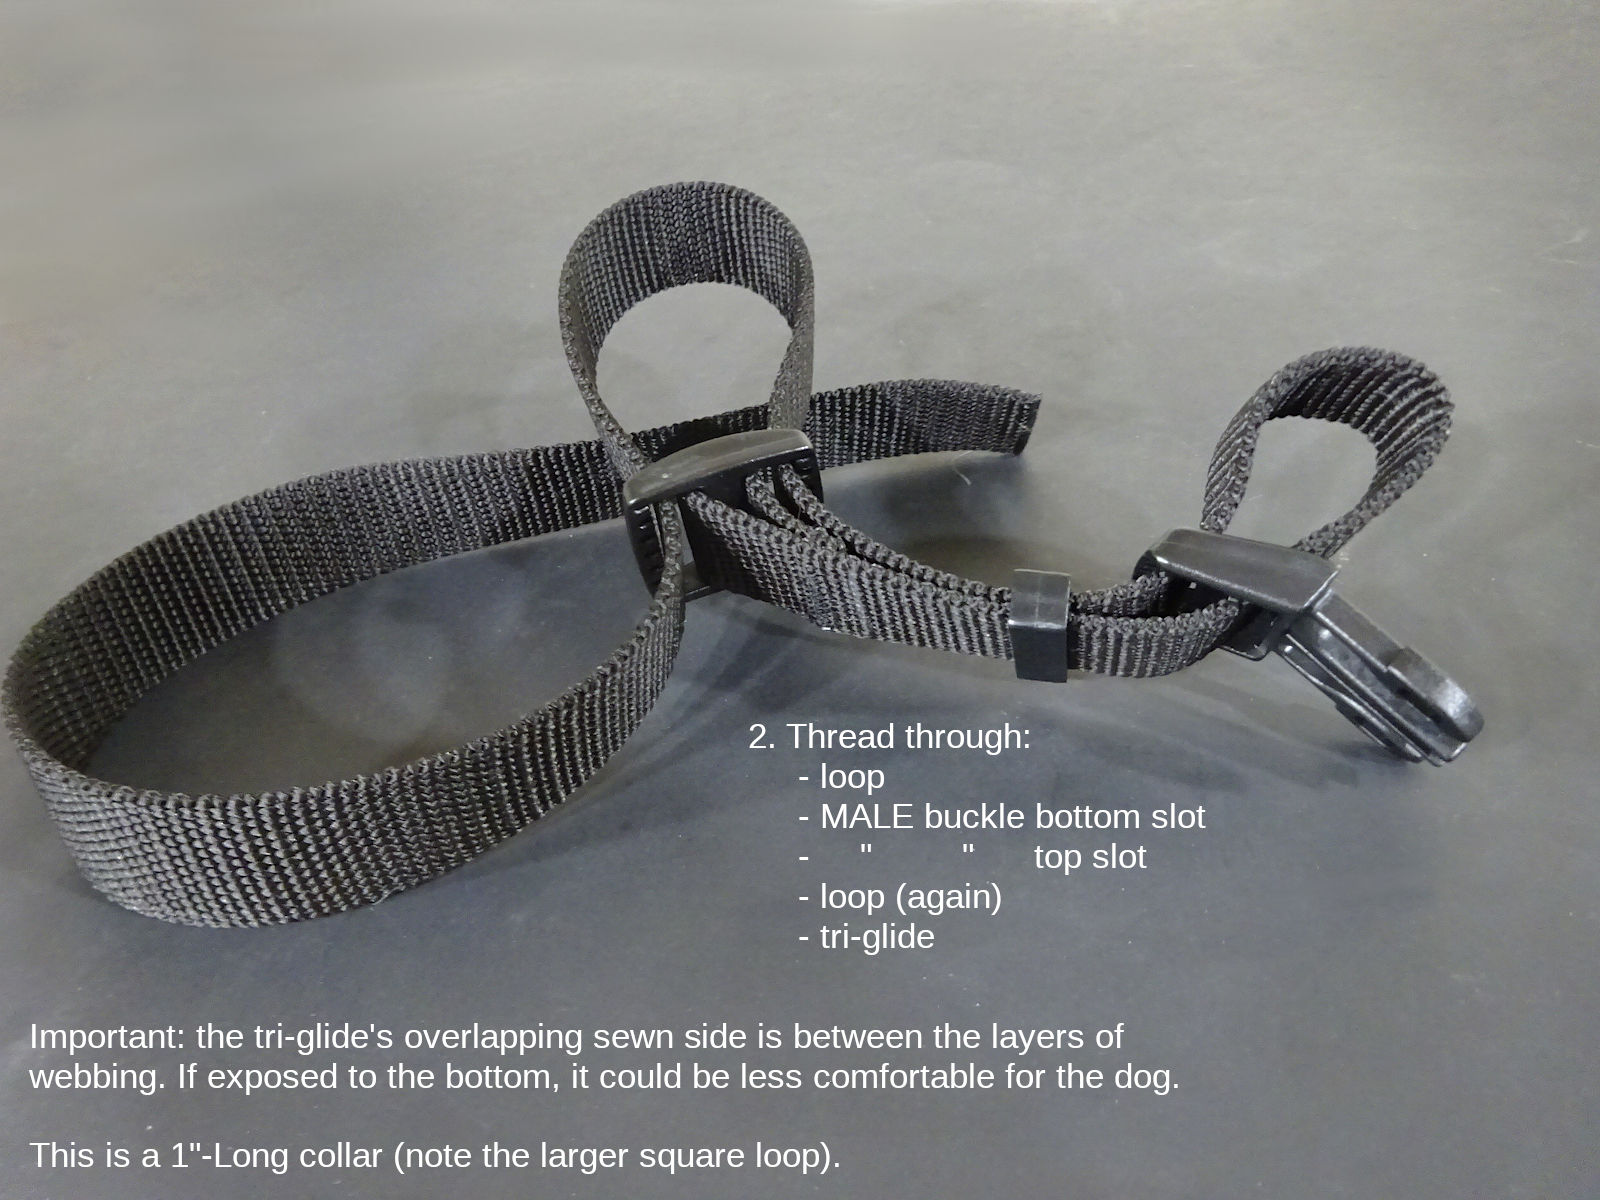
Be sure the overlap at the tri-glide goes between the webbing. If exposed, it could be less comfortable.
Be sure to use the male buckle. It contributes to the collar holding it's adjusted size.
When making 1-1/2" collars: the loop has a curved side. The flat side should face the dog.
3. Sew the remaining end onto a D-ring & female buckle:
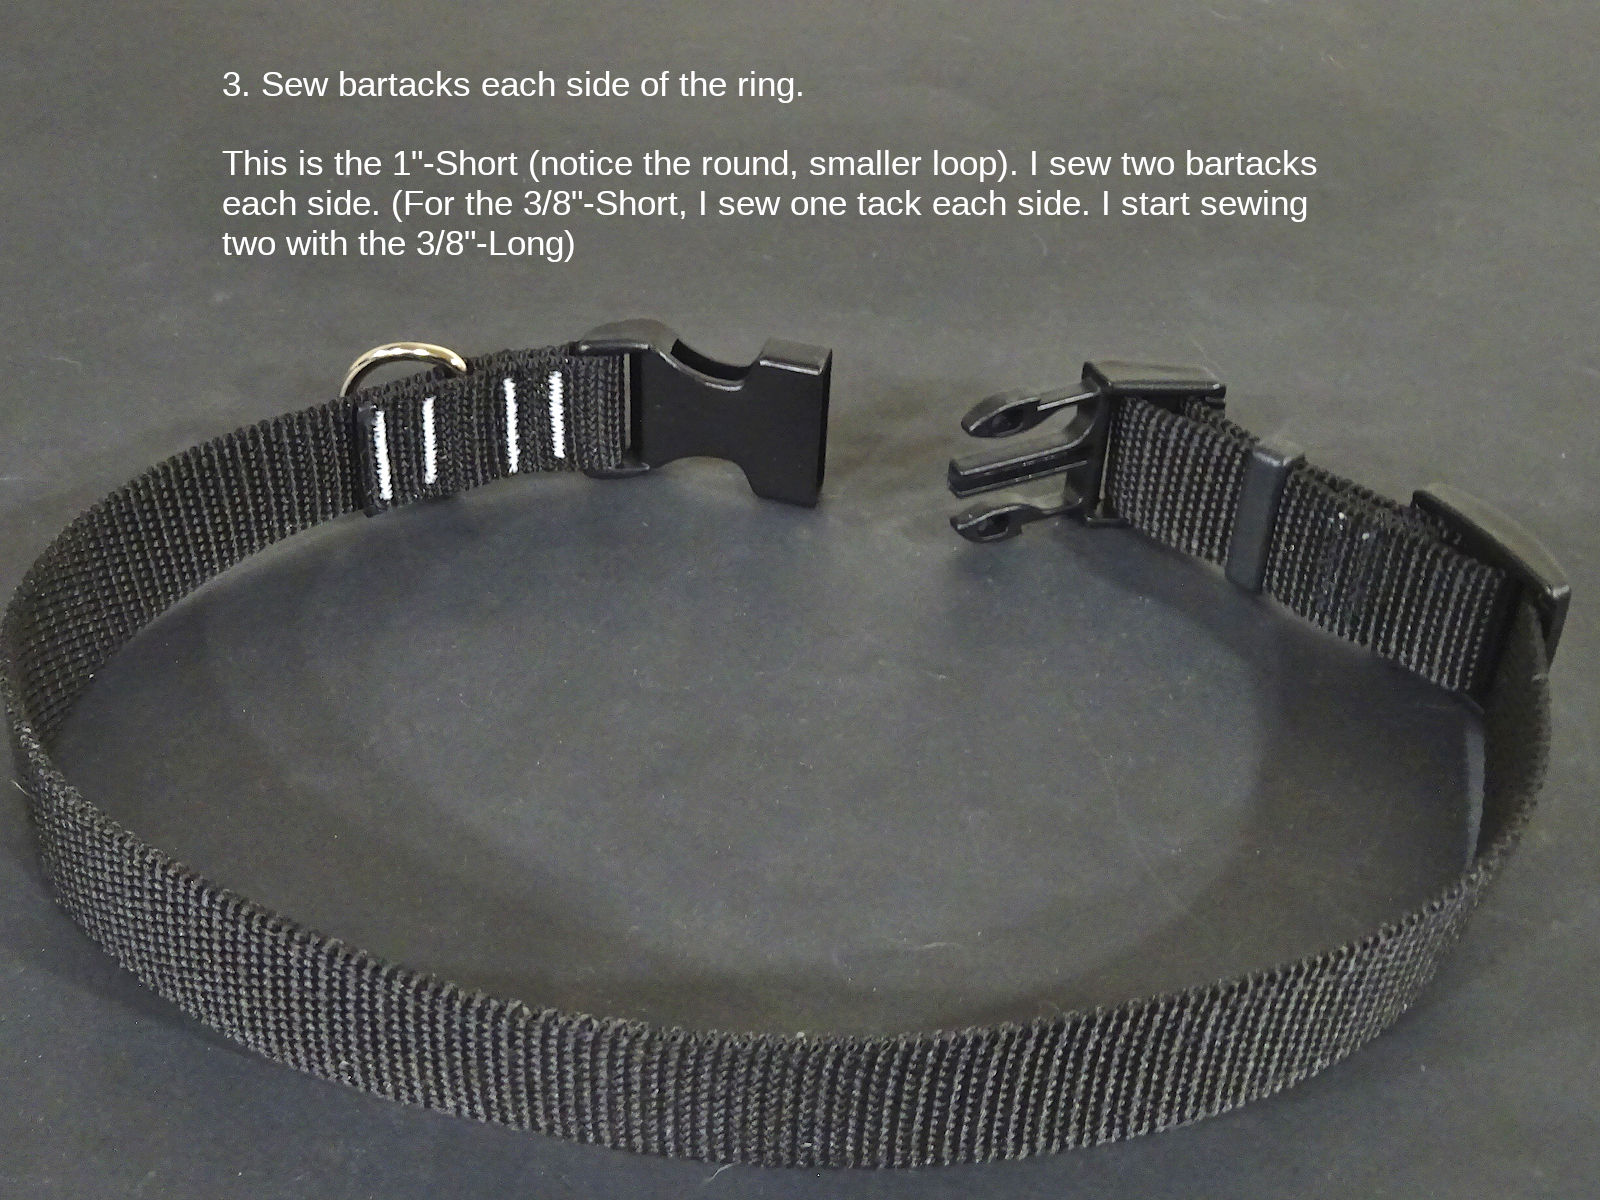
I use bartacks. Retail collars usually have a "box-x" pattern. Box-x takes a little more space (a longer overlap of webbing reduces the adjustable range, fits more dogs). A bartack is strong enough; two gives redundancy (if the one failed).
The photos above show the 1"-wide collar which gets two bartacks at all three locations (tri-glide & both sides of the D-ring). The smallest collars get fewer.
Cuts, marks & bartacks
The following shows the length of webbing to cut, where to mark the ends, and the number of bartacks to sew:
| Collars | Cut length | Sewn ends | Adjustable range | ||||||
|---|---|---|---|---|---|---|---|---|---|
| Tri-glide | Male buckle | ||||||||
| Width | Length | Mark | Tacks | Mark | Tacks | ||||
| 3/8 (X-Small) | short | 11-5/8 | 1-5/8 | 1 | 1-7/8 | 1+1 | 5-7/8 | to | 9 |
| long | 15-1/4 | 2-5/8 | 2+2 | 7-5/8 | to | 12-1/4 | |||
| 5/8 (Small) | short | 17-5/8 | 2-1/4 | 1 | 3-3/8 | 2+2 | 8-3/4 | to | 13-1/8 |
| long | 20-3/8 | 2-3/8 | 2 | 10-1/8 | to | 15-3/4 | |||
| 3/4 (Medium) | short | 22-3/4 | 2-3/4 | 2 | 4 | 2+2 | 11-1/4 | to | 17-3/8 |
| long | 26-5/8 | 13-1/4 | to | 21-3/8 | |||||
| 1 (Large) | short | 28-3/8 | 3 | 2 | 4-1/4 | 2+2 | 14-3/8 | to | 23 |
| long | 33-3/8 | 17 | to | 28 | |||||
| 1-1/2 (X-Large) | short | 33-5/8 | 3-3/8 | 2 | 5-1/4 | 2+2 | 17-3/8 | to | 27-5/8 |
| long | 37-5/8 | 19-1/4 | to | 31-1/2 | |||||
Bartacks
For the tri-glide end: two bartacks are probably overkill for even the largest collars. These stitches receive almost no stress (consider how it's buried under another layer of webbing like a pulley. That tack gets half the force. It's also never exposed to external abrasion like the buckle-end stitches.). I start double-tacking the tri-glide at the 5/8"-Long size. I like the added sense of durability, redundancy. But, none of the sizes need two here. Which size to start using two is subjective.
For the male buckle end: I sew two bartacks each side of the D-ring starting with the 3/8"-Long. (For the 3/8"-Short, I sew one tack each side. This collar couldn't fit an animal that pulls much.). It's probably safe to use one tack for all the collars. If one tack failed, the collar wouldn't come apart. These tacks receive more force than the tri-glide tack(s). It made sense to me to use two. Again, this is arbitrary.
Packing labels
I created packing labels you can use. I stand a dozen collars against each other (on their side). I stack a dozen more and set those on top of the first. Using ordinary kitchen plastic/cling wrap, wrap the plastic around the collars:
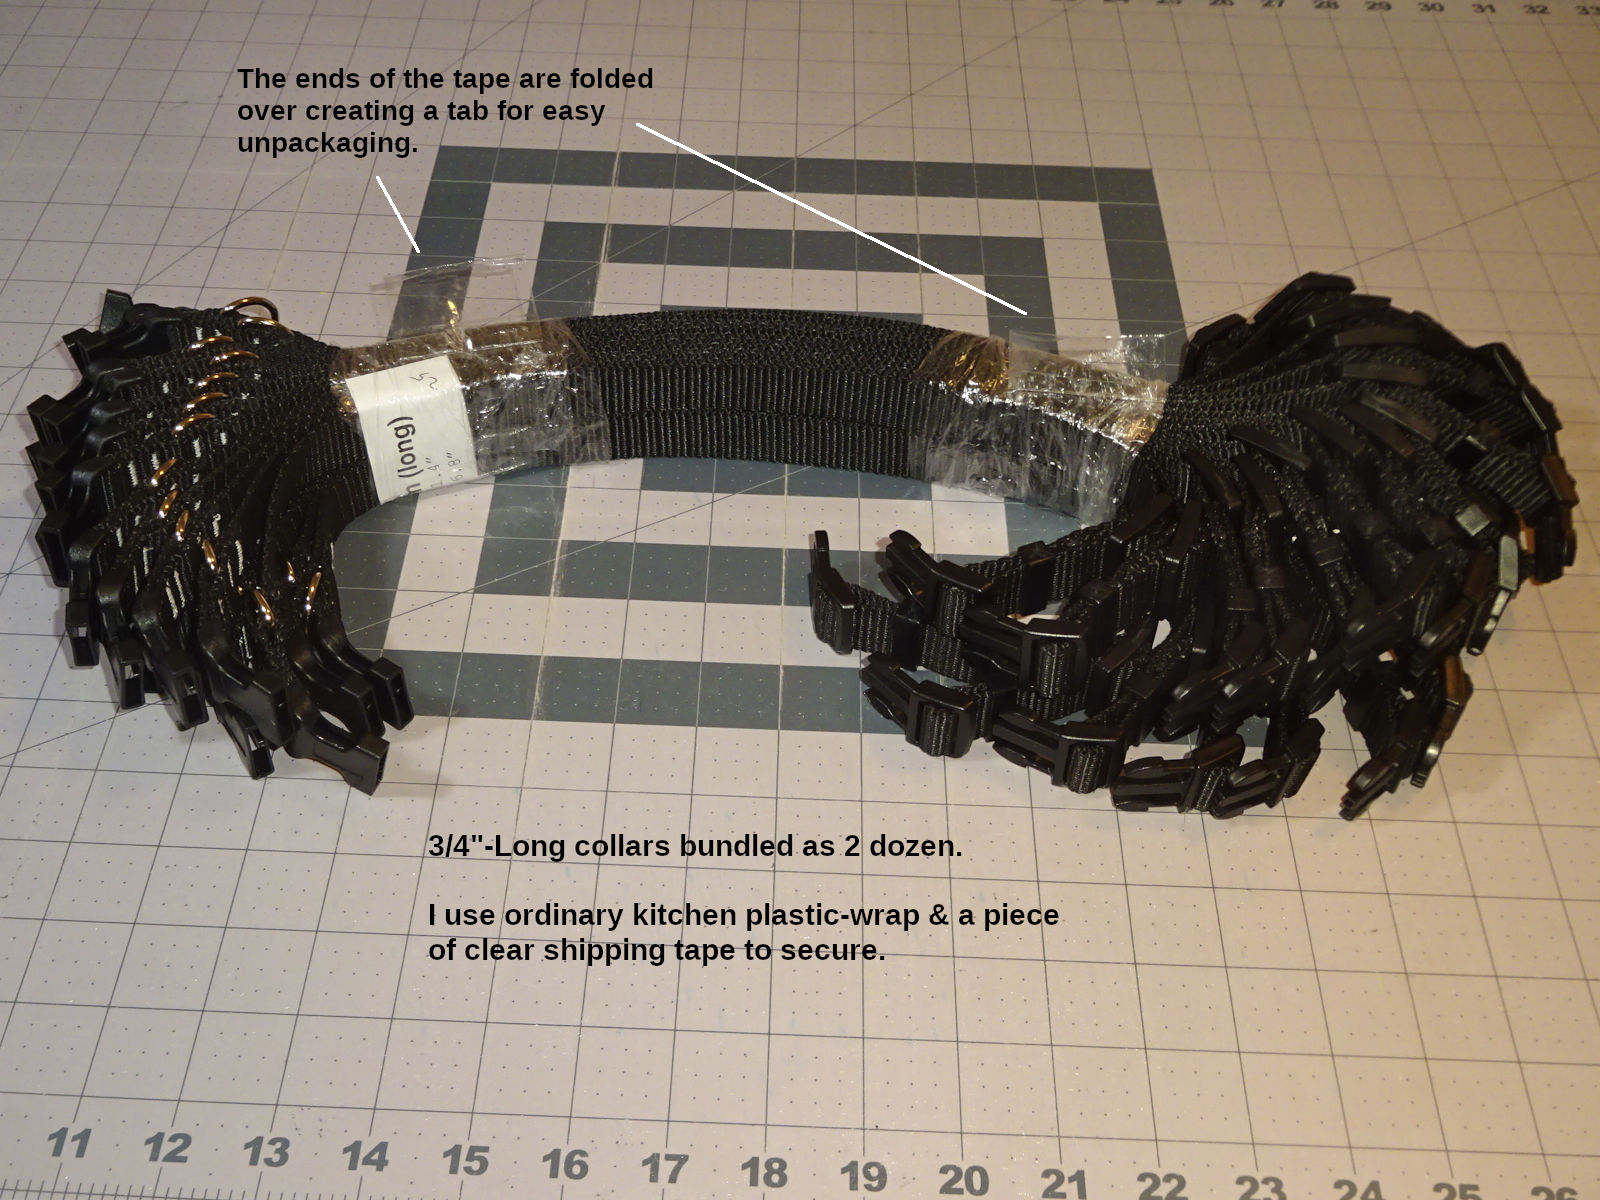
For medium-length collars (shown) I wrap around each end. For longer collars, I wrap in the middle too. (For shorter callers, I only wrap the middle.). I use clear packaging tape to secure the plastic wrap from unwrapping. (I fold one end of the tape over so there's a "tab" to grab and pull it wrap open.).
Leashes
I make leashes in four widths, just one length: "5-foot" (nominal). Unlike collars where length is important, this is a matter of getting a certain number of reasonably-long leashes from a roll of webbing. The rolls are 50-meters (1,968 inches). That turns out to be thirty (30) "5-foot" (58"-59") leashes from a roll.
Materials
| Leashes | Part #s | ||
|---|---|---|---|
| Width | Duty | Webbing | Snap hook |
| 3/8" | light | WE10/B | 45/10 NP |
| regular | 50/10 NP | ||
| 5/8" | regular | WE15/B/T | 60/17Q NP |
| 3/4" | regular | WE20/B/T | 60/20Q NP |
| 1" | regular | WE25/B/T | 60/25Q CP |
| heavy | 70/25Q CP | ||
The 3/8" webbing is the same as the collar webbing. The others are thinner than the collar webbing (and less expensive).
I make a Light version of the 3/8" leash for use with the 3/8-Long collars (the Regular version is intended for 5/8"-Short collars). Also, a Heavy version of the 1" for use with 1-1/2" collars (the Regular version is for 1"-Long collars). To help identify these, I sew the 3/8"-Light with a blue thread; the 1"-Heavy with amber thread (the Regular leashes are sewn with gray thread.) What makes these lighter- or heavier-duty is the bolt-snaps being rated for less (or more) load.
The "CP" snaps are chrome plated. They cost a little more than "NP" (nickle plated). Some of the "NP" versions I use now were "CP" in the past. I'm hoping the 1" snaps become available in NP (they'd be less expensive). If PetHardware ever stops carrying an "NP" version, look for the "CP" version. Pay attention to the weight rating.
Thread
I use the same thread described for collars (Tex-70 for 3/8 to 3/4 webbing. Tex-90 for 1". But, tex-70 is strong enough for that.). Since the thread is exposed on both sides, I use charcoal (7115) for Tex-90, and shark-gray (7090) for Tex-70 (I haven't find charcoal in Tex-70.) If this thread pulls through, these colors don't stand out as brightly as white.
For the 3/8"-Light leash, I use a blue Tex-70 thread I found on Amazon (ASIN: B06Y63HP4B) so it stands out from the -Regular leash. For the 1"-Heavy leash, I use Amann's ocher (7477) Tex-90 so it stands out from the 1"-Regular. (This color is amber, like the color of stitching on blue jeans. Sometimes called "cowboy yellow.").
Cuts, marks & box-x patterns
The cut length is 65-1/2". This will give you 30 leashes per 50m (1,968") roll. The leashes will have handle openings 6-3/8 to 6-1/2" long. The assembled length of the leashes will be 58-1/4 to 59". (They don't come out the same length because the metal snaps have different lengths. Also, the box-x pattern requires different lengths of overlap at each end.). If you cut 29 pieces, they'd turn out 2-1/4" longer. If you cut 31, they'd be 2" shorter. (Cutting 65-1/2" results a leash that's the closest to 5-foot long.).
I often end up with 10-20" extra. It's tempting to cut longer pieces (ex., 1/4" longer per leash x 30 leashes = 7.5" additional webbing used.). Resist that temptation until you see how consistent the excess is. If a roll doesn't have the exact excess all the time, then your last leash will eventually be short. (It seems like the 1" webbing is more prone to this - even having a few inches less than it should sometimes).
I save the longer pieces of scrap (over 6") and donate them Goodwill or independent fabric store. Sewers can always use odds & ends like this to add handles to a project, or reinforce stress points.
Remember: the 3/8" webbing is the same as used for collars. You can use scrap longer than 11-5/8" to make a collar. (The other widths of leash webbing are too thin to use for collars. The collar probably wouldn't hold it's adjusted size.).
Marks
The following table shows where to mark the ends (to fold over and sew):
| Leashes | Mark ends | ||
|---|---|---|---|
| Width | Duty | Handle | Snap |
| 3/8" | light | 14-1/2 | 2* |
| regular | 2-1/8 | ||
| 5/8" | regular | 14-1/4 | 2-1/2 |
| 3/4" | regular | 14-3/4 | 2-3/4 |
| 1" | regular | 15-1/4 | 3-1/4 |
| heavy | 3-3/8* | ||
Box-x pattern
The 5/8 thru 1" leash webbing is thinner than the webbing used for collars. I think the stitching should be spread over a larger area (two bartacks might be too concentrated for the material). I sew a box-x pattern (see the sewing section below). The lengths to mark (above) are long enough to fill with a reasonably-sized box-x.
The 3/8" leash webbing is the same used for collars. I sew two bartacks like I do collars. I think sewing a box-x pattern this small would be tedious. The marked lengths (above) allow for two bartacks 1/2" apart.
Packaging & lubricating the snap bolts
The bolt-snap's sliding bolt can feel rough (crunchy) to operate. I'm in the habit of applying a couple drops of "Zoom-Spout" oil. (Mineral oil from the pharmacy would be fine. Anything thin, light like sewing-machine oil. You can refill the Zoom-Spout using a cheap gallon of "Lily White" on Amazon.). To easily apply the oil, I inserted a 5/16" diameter steel rod (3' long) into the top of my wire-frame shelving (14" deep):
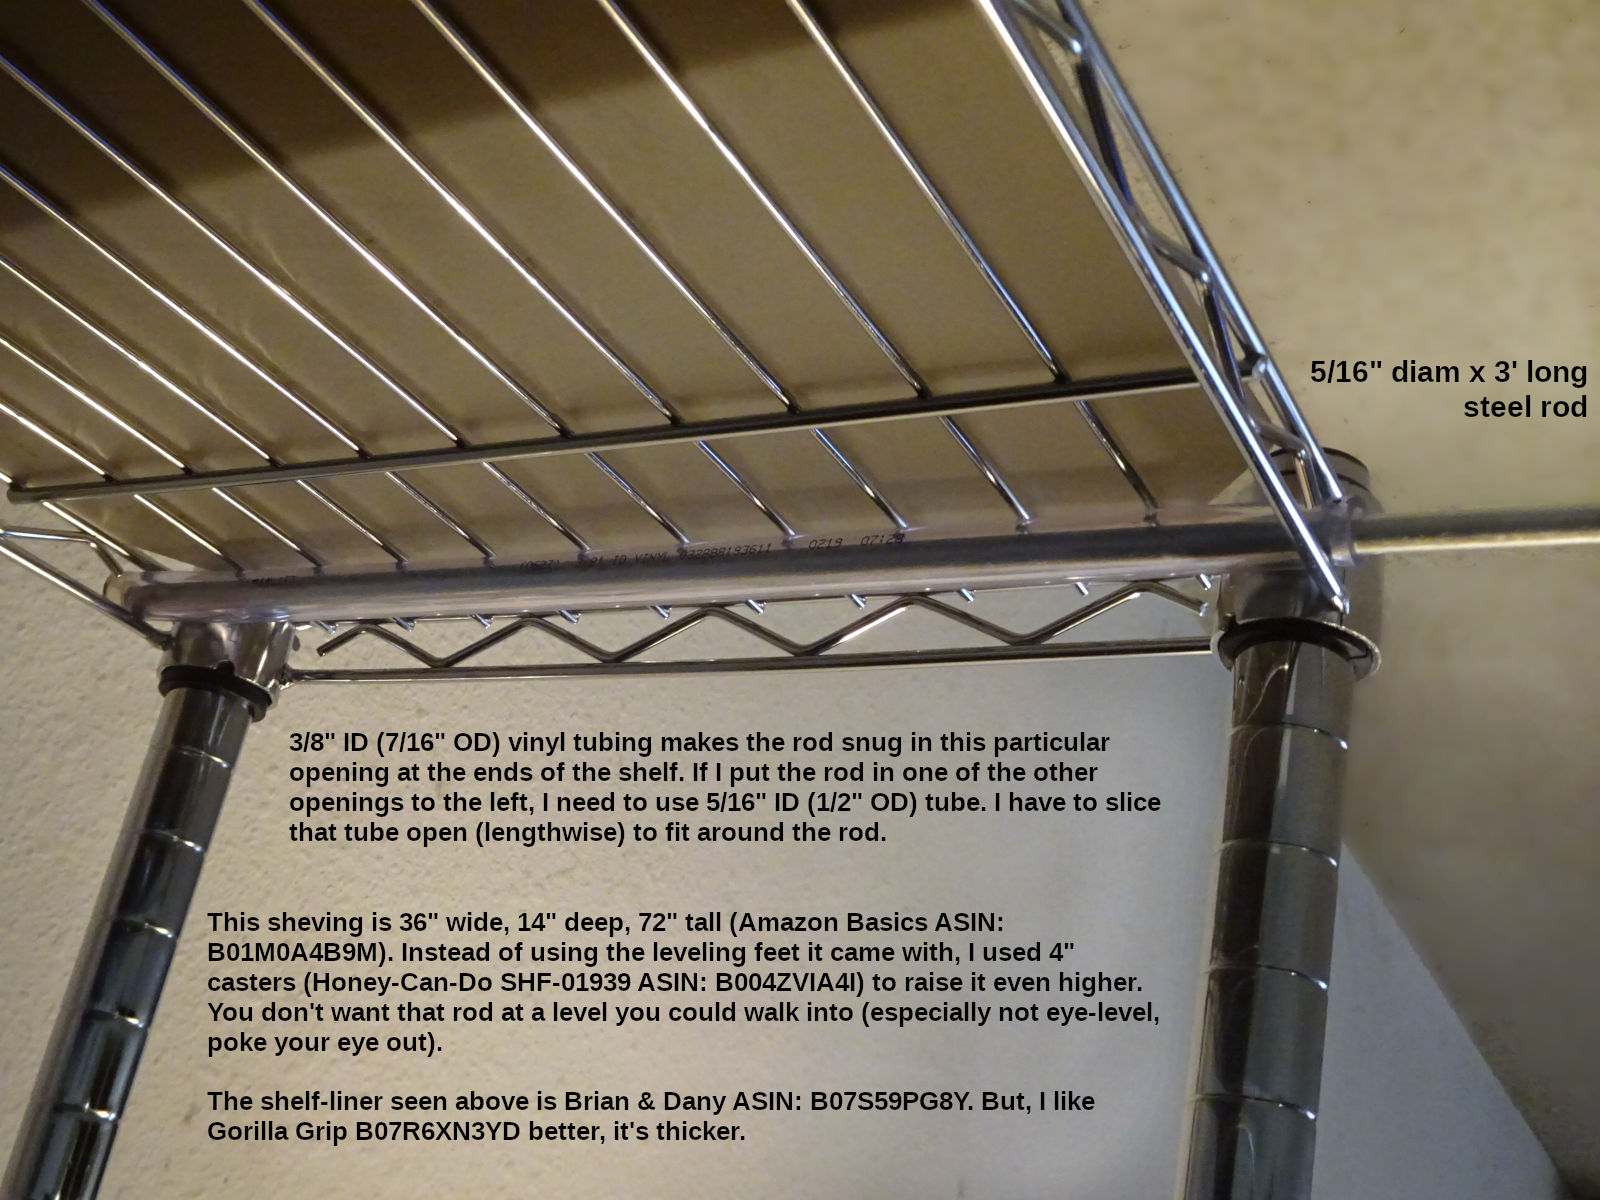
The rod hangs 22" in front of the rack. (HAZARD WARNING: my rack is 6' tall and on wheels which adds more height. If your rack is shorter, these rods pose a hazard to someone walking into them, poking an eye out. If it's really low, a dog could hurt themselves.).
I slide all the snaps onto the end of the rod (with the webbing hanging down). With all the snaps hanging, I apply 1-2 drops to each sliding gate. Then I operate each sliding gate 1-2 times to help spread the oil. (The 3/8" snap-bolts haven't been crunchy. If they were, they won't fit over this rod. I'd have to install a 1/4" rod.
Hanging the leashes helps with packaging too. Gravity helps stack their sides flat against each other. (3/8" is too small to arange side by side.). I wrap 25 together as a bundle. Like collars, I use ordinary kitchen plastic/cling wrap. I wrap both ends, and two places in between. I made packing labels you can use too.
Marking, cutting, melting & sewing webbing
These topics are applicable to both collars & leashes:
Marking
To mark the webbing, I use a Clover 469/W Chaco liner (ASIN: B001K56TR2 with white chalk). There's another version called "pen style" 4712 (ASIN: B0016ZZOEK). It has a narrower tip for drawing lines against a ruler. That model didn't work as well for me. I had to shake it frequently to get chalk to come out. Also, the chalk refill bottle is designed to screw into the 469 liner. Refilling the 4712 is messy (roll some paper into funnel). To use either of these, you need to roll it in one direction. I.e., don't go back/forth like you would with a ball-point pen to make a heavier line. Lift, go back to the start, roll again. (If you go back/forth such a short distance, the wheel won't pick up more chalk).
Cutting
Today, I use a cutting hot-knife (page coming). It goes very fast compared to manually marking, cutting & melting two ends per piece. But, a hot-knife isn't very useful by itself. You need to dispense the webbing from one side & measure the length to the other side. The more thought you put into that being easy & auto-pilot, the more time-saving the hot-knife will be. You should start with scissors. It'll be some time before that's your bottleneck.
I used heavy-duty scissors I bought at Harbor Freight. They don't sell those anymore. I tried other scissors at the time; some didn't work well. You probably want heavy-duty scissors. This multipurpose scissors from HF work ok (not as good as the shorter ones they don't sell anymore). Their shop shear works very well. PetHardware has leather scissors which look like they would work for webbing.
Scissors aren't the best for cutting webbing. The edge where the cut ends will blow out (a tuft). That takes a little more cleanup when melting. PetHardware sells this Razor Plier Tool. The blade comes straight down onto the webbing for a clean cut. If I still cut with scissors, I'd definitely try that.
Melting
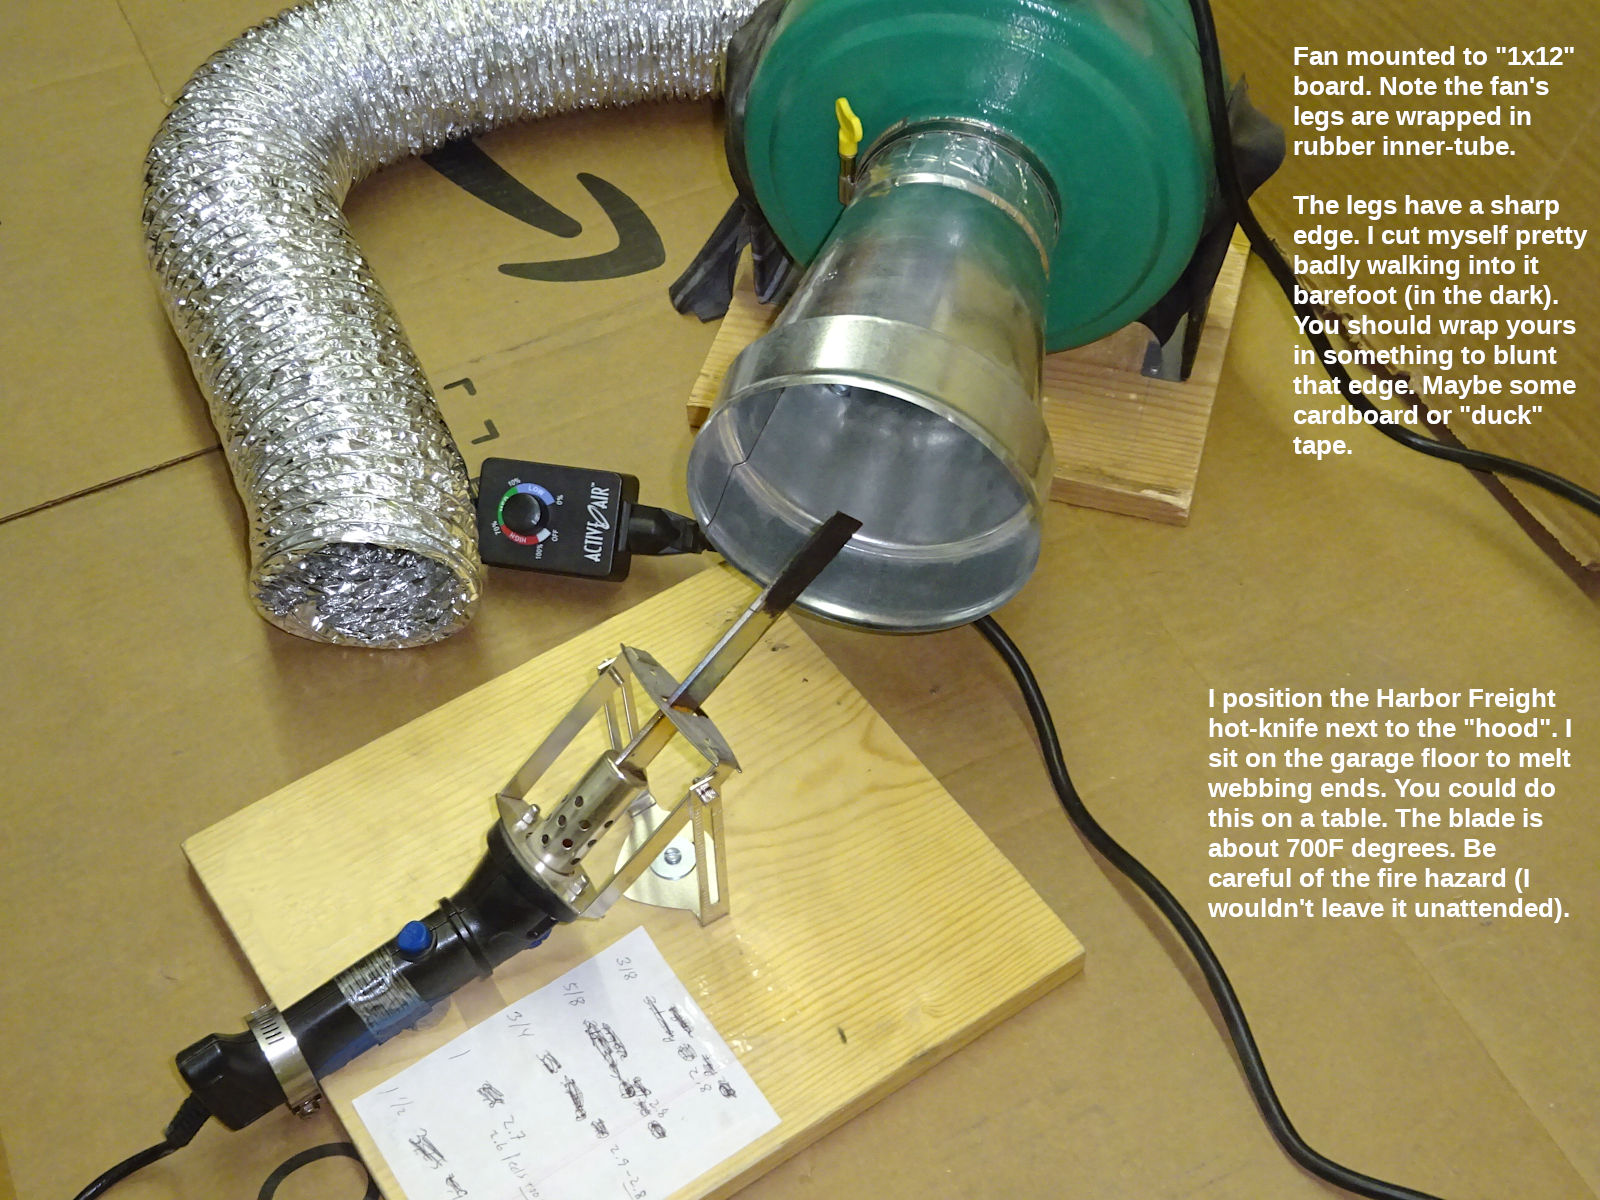
As mentioned, I use a cutting hot-knife (page coming). It cuts & melts at the same time. Prior to that, I used this Harbor Freight hot knife to melt the ends after cutting with scissors. I mounted it upside-down on a "1 by 12" board:
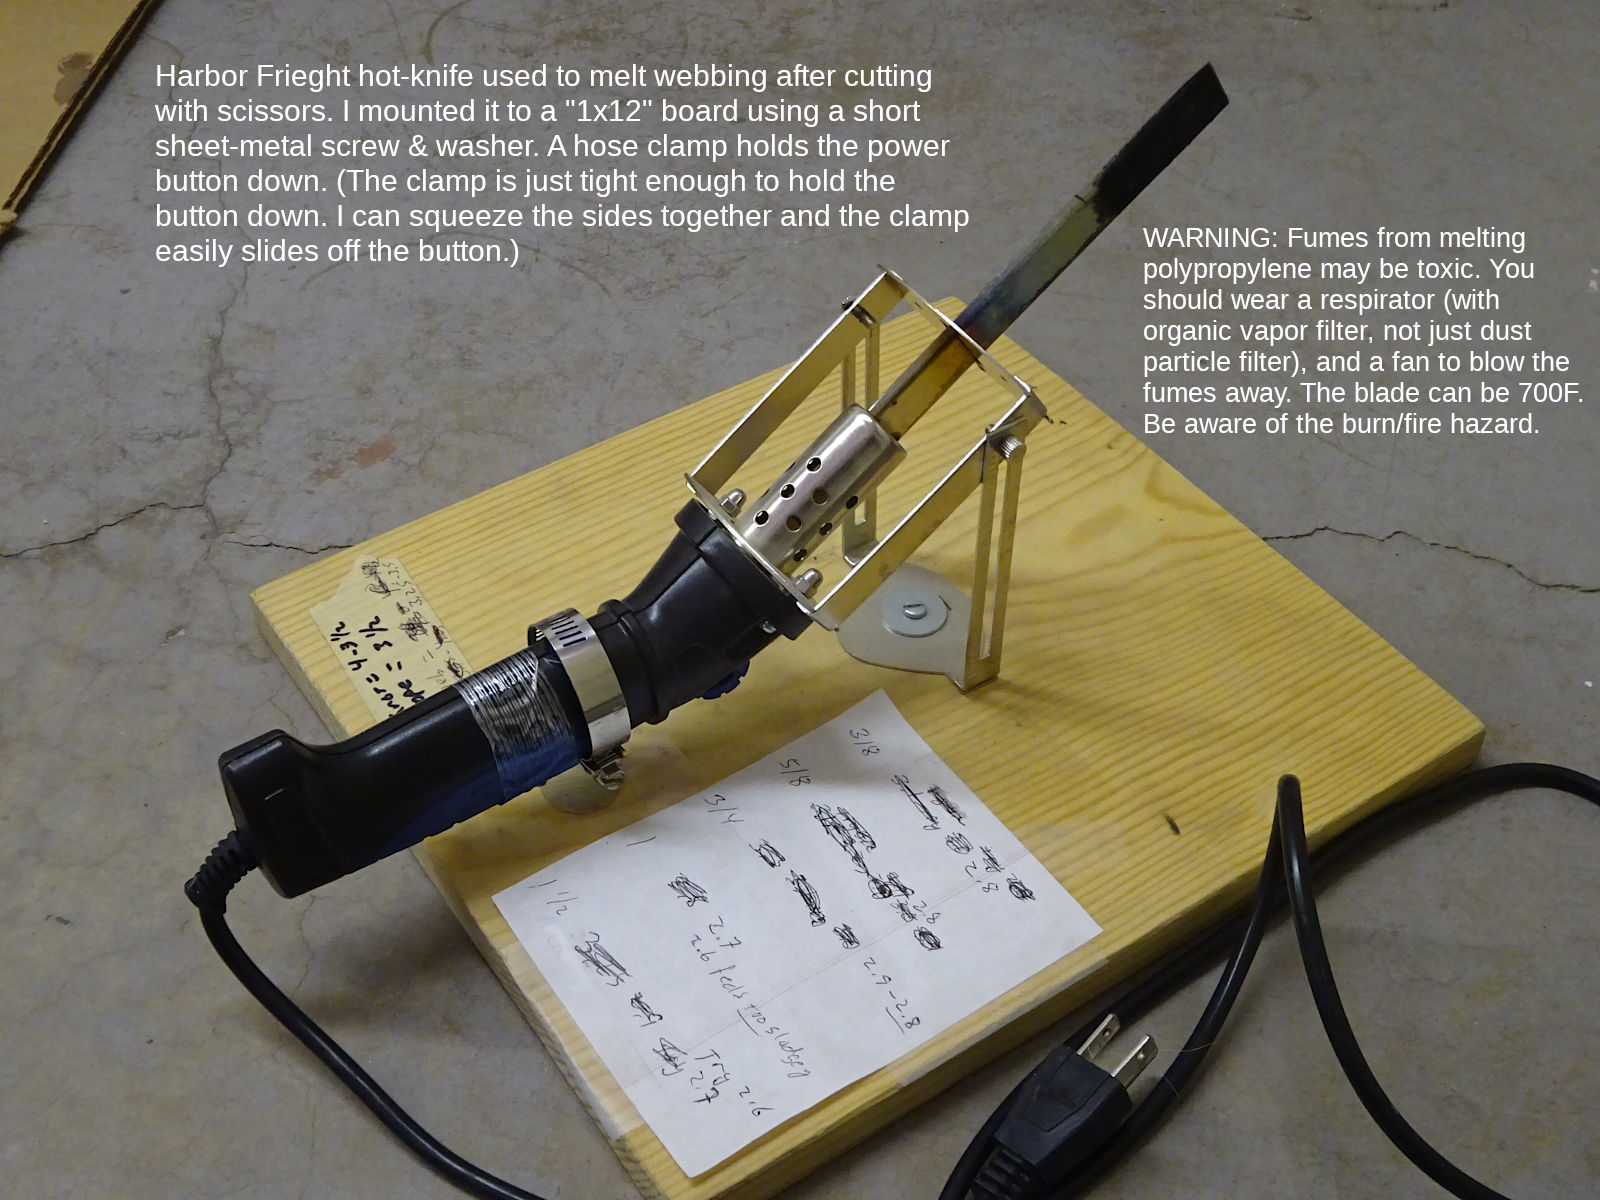
The band clamp around the handle holds the power button down. The clamp is adjusted so I can squeeze the sides to slip it over the button (release the sides and the clamp holds the button down. In addition to removing the clamp from the button when I'm finished; I try to unplug the knife too when not in use.).
I sit on the floor and roll each end webbing against the blade's surface. It works well. Setting the dial to 2.6 to 2.8 seemed best for collars. (I never used it for thinner leash webbing. I assume cooler would be better. Maybe 2.3. But, the dial's numbers probably aren't calibrated across each knife. My numbers may not be the same temperature on yours.). Too cool, it can be sludgy, take longer to melt. Too hot will be too liquid, take longer to cool before you can touch it.
I wipe each side of the webbing against the blade, and touch each corner to the blade. I shape/smooth the melted surface between my fingers. I blow on the end, wait 1-2 seconds and then apply my fingers. (It can burn if too molten. You can tape your fingers with first-aid tape, but you want to feel what you're doing).
I still use this with the cutting hot-knife (page coming). Cutting with a cold-knife & sealing the ends manually involves some shaping (smoothing). Cutting with a hot knife speeds things up (combining measuring, cutting, melting into one operation). But, to the extent you become accustomed to manual sealing (shaping; wanting the same smoothness), you'll still have to "dress" the ends. I can either touch those to the cutting-knife's blade while cutting. Or, wait to do it with this melt-only knife. I prefer the latter because it seems faster to do one thing at a time. (Plus, this knife is inexpensive. Maybe it's better to put the operating time on it instead of the cutting hot-knife.).
Ventilation
WARNING: I've been unable to learn whether the fumes from melting polypropylene are toxic. I'm sure it's not healthy. At a minimum you should blow the smoke/fumes away so you're not inhaling it straight from the blade. I set up an "extraction fan" to pull the heat & smoke away (exhaust outside). Without knowing how toxic these fumes are, you should probably wear a respirator too (with an "organic vapor" filter, not just dust/particle protection).
That's a Hydrofarm Active Air 4" inline fan (ACDF4). You'll need an Active Air speed adjuster (ACSC2). Without the speed controller, that fan runs unnecessarily fast & loud for this use (I dial it down to the middle.). You can find 4" flexible ducting at the hardware store. I route the end out a window or door.
I used a "6-inch to 4-inch to duct reducer" as the intake hood. You can find these online. I had to use tin snips to cut 1"-long slits (1/2" apart, all the way around) so it would slip over the fan's flange:
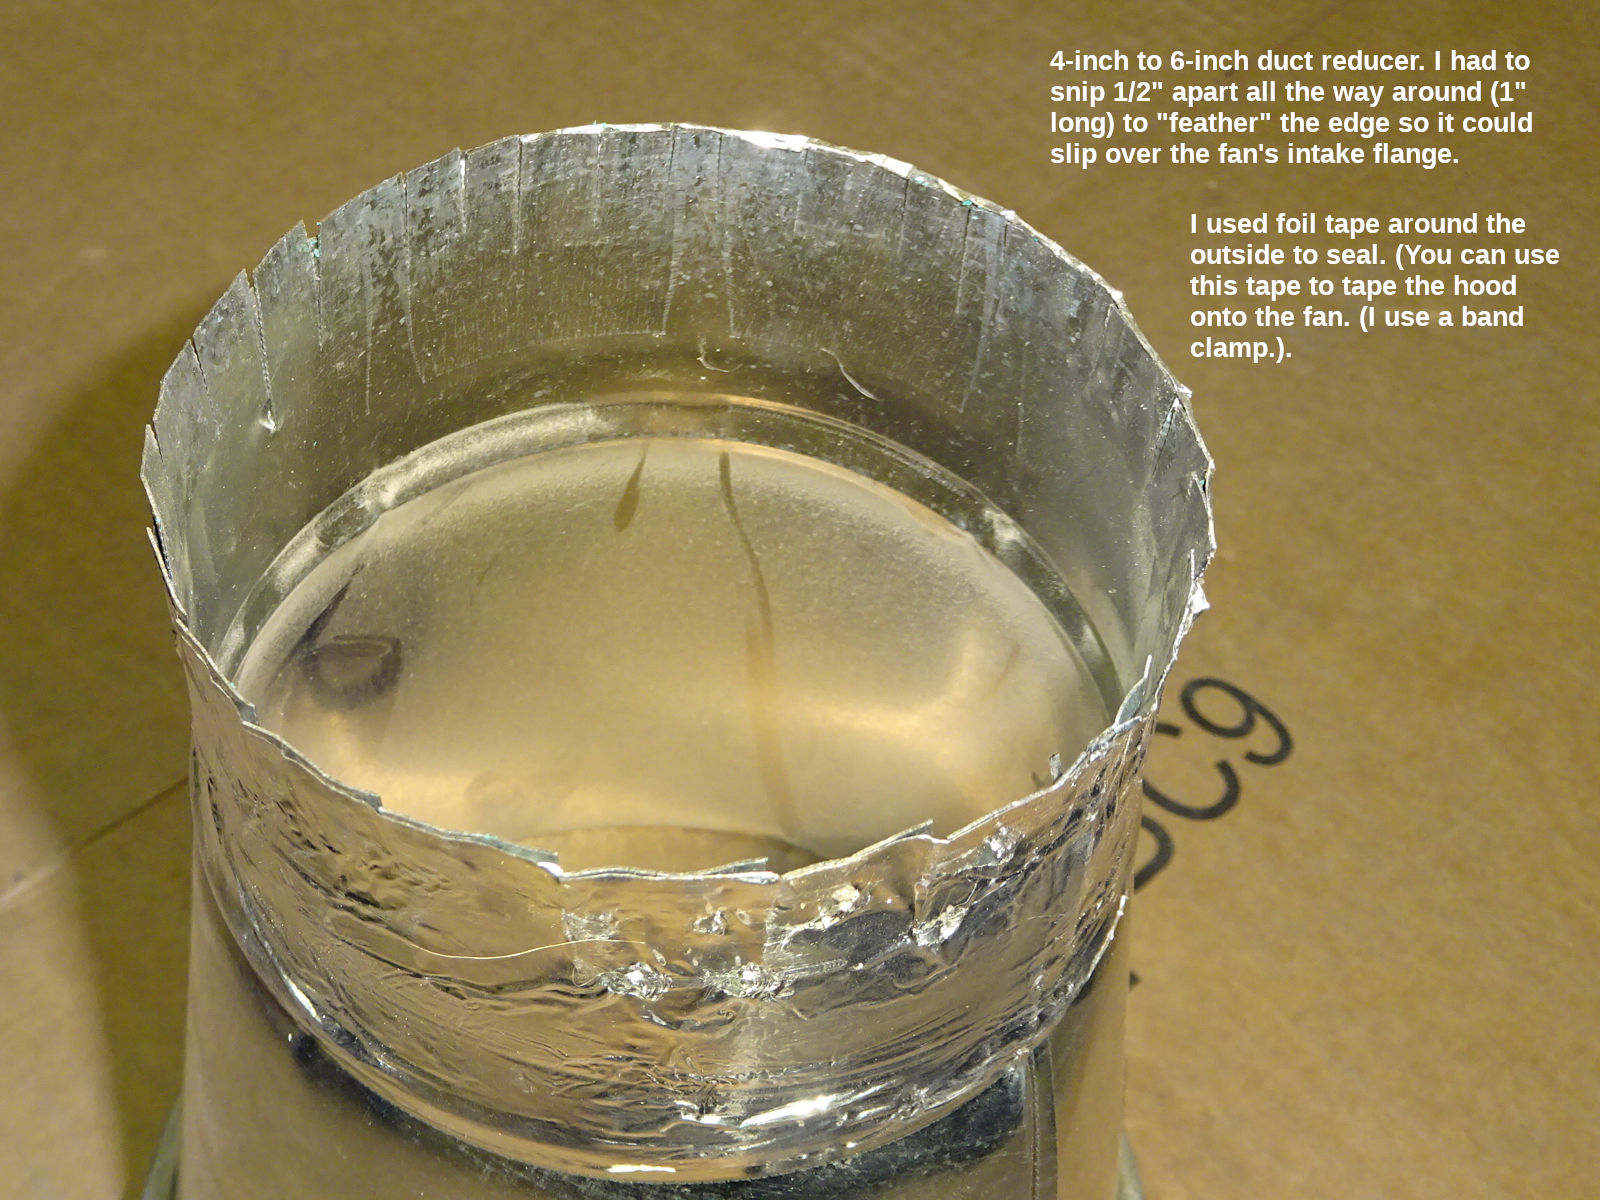
You may not have to do that. I used "foil tape" to seal the snipped flange. (You can even tape the hood onto the fan. The photo shows using a band clamp.).
WARNING: the fan's mounting legs have sharp edges. You can cut yourself pretty badly if you walk into it barefoot (in the dark, as I did). A dog running into it (chasing a ball) could cut themselves. I wrapped mine with a rubber bicycle inner-tube (cut open lengthwise). You could wrap a piece of cardboard around the legs (use ordinary "duck tape" to secure that in place).
Melting smarter (advanced topic)
You can skip this topic. I didn't have a reason to think about it for a couple years (when I began making more & going faster. I started using a cutting hot-knife (page coming). That saves a lot of time by marking, cutting and melting in one step. But, they create a burr along the edge, and sharp pointed corners. I felt like I needed to touch that up, "dress" the melted ends. The following saves considerable time & tedium when making 200 pieces. You don't need to think about this when you start.
Leashes
This topic is easier to explain with leashes: the direction and side of the webbing make a difference how smooth or comfortable the melted end needs to be. I.e., only one end (the handle) will be in contact with the person (the bolt-snap's end won't be touched much.). Also, only one side (of each end) will be exposed. The other side folds over against the webbing.
So, you don't have to spend as much time (attention) on one side of the webbing. And, even less on one end. When cutting the webbing, I maintain an awareness of direction & side:
"Side" is easy: the webbing has a natural curl from being rolled up. I call the inside of the curl, "up." That's the side that will be folded over to face the webbing. That side (both ends) doesn't need dressing.
To maintain "direction:" I attach a piece of painters tape to one end. I tape just one cut piece. I consider that to be the handle end (just because it's the first end I sew.). That one taped end lets me know which end is which (for the whole pile, perhaps 200 cut pieces.).
After cutting, I smooth the corners of the handle end only. The leash webbing is thinner than the collar's. The burr along the edge isn't as pronounced. I don't usually need to dress the handle end's exposed cut edge. (I don't do any dressing to the snap-bolt's end. The corners can be a little sharp, but it won't be handled much.
Collars
The same principle applies to collars. It's harder to conceptualize because of the way the webbing threads through the tri-glide. The difference is:
Only one exposed cut side (the buckle end's) will be in contact the dog (could be uncomfortable depending on coat thickness). The exposed cut side at the tri-glide's end is covered by a layer of webbing.
The corners of both cut ends can be touched by the person. But, the tri-glide end's corners are sandwiched between two layers of webbing (less exposed).
Like leashes,
I consider the inside of the curl to be "up." The cut sides (each end) facing up will fold over and face the webbing.
I affix a piece of painters tape to one end (of just one cut piece) to signify the tri-glide end (just because it's the first end I sew.).
I want the buckle end's exposed cut edge to be fairly smooth. Dogs have a coat. This won't be like it's touching a bare hand (like the leash'es handle-end exposed cut). But, some dogs have short coats, no undercoat. I don't want this edge to be too rough or sharp. Also, I don't want the corners of this end to be too sharp, but they won't be touched often.
The tri-glide's end gets even less attention. If the exposed cut edge is exceptionally rough/sharp* it could abrade the webbing that slides over it (when adjusting the collar's size). Likewise, the tri-glide end's corners need less attention than the buckle end's because they're less exposed to touch (covered by a layer of webbing above & below).
The collar webbing is thicker than the leashs' (except the 3/8" which is the same for both). Cutting with a hot-knife produces more pronounced burrs than it does with leashes. For that reason, collars have more potential for dressing the ends. You can save more time by being more aware of the above, not wasting time where it's not needed as much.
Now that I do the above, I can feel which end (and side) is which (when preparing to mark the tri-glide end for sewing). But, I use a piece of tape on one end (of one cut piece) to maintain directionality of the pile. (You don't want to have to feel the ends of each piece to figure out which is which. Sometimes I don't do a good job melting. The other end might feel like the better one. I'll switch directions. I don't spend time judging the difference, or enforcing the direction. If it immediately stands out, I'll switch.). I don't maintain which side is up. I can see that (the curl), and also confirm it feeling the ends (as I lay the webbing on the table to mark the tri-glide end.). That stands out more (by touch) compared to which end is which.
Sewing
I started sewing webbing with a vintage Singer 201-2. This is comparable to a "heavy duty" consumer machine. It can sew tex-70 thread. It worked ok. For heavier collar webbing (the 3/4" is the hardest to sew through), I had to help it start by turning the handwheel. For narrower webbing, I helped it start too because it's a little harder to control starting/stopping in for such short lengths (I used my hand as a brake.). These are the details I used:
| Collars | ||
|---|---|---|
| Width | Stitches per inch | Needle |
| 3/8 | 22 | 100/16 |
| 5/8 | 20 | |
| 3/4 | 17 | 110/18 |
| 1 | 15 | |
| 1-1/2 | 13 | |
The stitches are denser the narrower the webbing because it's a shorter distance to sew back/forth. It's hard to stay on the narrower webbing. You have to pack the stiches in the best you can. The collar webbing is thinner. You can probably use one needle size lower (90/14 & 100/16).
You'll need a "heavy-duty" consumer machine. It needs to be able to sew tex-70 thread, and have a stronger motor than a typical home machine.
I was interested in a Janome 3160 computerized machine after seeing this video showing it automatically sew a bartack. That looked like it could be a lot easier than manually switching forward/reverse with my 201. I never learned if it could sew tex-70 thread, or how strong the motor is (if it could sew thick webbing). I got the impression that the computer component of that machine is generic; used in many machines. Maybe there's another stronger machine with that same computer interface (the same pattern to choose)?
I mentioned on the leash sleeve page that I use a Juki DU-1181N for those. That would definitely sew this. It can sew tex-90 thread. The only downside I can think of is that the reverse lever is spring-loaded (you have hold it down while sewing in reverse). That might be harder to work with than the 201's lever (which stays put until you change direction again). If I were thinking of using the 1181 for bartacks, I would consider rigging a foot pedal (or elbow lever) to hold the reverse lever down. Or, I would pivot the webbing 180-degrees (sewing forward all the time). You can add an accessory called a "needle positioner" (which comes with a servo motor it controls). It can stop with the needle always down. That would make pivoting faster.
Now, I use a Juki LK-1900BN industrial bartacking machine. I can make 10x as many. If you're going to make a lot of collars & leashes, you need this machine. I provide details about how I use my 1900.
Bartacks
A real bartack has a slight zig-zag over a basting stitch. Using a straight-stitch machine, you'll sew fwd/rev 4-6 times. (If you sew many items, it's tedious. The LK-1900BN lets you make many more pieces in the same amount of time.).
Box-x
For leashes I sew a box-x pattern. This is even more tedious to sew (without a bartacking machine) than bartacks:
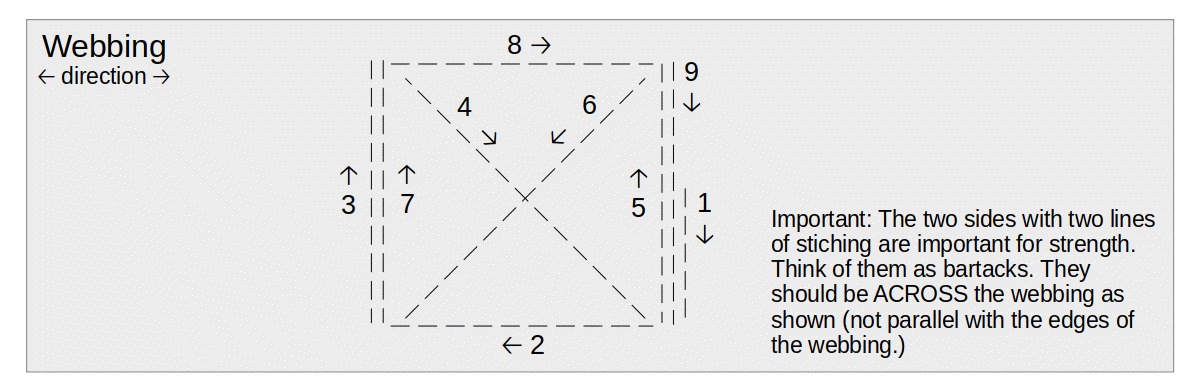
The leash webbing is thinner. I think a concentrated bunch of stitches (a bartack) isn't as good for that. I think spreading the stitching over a broader area is better. (But, the 3/8" leash webbing is the same used for collars. I sew bar tacks for those leashes. I think a tiny box-x would be hard to do.).
Collars sold retail usually have box-x stitches. I don't do that with mine. In addition to taking more time to sew, box-x takes more space, requiring more overlap (which reduces the adjustable range of the collar - how many dogs it fits). I do bartacks for collars to minimize the overlap (maximize the collar's range of fit).