Winding LK-1900 bobbins with a standalone winder
When I began using my LK-1900 bartacker to sew collars & leashes, I considered using a standalone after-market bobbin winder. I thought it would be easier than the machine's built-in winder. (Also, the machine's winder doesn't operate seperately. If all you want to do is wind a bobbin, the whole machine operates. That seems like a lot of wear & tear. But, you usually wind while sewing. It's not much of an issue.).
The machine uses style A, class 15 bobbins. This is the only winder I could find that works with this size bobbin:
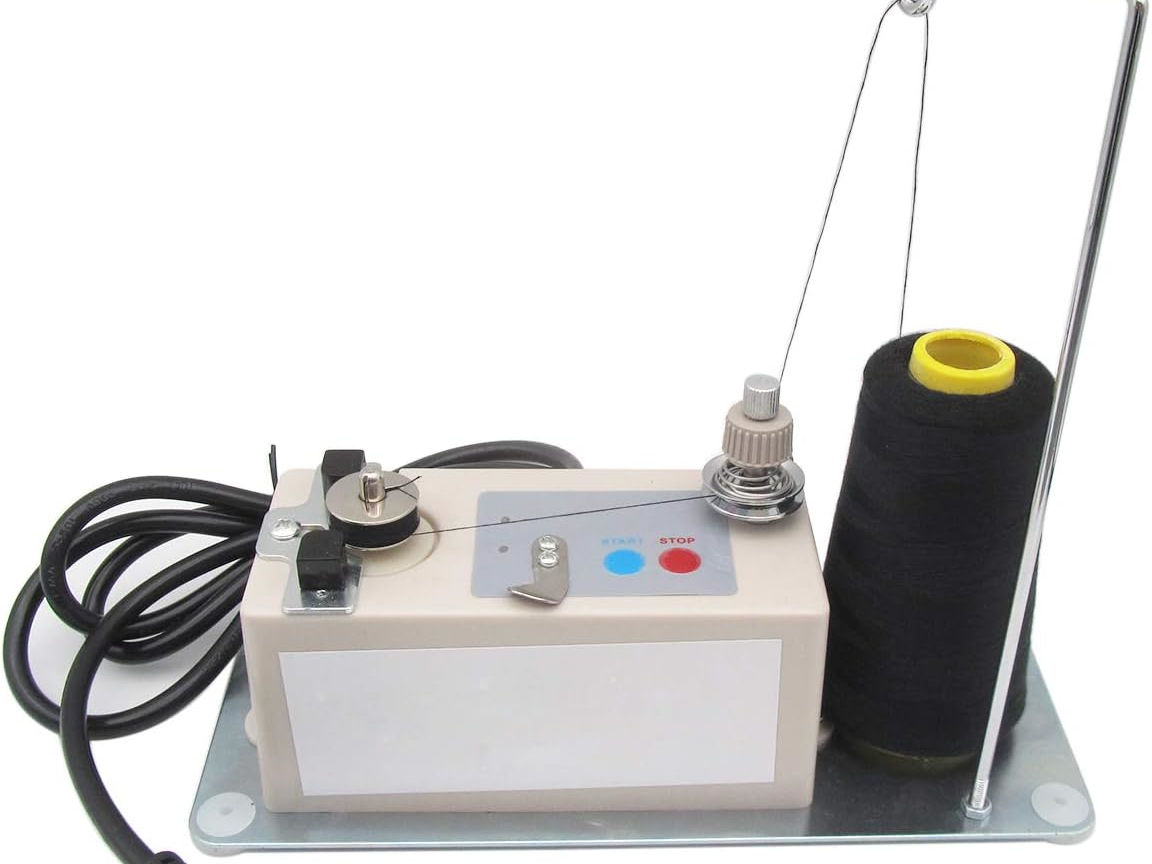
As the photo notes, it has some shortcomings. I don't recommend having one. But, if you wanted to wind bobbins separately, that's the only one I could find. This page documents what I learned in case it's useful to others. It's just a generic, no-name product sold by many online. The one I bought was ASIN: B07RJL9XHY (seller CKPSMS). I chose that one because the product photos were more informative than other sellers; printed instructions were included (the english is hard to understand, but better than nothing).
Shortcomings
It works, but:
Large spools of thread won't fit the stand.
The shutoff sensor is light-based. If there's too much ambient light, it won't shutoff. (The sensor is mounted on a shiny silver steel plate. That might contribute by reflecting into the sensor.).
The sensors are mounted a little low, not looking through the middle of the bobbin.
The tension disk is problematic in a few ways:
It's too close to the bobbin. You'll adjust the vertical height of the tension disk so the thread winds evenly up/down the bobbin. But, being so close, it won't let the thread travel that far (up/down). You end up with a bulge (donut) in the center of the bobbin). You can sew with it. But, you're not using the entire bobbin's capacity. Increasing the disk tension usually helps bobbins wind flatter. But, I think this is too close for that to work.
The silver knob adjusts the height of the tension disks. But, it's not long enough to center the disks within the bobbin.
Because of the way they fit the thread stand in a small space, the tension-disk's guide hole points in a direction which prevents routing the thread completely around the disk (exiting the guide hole, the way you do it with the LK-1900's bobbin-winder). You should enter through the guide hole, but only wrap the thread 3/4 turn (clockwise) around the tension disk (go straight to the bobbin from there).
#3 (sensors mounted low) is more of an issue due to the bulging wind (4.a). The sensors "see" the area near the bottom flange. The bulge could grow larger than the bobbin's diameter before that area near the flange fills up enough to stop the winding. If it wound evenly, it wouldn't matter much if the sensors weren't aimed through the middle of the bobbin. It's not a big problem if the bulge winds taller than will fit into the bobbin case. You can manually unwind enough to fit, and wind that into the unfilled area next to the flanges. It takes a minute.
Easy improvements
Most of those shortcomings can be improved without too much effort:
Replace the silver center knob with a bolt that's longer (so the disk height can be adjusted higher). That knob's thread is M4 x 0.7 pitch. I replaced mine with a 35mm-long hex-head bolt (it doesn't have to be threaded the full length).
Important: there is a circuit board underneath. From the point my bolt starts threading, I can screw it down 1/2" before it touches the circuit board. After you replace this part, you may not be able to use narrower bobbins (screwing this bolt down that far might hit the circuit board.). If the bolt is threaded the entire length, you could thread one or more nuts up against the head of the bolt, effectively making it shorter. (If it's not threaded that far, you could use washers.)
Put a washer under the plate the sensors are mounted on. (Raise them so they're looking through the middle of the bobbin). You may need a longer screw. It's M4 x 0.7. A 10mm length works fine. FYI: there's nothing underneath it inside the box. No risk of it being too long and going too far down.
Use a separate thread stand. I have one with a cast-iron base (Amazon ASIN: B01ELYA1HC. That same stand is also sold with a plastic base. The weight of cast-iron is worth the extra cost. I cut a piece of felt to fit the bottom of the stand so it wouldn't scratch tabletops, glued it on.).
Tape some poster-board around the end of the winder where the sensors are (create some shade. It might help to paint the shiny plate black, or affix some painter's tape so it's not as reflective.)
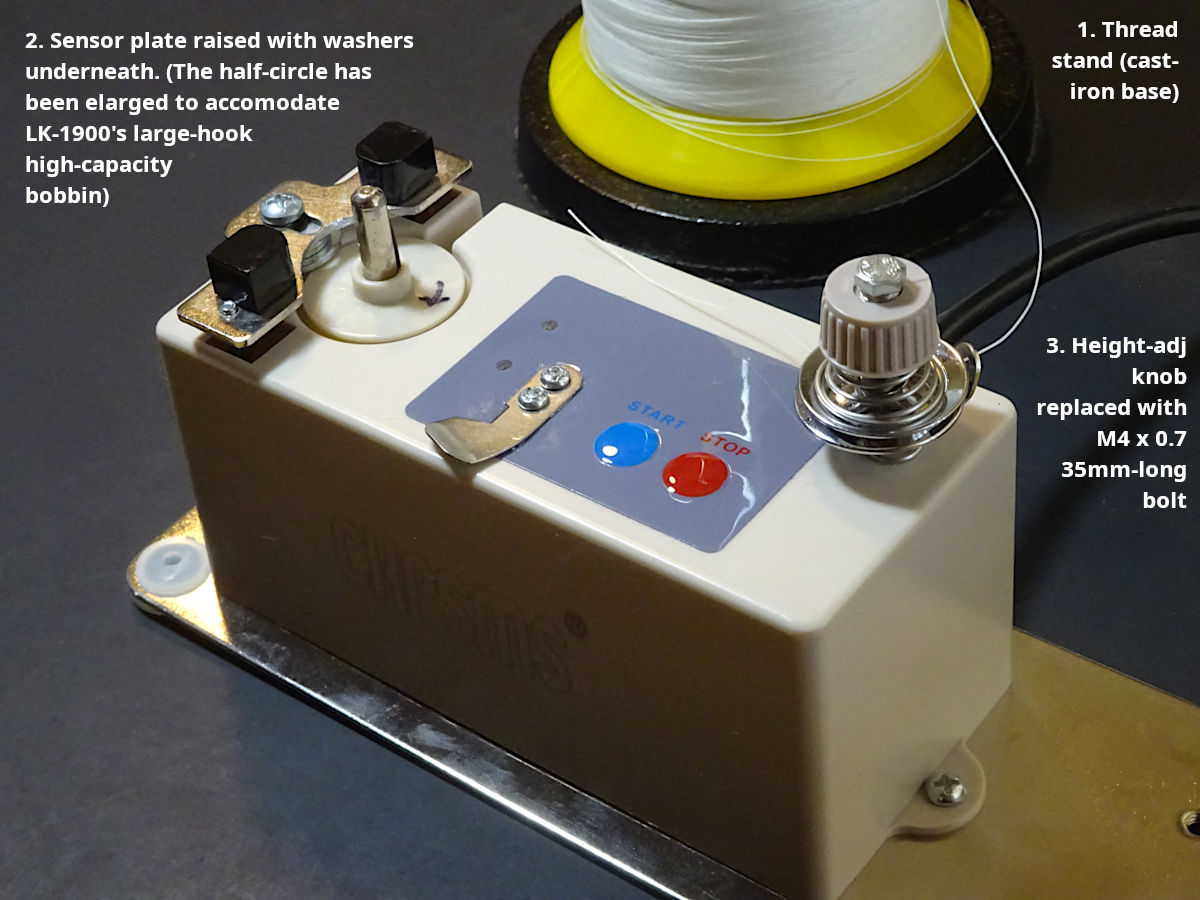
Note: that photo shows the sensors raised even higher for the LK-1900's high-capacity bobbin. The half-circle has been enlarged for that too.
Since you'll use a standalone thread stand, you could orient the tension-disk's guide hole to point more toward the bobbin (so the thread can go in & out of the guide hole as you'd expect). The bottom of the tension-disk has an "indexing" post which slips into a hole. You can drill another hole so it indexes into a different position. But, be careful not to let the drill travel too far in when it drills through the plastic (there's a circuit board underneath. You have about 1/4" of space before hitting the board). But, I don't think that's worth doing. I would proceed with the next level of improvements.
More improvements
The simple fix above works really good. But, you'll still have bulging (uneven) winds because the disk & bobbin are too close. If I were going to use this winder regularly, I would improve it more:
Remove the plastic box from the metal base & mount it to a plank of wood (a larger base, so the tension disk can be mounted further away)
Make a "stand" for the tension disk to mount on top of & be the same height as it was. Bend some 1" aluminum (bar stock) into an n-shape. Mount that "stand" to the board, screwing the two legs down to the board. The tension disk should be 11" from the bobbin (measured from the centers. The same distance as the LK-1900 winder).
You can use an M4 x 0.7 tap to cut threads into that stand (for the tension disk to thread like it does into the winnder's box). Or, the more prevalent (in the US) #8-32 machine screws are the same diameter. In this case, I would use "threaded rod." Use a nut above/below the stand to fix the threaded rod in place. Use an 8-32 wingnut to adjust the height.
When relocating the tension disk to the "stand," orient the guide hole to point more toward the bobbin (so the thread can go in & out of the guide like normal)
Even better: replace the tension disk with the one used on the LK-1900 (#141-13468). It's not very expensive, but better quality. It uses an 11/64"-40 thread. You should have a tap/die for that anyway because it's a common thread used by other things on the LK-1900. I wrote about it in the LK-1900's page regardng making custom arch face-plate screws.
Using this larger platform, you can now mount the winder's thread stand in a way to use larger spools of thread (you won't need a separate thread stand.). You'll need "threaded inserts for wood." These have heavy outer threads that screw into the wood, and machine-screw threads inside. The center pin (spool holder) is M5 x 0.8. The suspended thread-guide is M4 x 0.7. You'll need one threaded insert of each. But, they're not common in the US. They're sold online in quantities of 20.
It may be possible to use the more-common #6 & #8 threaded inserts, and cut new (metric) threads into those. After buying 20 threaded inserts of each, you could spend twice as much on a set of taps & dies. That could be more useful in the future than all those extra threaded inserts.
I intend to make that. This PDF contains a drawing with measurements of what I envision. I intend to make that. I will add photos soon. The only thing that needs more detail will be how I mount the tension-disk and the two thread-stand parts.
High capacity bobbin
The standalone winder works with the LK-1900's high-capacity bobbins too. But:
The tension-disk height needs to be a little higher. A 40mm-long screw is more appropriate (but the 35mm works). FYI: There is a circuit board underneath. If you screw this down 1/2" you'll be close to touching the board. So, this screw should be chosen to fit.
The sensor plate needs to be even higher. You'll need a 12- or 15mm-long screw (another washer underneath). There's nothing underneath this screw (inside the box for it to interfere with). It can be any length.
The half-circle cutout in the sensor plate needs to be enlarged with a dremel to accommodate the larger bobbin diameter.
To the extent moving the tension disks further away helped normal bobbins wind more evenly (flatter), it may help to go even further. The high-capacity bobbins are 32.6% wider (the thread travels that much further up/down to fill evenly). It could benefit if the disks are moved 32.6% further (i.e., 14-5/8" apart).