Sewing collars & leashes with an LK-1900BN bartacking machine
As described on the collars & leashes page, I used a Singer 201-2 to sew collars for 2-3 years. I bought a Juki LK-1900BN bartacking machine (brochure, instruction manual, parts list & engineer's manual) which lets me go 5-10x faster. The sewing field is 40 x 30mm (1.57"w x 1.18"h). It can sew box-x patterns, but doesn't come with any.
Before buying
The machine has a steep learning curve (adjustments, options & settings). It takes time using it to get comfortable, find what works for you. There are YouTube videos showing different things about the machine. Watching a lot[1] of those (more than once) helped me feel prepared when my machine arrived. You especially want to see videos showing how to step through the needle positions (to see if it's within the feed-plate's cutout), and how to adjust the pattern's scale, the x/y offset to center the pattern within the cutout. How to disable all the patterns you don't intend to use ("standard pattern select" so they aren't in the way as you use the control panel; accidentally selected). Any videos about the control panel will be useful.
Keep in mind it's incredibly heavy (110 lbs + the table). Having a table with wheels helps a lot. Industrial machines traditionally use a "k-leg table." Sometimes people add casters to those. But, that's kludgy (it raises the foot pedal too.). There are newer designs of tables with wheels (the foot pedal remains at the floor). I would try to get the machine with that table. Usually the table is 48"w x 20"d. I was able to get my machine on a 36" wide. (I didn't need a full table because I have another table next to this one).
There is a high-capacity bobbin version (-BNW). If you're starting with the -BNH (heavy weight), then it's just four parts to convert.[2] The standard-sized bobbin works fine. Replacing the bobbin (and start an empty winding) doesn't take long after you get used to it. But, a large-capacity bobbin (lasting twice as long) is nice. I didn't convert mine until I had it 2 years. If you don't think you could replace those parts yourself, consider having it done when you buy the machine.
Pre-loosen screws
I've never had a good relationship with screws. My biggest fear is rounding off a screw head (needing special equipment to remove it). You should plan on investing in a good set of screwdriver bits, "hollow ground." Most of the screws are slotted heads. People think those are automatically better than philips heads (just choose a screwdriver with the same width as the head). But, the thickness of the slot makes a difference too (too tight can round the slot making it fit into the slot. Too loose can cause it not to hold well, and round sooner). Having multiple sets (even cheap sets) can give you better a fit. (The bits might visually look the same, but one may fit a screw better. It helps to have a few to pick the best fit for a particular screw.). Think ahead about the screws you may need to remove, and how accessible they are (you'll probably need a stubby-handle driver, or right-angle ratcheting bit driver). Ask the seller if they recommend any screwdrivers, bit sets & drivers.
I use Liquid Wrench and Harbor Freight's heat gun for tough screws. I spray the penetrating oil on the screw, heat it (but don't inhale the fumes if it smokes. Also, be careful not to damage anything that shouldn't get that hot). I spray more after it cools a little, then give it a few hours to penetrate. Some screws seem to be "seized" due to the anodized surface of the screw head and what it tightens against. The threads don't seize, it's the finish. (You'll know this was what it was because they snap free suddenly, spin so freely you'll think you snapped the head off.). These loosen easier when frozen. I always use Liquid Wrench & heat before freezing. I might even do that 2-3 times (the hot/cold cycles might help). You should apply some anti-seize compound (or at least grease) before tightening any screws again.
The are a few screws you'll probably need to remove sooner than later. Ask the seller to loosen these for you & re-tighten with anti-seize compound:
"work clamp face plate" screws (5)

You'll have to remove these screws to change the "work clamp feet." These are notoriously difficult to loosen. It has something to do with their anodized finish (binding with the anodized finish of the plate, the beveled mating surface). When they snap free, they spin so freely you'll think you snapped the head off.
Usually you'd heat over-tight screws. But, putting the arch in the freezer works much better for these. Leave it for hours (let it completely freeze to its core).
I bought additional arches, so I got more experience with this topic than you normally would. I sprayed "Liquid Wrench" on the screws, then heat it with a heat gun. When cool, I sprayed some more &the arch in the freezer. The expansion before contraction of freezing may help. But, I wouldn't try to loosen while it's hot. It always snaps free easier when frozen. (If you try when it's hot, you're just risking rounding off the head in a way you wouldn't if you wait till it's frozen.). After a deep freeze, if the screws don't break free, I do it again (penetrating oil, heat, deep freeze for hours). It may help to strike the screwdriver with a hammer after it's frozen. Cycling through hot/cold helps more than striking the screw (if you're not comfortable striking it).
You need a vice to do the above. Clamp it between some wood so you don't mar the arch. It's a good idea to buy a few spare screws (#SS2110930SP, desc: SCREW 11/64-40 L=8.7). You might partially round a slot. But, if the seller breaks these free for you, you'll have less chance of needing spares.
"finger guard" setscrews (2)
These seem to be hard to turn due to thread-locking compound. Heat works better than freezing. What makes these risky is that they're tiny. You need a jeweler screwdriver (which aren't made for this kind of torque, they can snap if you turn too hard). Also, if you round the head off, it would be harder to fix because of the screw's size & being recessed.
To get enough torque, I clamped long-nose clamping pliers onto the screwdriver. With my thumb pushing hard against the end of the screwdriver, I rock the screwdriver back/forth with my other hand (using the clamp for leverage). The screw will give a little as you do this. Trying to turn it too much will break the tiny screwdriver. Just push a little one direction, then the other. You'll notice it starts moving. (Cycling cold/hot might help. But, I wouldn't try to turn it while frozen. Heat & penetrating oil, rocking it back/forth is when there's more chance it will loosen. The key is to rock it back/forth. You might have to do it that way until it's all the way out.).
(Spares: #SS8080310TP, desc: SCREW 1/8-44 L=2.8)
"ball retainer" setscrew (1)
This one's not as bad as the prior two. It may need some penetrating oil & heat. (If that doesn't work, try it again after freezing).
The "ball retainer" actually retains a flat slider part. Prior versions of the 1900 used balls. The parts manual still refers to the retainer that way (but it's not the same part #). You may need to adjust the retainer up/down. If too low, the front of the arch will flex up/down too much. Too high you could get an E926 error when the machine initializes (the arch won't move freely enough).
(Spares: #SS8150510TP, desc: SCREW 15/64-28 L=4.7. I don't think you need a spare for that setscrew. But, I think it's easy to lose the "slider" #401-42736 if you remove the arch. A spare might be handy to have.)
"lever driving plate" screws (4)
These screws are almost as difficult as the 5 faceplate screws above. Once again, it seems like it's the anodized surface under the screw head that binds to the anodized surface of the levers. These break free easier when frozen (follow the advice for the faceplate screws).
These let you adjust the height of the "work clamp feet." This is mainly to make them level. But, you can adjust both sides 3/8" higher/lower.
(Spares: #SS7110740TP, desc: SCREW 11/64-40 L=7)
"needle plate" screws (4)
Eventually you'll have to remove the needle plate. Ask the seller to pre-loosen these because there's limited space above them (the machine's head is in the way). Trying to turn them with a long screwdriver at an angle could round the slot. Using a shorter screwdriver could be awkward to push down while turning.
These screws scare me. If you round one off, I don't know how it could be fixed. There's no room to drill it out. I'm very careful with these. I tighten them only enough that they won't vibrate loose. I use a short 90-degree ratcheting bit driver (a stubby driver would be better). I don't tighten them very hard. They've vibrated loose a couple times (I've learned how tight they should be. I'm tempted to use blue/medium thread-locking compound. That might stop them from vibrating loose, but not be too hard to loosen.). I have spares to replace a screw if its slot becomes rounded. If you're careful this way, then your biggest risk is if they're factory tight when you receive the machine. Ask the seller to loosen them for you. If they feel tight to you, use penetrating oil & a heat gun. Give it a few hours to penetrate (repeat to be safe).
The reasons you'll have to remove the needle plate are to replace the needle-hole guide (if its screws are too tight), and replace the thread-cutting knives underneath. Removing the needle plate also gives you more room when upgrading to the high-capacity bobbin.
(Spares: #SM1040650TP, desc: SCREW M4 L=6)
"cutter lever asm" screw (1)
After removing the four needle-plate screws, you can't fully remove the plate because a "connecting rod" hitches onto post "A" (32). You can't un-hitch that without loosening the highlighted screw (33). You don't have to fully remove that screw. Just loosen it enough for the rod to slip over the post. You should loosen this screw first (before unscrewing the four screws on top). It's easier to push against (sitting on the floor, looking up) when it's solidly screwed down. After that screw is loosened, remove the four needle-plate screws. Then, finger loosen the screw (33) a little so the connecting rod slips over post "A."
Note: You can't reach screw 33 without first removing the bobbin flip-cover. There are two small 2mm hex screws attaching the flip cover to the hinge. They're easy to unscrew. (Don't overtighten when reinstalling. You could strip the threads being so small.). There's one larger screw further back. I thought that would be the screw to remove. But, it wouldn't turn. Maybe heat & Liquid Wrench would work. But, removing the two small screws works. No reason to fight the larger screw.
This screw (33) was hard to loosen the first time. It felt like the anodized surfaces seized (the screw spins freely when it snaps loose). Heat & Liquid Wrench worked. Letting it soak for a few hours seemed to help. Being awkward (upside-down) and unable to freeze it, I was worried about this one. It would definitely help if the seller pre-loosened this one for you (and applied anti-sieze).
It's also an unusual screw: a very wide/flat head. This was a screw that benefited from my having a few sets of bits. One wide bit fit that slot better than others (even though they visually looked the same). If you couldn't loosen the screw, I think the rod can be disconnected from the rear of the machine (under the blue plastic cover), pull the rod through and freeze the whole thing?
FYI: When the needle plate is removed, it's not too hard to remove the other screws (for the moving & fixing knives - 41 & 27, respectively). Lay the needle plate's top on a flat sturdy surface. Use penetrating oil & heat. Give it some time to penetrate.
IMPORTANT: When reinstalling the needle plate, the "moving knife" (41) can disconnect from the small post on 31 (which is screwed tight to 32). This is hard to visualize with the parts diagram. When you remove the needle plate, look carefully at how 32 swings the "moving knife" (as 31 moves). When reinstalling the needle plate, you'll loosen screw 33 so the connecting rod can slip back over hitch "A" (32). Make sure the "moving knife" remains hitched to the small post on 31. This works best before screwing the needle plate down with the 4 screws on top. If the needle plate is free, you can push/pull against the connecting rod to verify the blade moves freely. You can finger loosen/tighten 33 as needed to correct the "moving knife's" linkage. (If you screw the needle plate down & then hitch the connecting rod to 32: If the "moving knife's" linkage isn't right, you won't know until it doesn't cut thread. Or, worse, it could bind and sound when you load/cycle the pattern, causing an error.).
Spares: #SS6110430TP SCREW 11/64-40 L=4.0. You probably don't need a spare. But, it's useful to have spare knives (moving = #B242-12800A0. fixing = #B242-4280000). You'll need to replace those eventually.
"needle-hole guide" screws (2)
The two screws holding the needle-hole guide are very small, and not in a good position to work on. In a typical set of jewelers screwdrivers, the largest one fits these screws. But, not well (the blade is too thin, doesn't solidly fill the slot's width). There are hollow-ground bits that will fit these screws. They might be in the "gunsmithing" category (larger than jeweler. Not as large as household screwdrivers). I was fortunate that one of the cheap sets of hollow-ground bits I bought had a bit that fits this screw nicely.
If your screws are factory tight, then you should completely remove the needle plate from the machine so you can work with them from above, have more control of the screwdriver. I would use penetrating oil & heat. Let it penetrate for a few hours (repeat to be safe). It would be helpful if these were pre-loosened for you.
You'll eventually need to remove the hole-guide when you have a needle strike. It's considered a "consumable" part. Its job is to take the hits (when the needle deflects). Whenever you have a strike, always look closely at the hole guide. If it cracks, then it did its job (and won't be able next time. It could shatter & damage the needle plate. The plate's expensive to replace.).
You can find less expensive (no-name) needle-hole guides on eBay. You need a 3.0mm hole for the heavyweight machine (BNW, BNH). Considering the expense of a new needle-plate, I wouldn't trust these to be as protective (hard/tempered) as the official part. I bought one as a spare, to use in a pinch until the official part arrives. That seems like a reasonably managed risk. I wouldn't use the generic part for longer than I have to. Considering how expensive the needle plate is, I'd feel better having the real part installed. (Just use the clone as a backup.).
Spares: #SS1060210TP, desc: SCREW 3/32-56 L=2.2. (The 3.0mm needle-hole guide is 141-09607).
"cloth feed presser plate" screws (6)
You'll have much less reason to remove the presser plate. But, like the needle-plate screws: if you round a head off, I don't know how it could be fixed.
One risk which may necessitate removing this plate: when you remove the arch, the "slider" (in the "ball retainer" cup above) may stick to the "slider sheet" above it (due to the grease on that sheet). I always worry it could fall off. If the "feed plate" (29) were removed, the slider could fall inside.
(Spares: #SM1040650TP, desc: SCREW M4 L=6. Same as used for the needle plate.)
Note: the "feed plate" (29) screw was also stubborn like the face & lever-plate screws (it snaps free. The anodized finish between the screw head and washer binds like those screws.). Grease between the screw's head & washer helps. Eventually the anodized finish wears off. (FYI: That screw has a 4mm allen-head. However, I felt like I got a slightly better fit using a 5/32" allen wrench.). You can buy allen wrenches with a ball-shape on the long end. Those are handy to quickly snug the plate (and the 5mm arch screw). Then use the short end to tighten.
Materials
You'll need Juki #2 oil (thicker than the #1 oil used with the DU-1181N, which I sew leash sleeves with).
The machine requires periodic greasing. It will display error code E220 when the machine's been used enough to require grease (I haven't reached it yet). The instruction manual (pg 54, "replenishing the designated places with grease") & engineer's manual (pg 132, "grease-up procedures for the specified position") discuss it. You'll need a tube of Juki "Grease A" (400-06323) for that.
There are other places you'll need to grease occasionally. The engineer manual (pg 121, "parts to which grease is applied") shows all the locations. What I grease most are 1) the plate above the arch (which the "ball retainer" slides against). 2) The clamp legs (sliding under the arch's face plate). Pg 120 ("greasing parts") recommends Lithium No 2 grease (often called "NLGI Grade 2"). Lucas "Red N Tacky" is known to be a very good grease. You can get it in a 1 lb can. But, the red color seems out of place for a sewing machine. I use Quicksilver #802859Q1 "2-4-C Marine Grease with Teflon" (ASIN: B002V3KD2O, 8 oz. squeeze tube). That grease looks like the grease that came on my new machine's clamp legs & slider plate. Light brown, peanut-butter consistency. I like that this grease comes in a squeeze tube. Most don't. If I bought a product like Liqui-Moly Multi-Purpose grease (a good product, but only comes in a rigid tube for use with a grease gun) I would pack the grease into a large syringe for easier dispensing, or into a small plastic food container.
You'll need spare bobbins (#138-12102. I believe they're "Style A, class 15." I don't know for sure. The large-capacity bobbin is #B180-621-0D00.). If you sew both Tex 70 & 90 thread, then you need another bobbin case (#B1828-980-0BB. Or, the large-capacity B1828-210-DAA case for the large-capacity hook.). You'll adjust the bobbin tension differently for each size thread. It's better to have dedicated cases so you don't have to adjust back/forth. You can find these (often generic clones, cheaper) on eBay & Amazon. However, there is a bobbin-case I would avoid.
Needles
The machine uses 135x17 needles (also called DPx17). I use size 140/22 for all the webbing (both Tex-70 and -90 thread. Usually you'd use a larger needle with heavier thread.). It wouldn't hurt to have smaller 120/19, 130/21 & larger 160/23 needles. Ask the seller of the machine what would make sense to experiment with.
I use Groz-Beckert 768692 RG point (round with small ball point) SAN5 (means improved thread guidance), "gedebur" (means titanium coated).
I started with Groz-Beckert 761032 R point (regular round point). They worked ok. The seller suggested SAN5 might work better. I think it does. When I switched to those, it seemed like the thread-tension balance (between needle and bobbin threads) was more consistent, less touchy. SAN5 has a larger channel for the thread. That might be why.
Scheduled needle replacement
My first broken needles were due to things I did wrong. Eventually they broke after prolonged use (fatigue). The problem is: when the needle breaks, the remaining (jagged) shaft tears up the webbing (while the machine continues sewing until the last stitch of the pattern). It's a good idea to replace the needle after a certain amount of work. They only cost 50-cents. There's no reason to run them till they break. The challenge is to know when.
You can download a zipped spreadsheet to calculate how many stitches are sewn per collar or leash. (It was created using LibreOffice Calc). I make a certain amount of each item at a time. It's easy to enter that quantity in the spreadsheet to know how much work the needle has performed. (I can enter the work I intend to do, and know when the needle should be changed.). It seems like 75k to 100k stitches is a reasonable amount of work. After that, the risk of breaking is higher. (When I change the needle, I set the quantities back to zero.).
Alternative: the instruction manual (pg 35, "sewing through the use of a counter") discusses 3 types of counters available (per shape, per cycle & bobbin thread). The latter increments (or decrements) every 10 stitches. However, I found this feature wasn't reliable. I would set it to 7500 (75k). It would count down to 3000-4000, then jump to zero. Maybe this is fixed in a firmware update. But, I like using the spreadsheet better (the ability to project work that hasn't been done yet, and anticipate when to change the needle).
You won't need to think about this when you start. You'll break needles through mistakes before they wear out.
Lighting
You'll want more lighting than the machine's built-in light. You can buy gooseneck lamps that clamp onto the table, or you drill a hole & install permanently. There's a common design used with industrial machines (google "industrial sewing machine lamps." You'll see lots of these). They seem to be called SNU-21, or SNU-26 referring to the length of the gooseneck in inches. The -21 has a larger hood (6-1/2" long, 4" inside diameter at the opening) for use with an A21-size bulb. (Being shorter length, it can hold more weight?). The SNU-26 has a smaller hood - 5-3/4" long, 3-3/4" ID - for use with a smaller A19 bulb. Note: You'd only use a 40- or 60-watt (equiv) bulb in either fixture. Those brightness levels are available in either bulb size. But, if you use the larger A21 bulb in the SNU-26's smaller hood, it will protrude & can be glaring.
I installed a SNU-21 lamp each side of the machine:
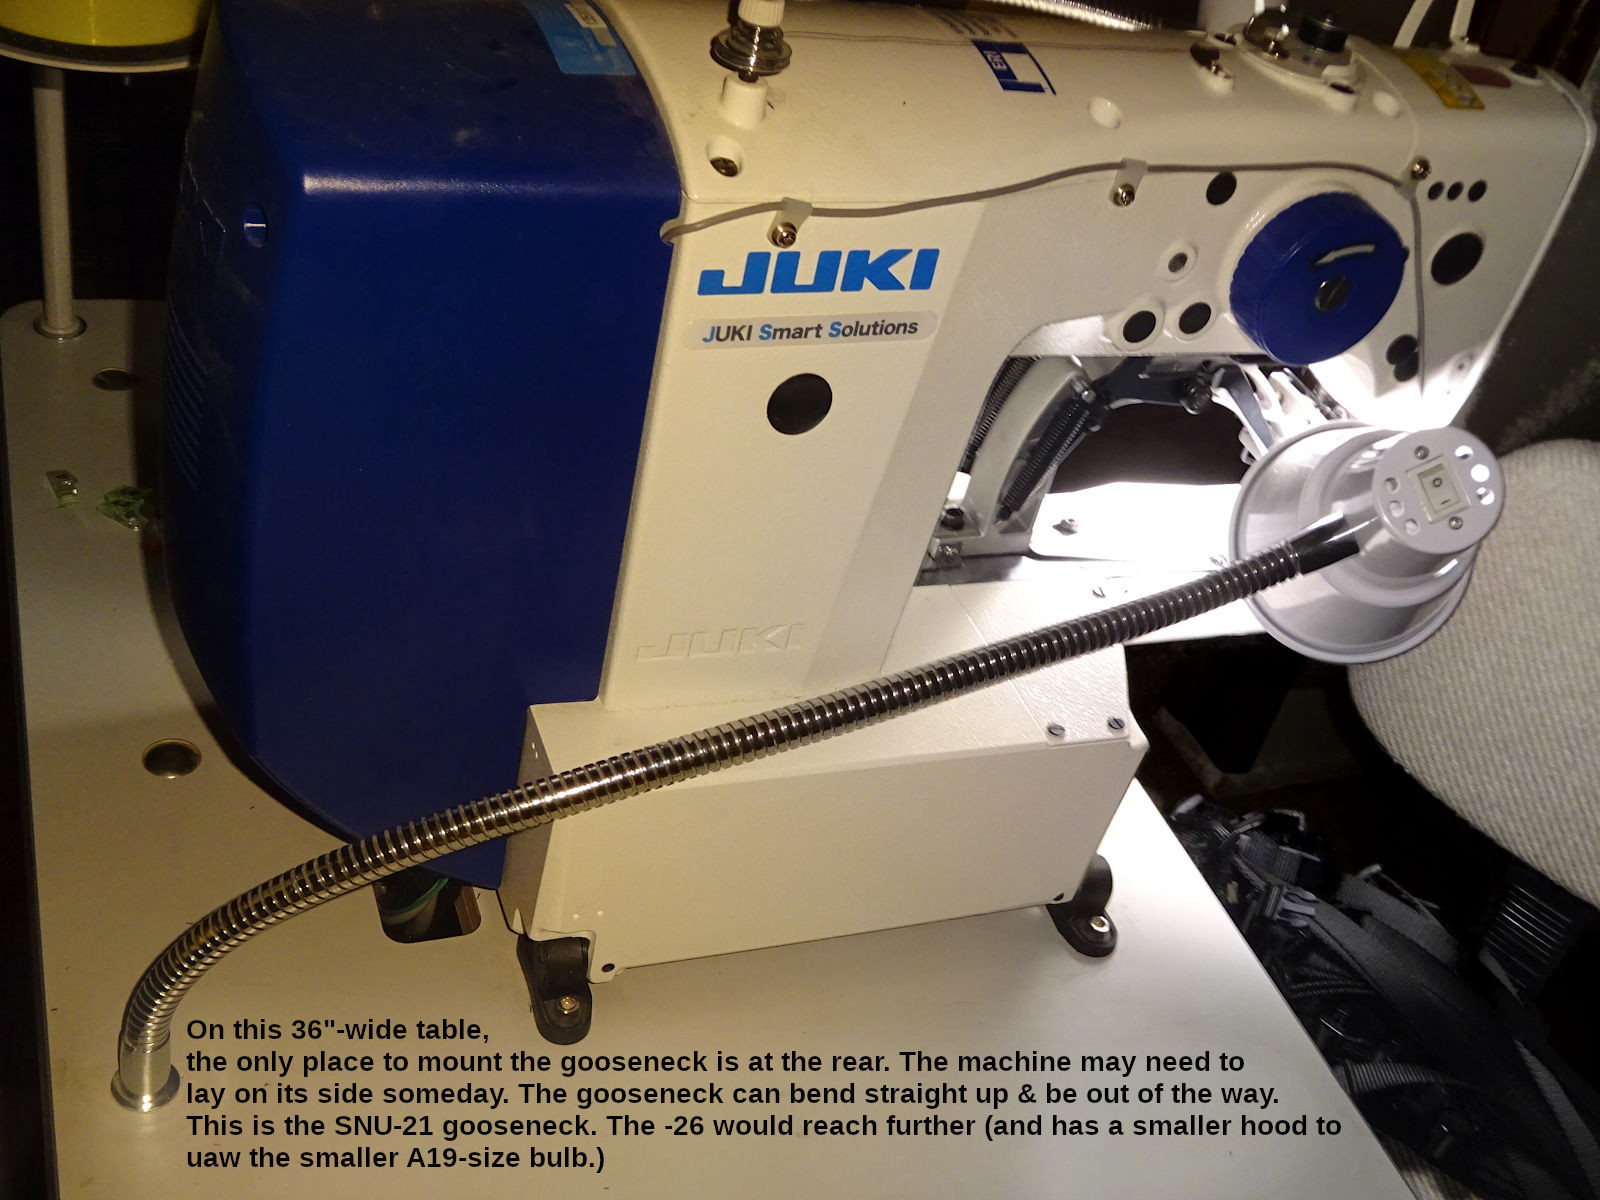
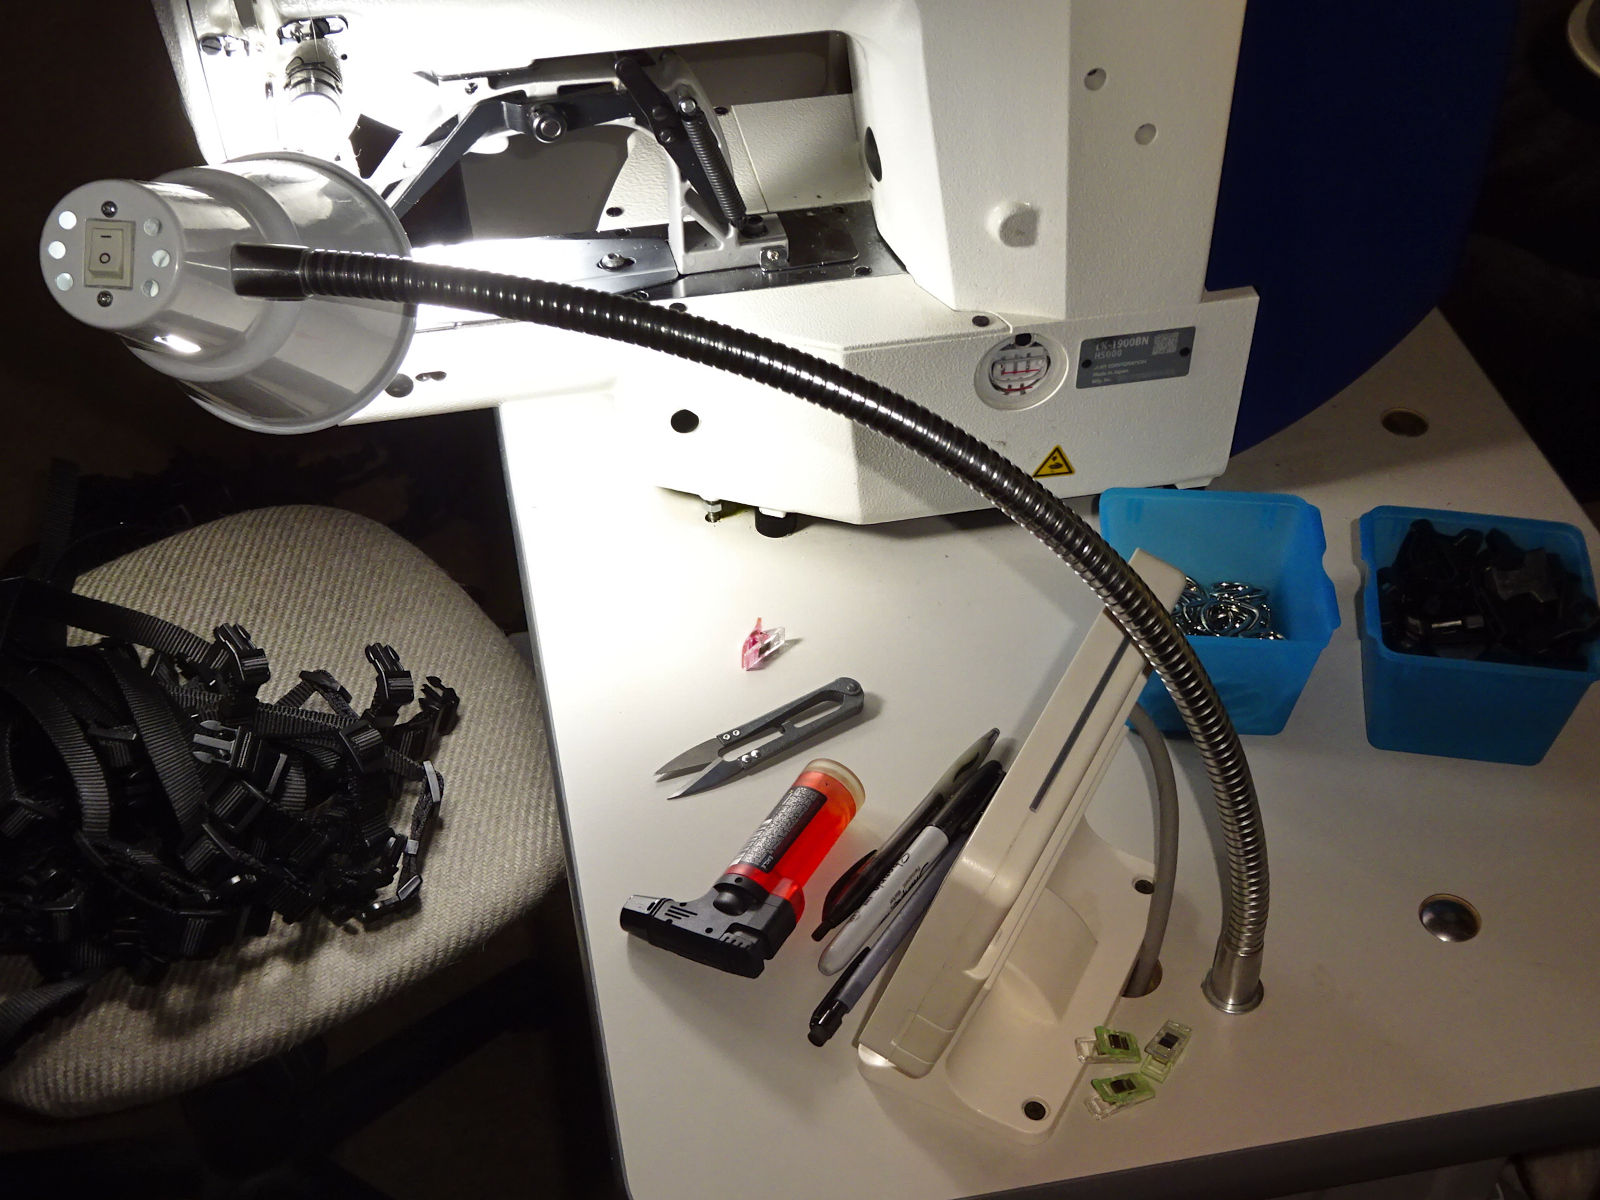
The SNU-21 barely reaches on the left. The longer -26 might be a better choice. (Not just for the length, but the hood is a little smaller. The -21's hood feels a little in the way. If I did this again, I would start with -26 on both sides. The bulbs would be the same 40W-equiv brightness, but the smaller A-19 in a smaller hood. I think smaller hoods would fit that workspace better. But, it's important not to use the A-21 bulb. It will protrude a little. To the extent you can see that protrusion, it will be glaring.).
It's important to note that the machine may have to lay on its left side for service someday (warning: requires two people to safely tilt over). That lamp should be installed so it doesn't interfere with that. I.e, my table is only 36" wide. If the machine head tilted over, it would extend to the left edge of the table. I can' mount a lamp on that edge (except perhaps at the rear corner). For me, mounting the light directly behind the machine worked well. The light can bend straight up to allow the machine to lay on its side.
The machine comes with a built-in light with four brightness levels. It seems glaring to me. Putting some scotch tape over it might help (or tape some tissue paper over it).
Getting started
There is a bolt holding the machine down to the table (right-front corner. You can see it in the second lighting photo above.). This secures the machine from tipping over onto its side (which you might need to do for service, but takes two people. I believe the machine is top-heavy, and could flop over easily? If it did, that would be catastrophic.). You should loosen that bolt from underneath the table, but don't remove it. (It's useful as a safeguard against accidental tipping over. Just back the bolt out 1-2 turns. Leave the locknut loose, or finger tight against the machine.). Don't operate the machine with the bolt holding the machine down tight against the table. There are reports of the machine's base cracking due to vibration during sewing.
The machine comes with a clear plastic shield for eye protection (see instruction manual pg 23). If you wear glasses, you should be safe without it. Without any protection, if a needle breaks, a piece could strike your eye. If you wear glasses, consider their coverage (if anything could reach your eye). If you don't wear glasses, consider buying the weakest reading glasses sold at the pharmacy (0.75?). A little magnification could be good in addition to the protection. Otherwise, consider safety glasses, or installing the shield (whichever feels less intrusive).
When I started, the fingerguard felt in the way. I removed it (until I got used to the machine). If you do that, be extra careful. The work clamp serves as a guard (when in the up position). It's not super unsafe to remove the fingerguard. But, it's better to have it on (I re-installed mine after 3-4 months when I was feeling better about everything). The fingerguard can be raised or lowered. You can try to find a height that doesn't feel as in the way. (Be aware that there are times you'll push the arch out of the way when the machine is off. For example, changing the work-clamp by removing the faceplate. If the fingerguard is high enough, it can bump into the needle.).
You'll need to hold the thread as the sewing starts. If you don't, the white top thread will be pushed through to the bottom (the black side) called "piling?" Pull the thread toward the rear of the machine until you have enough to comfortably hold. Then swing the end of the thread to the front (toward you). If you don't hold it towards you, the the wiper arm will hit it (one of the reasons I removed my wiper arm when I started. Buy, it's better to keep the wiper and learn to hold the thread this way). If you pull the thread toward you, it will be rough on the thread. You need to pull to the rear, then swing the end toward you. Fishing for the tail of thread around the needle made me nervous. Be aware of your foot on the pedal (not pressing down. Never put your finger under the needle. Just rub the side of the needle to get the thread.).
Sometimes the thread can loop over the top of the takeup lever. The symptom will be that it's hard to pull the thread (to the rear before starting to sew). If you don't realize it's looped, the thread tension will be wrong - the thread may even break; you could even break a needle. If it feels tighter when pulling the thread, be sure you're pulling to the rear (pulling to the front is hard) look closely at the takeup lever to see if the thread is looped over it. But, also be aware: if the thread is coming off the bottom of the spool, it can feel hard-to-pull too. The difference is that it will "give" freely when it gets past that. (You might feel that and think it's the takeup-lever problem. You'll get used to which is which.). I don't know why it loops over the takeup lever. It seems to happen when the pattern loads, the machine cycles into the ready state. I can go weeks without it happening, then it happens a few times in a row.
There is a thread guide above the thread-tension disks. See the instruction manual (pg 15, threading illustration). Notice that the thread goes through that guide only once (up to the takeup lever). I started with the mistaken belief that the thread should also go down through that guide. After 4-5 months it stood out to me. When I started doing it correctly, it seemed like the machine operated better (thread tension was more consistent).
Things like this caused me to learn: if things aren't working right, stop & question everything. (I think my confusion is that some machines actually do go both directions through such a guide. My DU-1181N for leash sleeves does.).
The control box mounted under the table has a cooling fan. I live in a hot & dusty environment. I'm in the habit of blowing out my laptop 2-3 times a year (especially summer so it will operate cooler. It usually accumulates a lot of dust.). I thought this control-box fan would be similar. But, I've removed the plastic cover (4 screws), and haven't seen any buildup. (You can't see the fan. It's buried behind the circuit board. The parts list shows it. See "Control Box Components" part 17.). I'm still going to occasionally remove the cover and see if it needs to be blown clean. So far it doesn't have the problem I thought it would.
However: one side of that box is metal; it seems like a heat sink. I use a 5" clip-on fan (clamped onto the bottom foot of the table) to blow air onto that surface. You may not need to do this. Being in a hot environment, I'm in the habit of doing what I can to help electronics last longer. (I service this clamp-on fan 1-2 times a year by blowing the dust out of it; remove the blade & plastic housing to apply some oil to the shaft's bearing surfaces. It will last many years doing that.). Juki's parts can be expensive. I'd do it in a cooler environment too.
I removed the bobbin thread-cutter blade on top. This is a convenience feature. But, I snagged the thread under that blade a few times when starting a new bobbin winding. I always reach for the thread snippers to cut the full bobbin's thread. So, it made sense to remove that blade.
Settings
Warning
The control panel has many options (called "switches") accessed by the "M" button. Press it once (one beep) and that's the options for normal operation. Hold it 2 seconds longer and you'll hear a 2nd beep. That gives you access to additional options. Hold it another 2 seconds for a 3rd beep gives more options. These options are listed in the instruction & engineer's manual. It helps to see them at a glance that way before seeing them on the control panel. (Juki's manuals are hard to understand. It doesn't help much.).
Don't play with these options (too soon, too many at once). Be sure to write down the value it was before changing so you can get back to where you were. There's probably a "factory reset." I haven't had a reason to look for it yet. If you write everything down you shouldn't have to either.
It's easy to change something without intending to (accidentally press the +/- keys), and there's no obvious "cancel." If you think you've done that, power off (the power switch mounted to the edge of the table). That's the "cancel" button. It doesn't save anything until you press the return "↩" button. (Some things won't save unless you press the control panel's green "ready" button before powering off. If you ever feel like a change wasn't saved, that's probably why.).
One of first changes I made were K021 & 23 ("pressure switch positions 1 & 3"). These are in Memory Switch 2 (3 beeps). These specify the foot-pedal position when the work-clamp drops, and when sewing starts. They default to 90 & 230. I found it hard to hold the pedal between those two positions. I set them to 45 & 245. That gives noticeably more range between the clamp coming down, and sewing starting. (It can go to 250, but that didn't work reliably. Often it felt like I couldn't push far enough to make it start sewing. So, I reduced it to 245. (That was good enough for me. I never went back to see if a higher number worked.).
I definitely recommend that change. Operating this machine is overwhelming in the beginning. A lot happens at once. Having more "wiggle room" for your foot definitely reduces stress. (Note: K022 isn't used. There is configuration of this machine that uses a "2-stage" pedal. It actuates something else between "clamp-down" and "sewing-start." You can ignore that.).
I was also stressed by the work clamp coming down. K027 (3 beeps, mem sw 2) sets the work clamp "lowering speed." I use 1,500 now. But, I started around 800. I would've gone even slower, but it sounds bad the slower it goes. (I don't think anything bad is happening. It just sounds like it.).
Winding bobbins
Winding bobbins with this machine is harder than others. The official(?) way is to wind the thread over/under a few times, and that will create enough friction to start. That didn't work for me most of the time. What works better is to drill a 3/32" (0.0938) hole in one side of the bobbin, near the center hole:
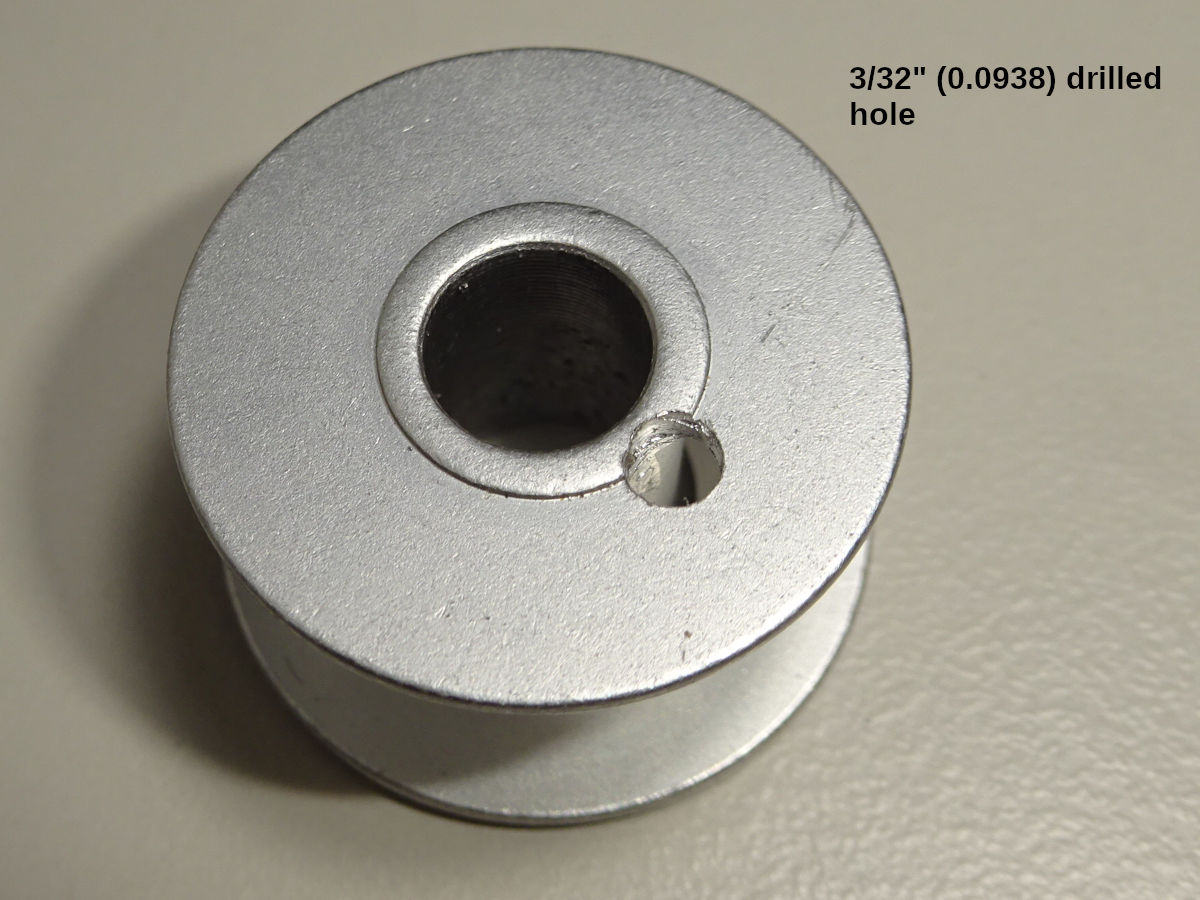
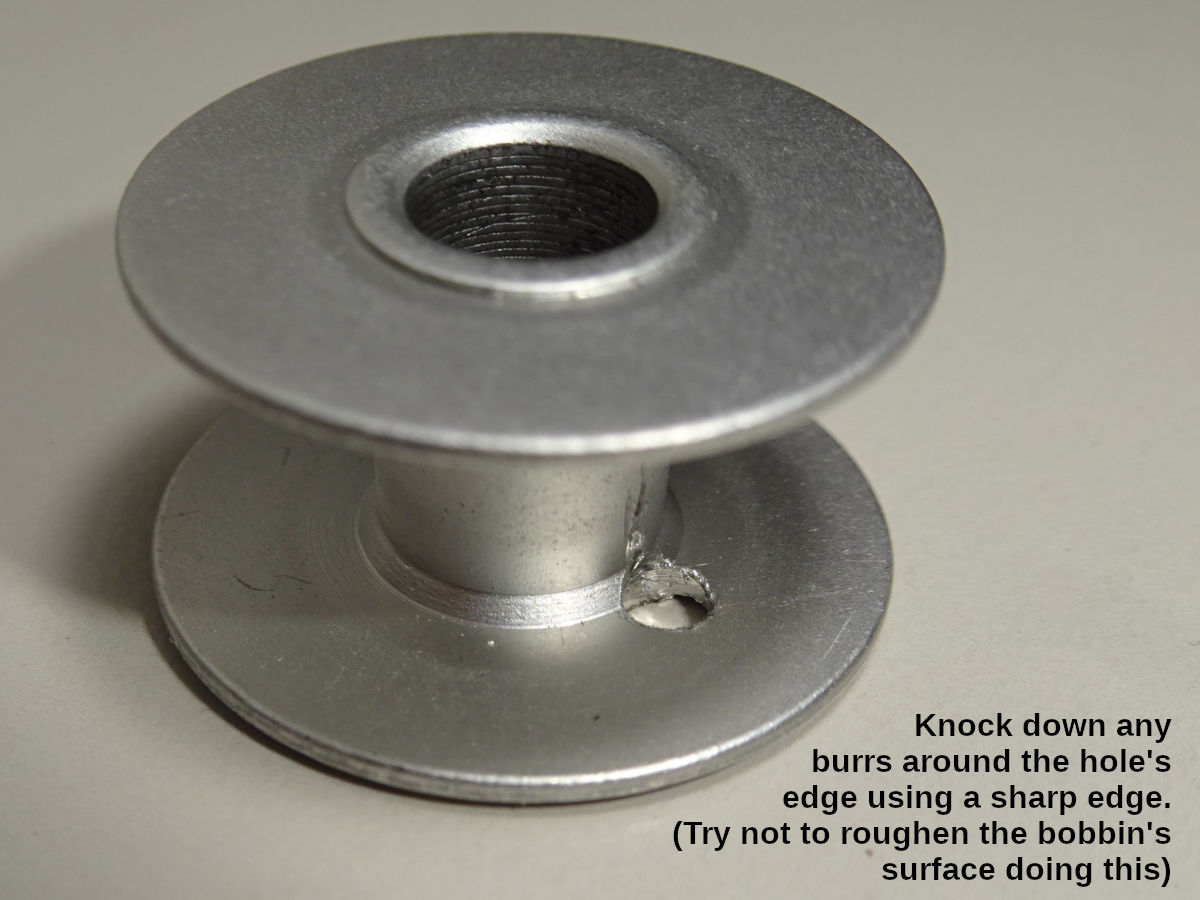
Smooth any burrs. You don't want the edge of the hole to snag the thread as it pulls off while sewing. (But, you don't want to roughen the inner surface of the bobbin trying to remove any burrs. The inner surface should remain satin smooth. It's a little hard to do. You need something with hard, square edge you can get into the hole from the outside hole, and scrape that around the hole's inner edge. (Note: pictured is an aftermarket bobbin from eBay. It seems to work ok. If you have any problems with aftermarket parts, you should switch to the official part to rule that out.).
To wind a bobbin: push the thread through the hole, and slip the bobbin on the post (with the hole facing down). Then wind the thread around the bobbin a dozen times (clockwise looking down at it). Do that while holding the end of the thread (coming out the drilled hole. The bobbin pressed down on the winder's base will hold it a little, but you should hold the end of the thread with one hand while winding those first dozen times.). Then snip the excess thread as close to the bobbin edge as possible. (Even a little excess can interfere with the winding.).
After winding, you must snip the rest of the excess coming out of the hole. If you don't do that, any excess will cause the bobbin to pop out of the bobbin case while sewing. (It sounds really bad, like the machine is destroying itself.).
Another problem I had: it seems sensitive to the thread tension when wound. Sometimes when sewing the thread would retract into the bobbin case. It seemed to be sensitive to being wound too tight (or loose). Also, the engineer's manual (pg 68) talks about adjusting the "idling prevention spring" (a flat spring inside the bobbin that stops the bobbin from "racing."). I adjusted mine to be stronger. That may have helped.
I also increased both the thread & bobbin tension around the time this got better.When I started using the machine, I made mistakes & needed to rip stitches (start over, salvage the materials). To make it easier to rip stitches, I reduced the bobbin-case's thread tension (also the needle thread tension to be balanced). if the thread tension was loose. When I didn't need to rip stitches as often, I increased that tension. That could've contributed to the problem (thread retracting into the bobbin case) going away.
But, it still seems like the winder tension can be too high (problems that seem like the thread doesn't come off the bobbin well). If you have trouble, loosen the winder's tension disks, try very loose. (Also make sure the excess thread is trimmed as close as possible before winding, and again before installing into the bobbin case. A small amount of excess can cause problems.)
Standalone bobbin winder
When I had trouble winding, I considered using a standalone winder which works with this machine's bobbins (style A, class 15). This is the only one I could find:
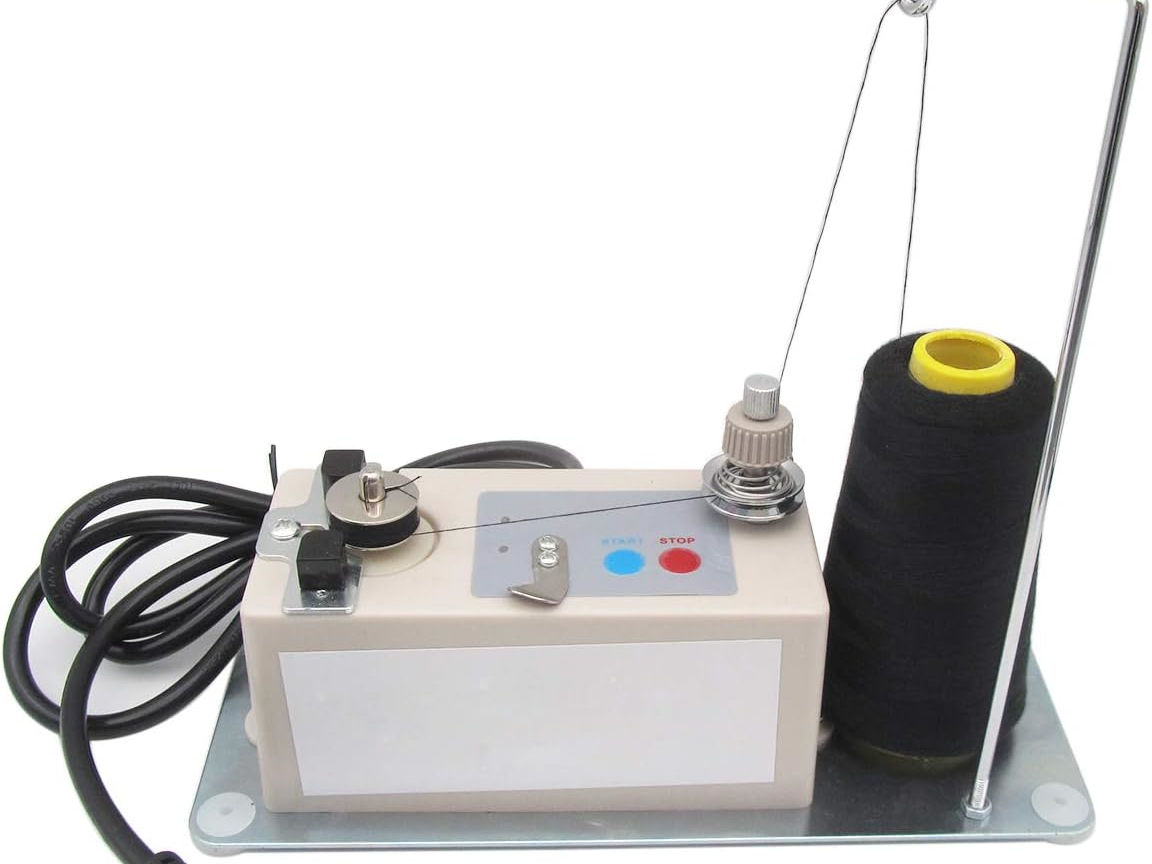
That photo comes from Amazon (ASIN: B07RJL9XHY seller CKPSMS). You'll find many sellers of this same winder. I chose that seller because their photos were more informative (instructional. The english is hard to understand. But, it was at least something.).
It works, but has some shortcomings (which wouldn't be hard to improve).[3] I mention it here (collapsed as a topic) because it's the only winder available. If you really need one, this works (and can be improved with some minor customization).
Control-panel bobbin winder
The control panel has a function to wind the bobbin (while not sewing) (instruction manual pg 23). But, the entire machine operates. That seems like a lot of wear & tear. I've done it when I had to, but wouldn't do this as a normal way to wind bobbins.
If you have to use this feature, be sure to unthread the machine past the takeup lever. If you don't, the thread could be pulled into the machine at the lever. That could take a lot of work to fix (removing the front & top covers of the machine, etc.).
I would use the standalone winder before doing this very often.
Installing a bobbin into the bobbin case
The instruction manual (pgs 15 & 16) shows how to install the bobbin. But, two things worth emphasizing:
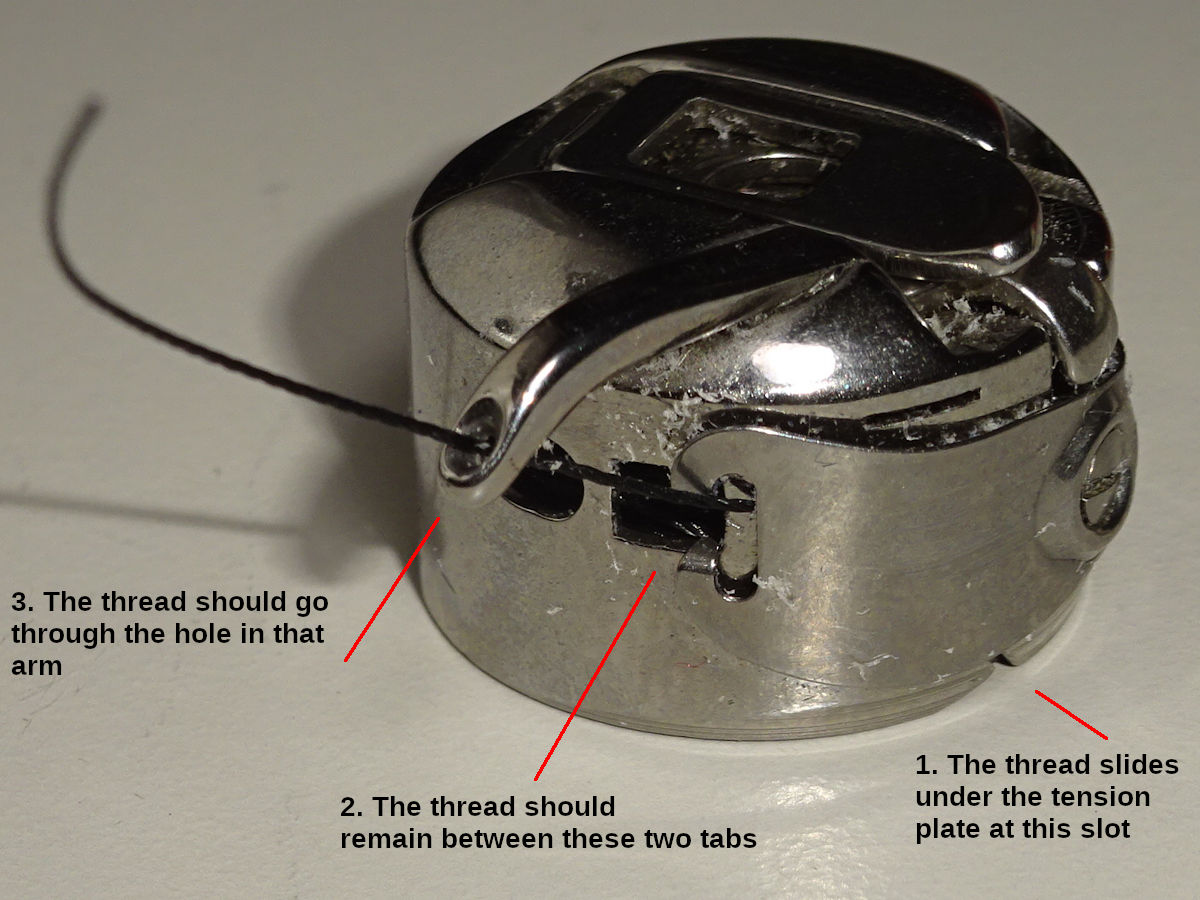
The thread should go through the hole in case's arm. I didn't do that for 2 months. It seemed to work ok. (I somehow got the idea the needle went though that hole.). But, it's supposed to hold the thread for the needle and shuttle hook to bring together. I'm surprised how well it worked. I probably missed the first couple stitches and didn't notice it.
The tension plate (on the outside of the bobbin case) has two guides which the thread should stay between. The thread can pull past the guide and feed from the side of the plate (especially if the bobbin-case's thread tension is set low - the plate sprung higher). If it's not between those guides, the thread tension will be inconsistent.
Bobbin case to avoid?
I bought this case on e-Bay:
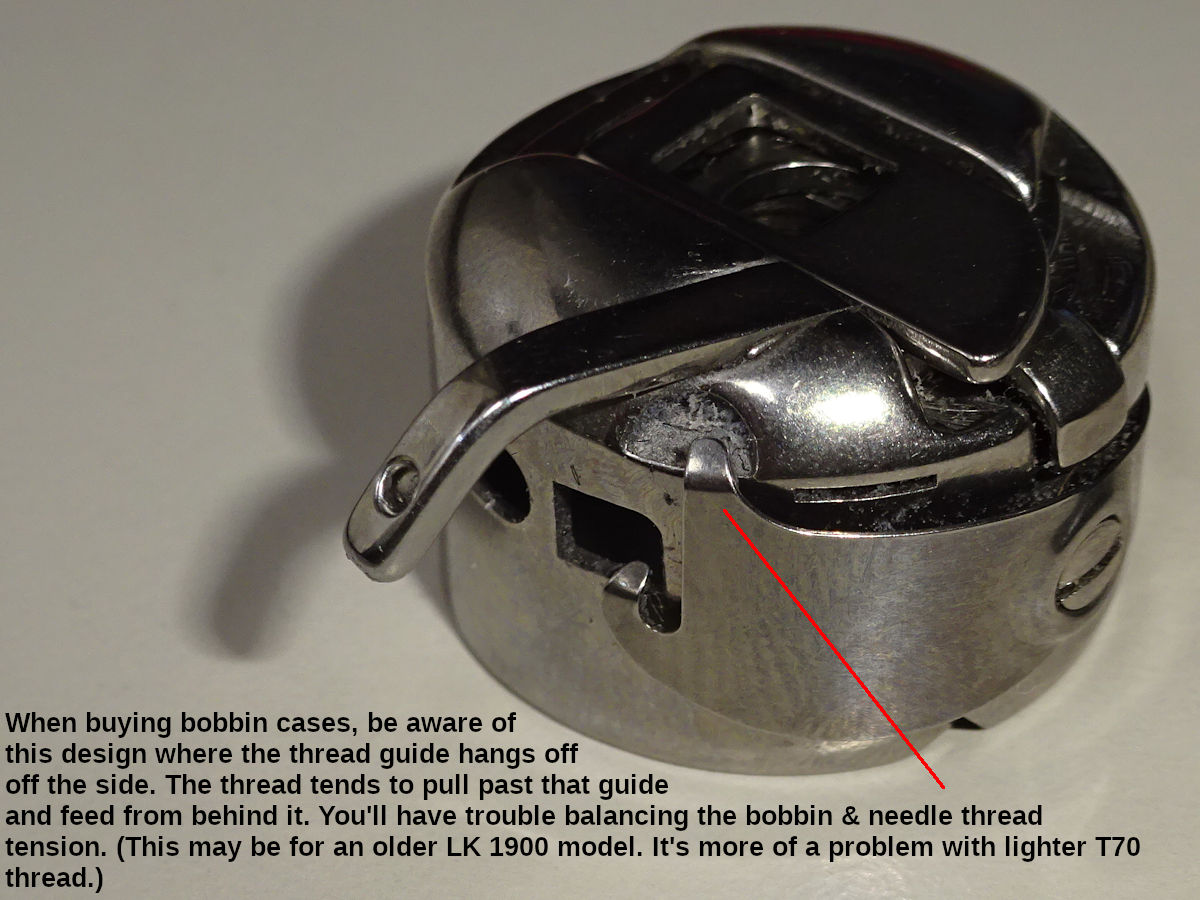
Notice how one of the guides (which the thread's supposed to stay between) hangs off the side of the case. The thread easily pulls past that guide, feeding from behind it - coming off the side of the tension plate. It wasn't a big problem. But, it's hard to get the thread tension balanced. You should look for the other style (shown above, both "guides" go down into the square hole in front). This one may be an older design.
This one might work better with tex-90 (thicker) thread. Maybe that wouldn't slip past the guide as easily. My experience could also be due to me adjusting the bobbin thread tension to be pretty light. That means the tension plate is sprung higher, and the guide doesn't hang down the side of the case as far. Maybe that side of the tension plate could be removed & bent down a little to make that guide fit better. (FYI: I used light tension because whenever I made a mistake - like forgetting to install the d-ring before sewing the buckle-end - it was a lot of work to fix if the stitching was tighter. Having light thread-tension makes it easier to use a thread-ripping tool to "unsew" the mistake. I made a lot of mistakes in the beginning. This saved me a lot of time. But, could've contributed to this bobbin case not working as well.).
Work clamps & feed plates
The machine comes with a 27 x 5mm work clamp (27.4 x 5.2mm feed plate). You can use this for all the collar bartacks (3/8"- to 1"-wide. For the 1-1/2"-wide collars, you can sew two 3/4"-long bartacks across the webbing). This would be the fastest way to get started. But, my cut & mark measurements might not be right for the smaller collars.
I bought a 39mm-wide clamp for the 1-1/2"-wide collar. And, a 20mm-wide for the 3/4" (and smaller) collars. My goal with the smaller clamp was to reduce the webbing's overlap (have more adjustable collar range. The 1" clamp would require more overlap with these smaller collars.). Previously, I made these collars with a Singer 201-2 which has a narrow foot. I was able to put the stitches closer to triglide, buckle, ring. The 20mm clamp (modified as you'll see) got closer to what I'd been doing (than if I used the 27mm).
I use the following[4] with collars:
| Width | Clamp & Plate | Source |
|---|---|---|
| 1-1/2" | 39 x 6mm clamp & plate | eBay: CuTex Sewing Supplies |
| 1" | 27 x 5mm clamp & 27.4 x 5.4mm plate | came with machine |
| 3/4, 5/8 & 3/8" | 20 x 4.8mm clamp (modified) & 21.3 x 5.3mm plate | eBay: evernice |
For leashes you need box clamps. (The 3/8"-wide leashes are the exception. That webbing is the same as used for collars. Bartacks are fine. A box that small would be tedious.). The webbing used for wider leashes is thin compared to the webbing used for collars. If you use a bartack, I think it should have a wider zig-zag (y-direction) to grab more material. The collar bartacks would be too concentrated & heavy in a small spot (for such thin webbing). If you used a large enough - almost decorative - zig-zag, you'd have to to enlarge the clamp & plate's opening. If you had to do that, you might as well buy box-clamps.
I use the following with leashes:
| Width | Clamp & Plate | Source |
|---|---|---|
| 1" | 25 x 25mm clamp & plate | eBay: DailyDeal360 |
| 3/4" | 20 x 20mm clamp & plate | |
| 5/8" | 16 x 16mm clamp & plate | |
| 3/8" | Sew bartacks using the 3/8"-collar clamp & plate | |
Fitment
The inexpensive clamps I bought needed a little filing/polishing to fit into the arch's slots & slide freely. You'll need a polishing stone. I used a Harbor Freight Gordon Combination Sharpening Stone. It has a rough & fine surface. Be careful not to go too far, and make it fit too loose. Be sure to clean the surfaces of the grit before installing.
The clamps also tended to come down "toe-up" (the heel made contact with the feed-plate. There was a little gap at the front of the clamp. That allowed the material to slip easier during sewing, as the plate/clamp moved & vibrated.). I placed mine in a vice (with a piece of wood protecting the polished surface from the vice's surface) and tapped them lightly with a hammer to align them a little better. Take your time, go slow. I tapped one clamp so far back (to bring the toe down enough to be flat) that the feed-plate wouldn't go back far enough (the rear of the feed-plate hit the front of the arch's base). I had to grind some material off the rear edge of the plate so it could go further back. Be prepared. (Tapping the "thigh" of the clamp down won't move the foot back as much as tapping the "shin." It may be best to do a little of both.).
If the height of the two feet aren't the same, you can adjust the "lever driving plate:"
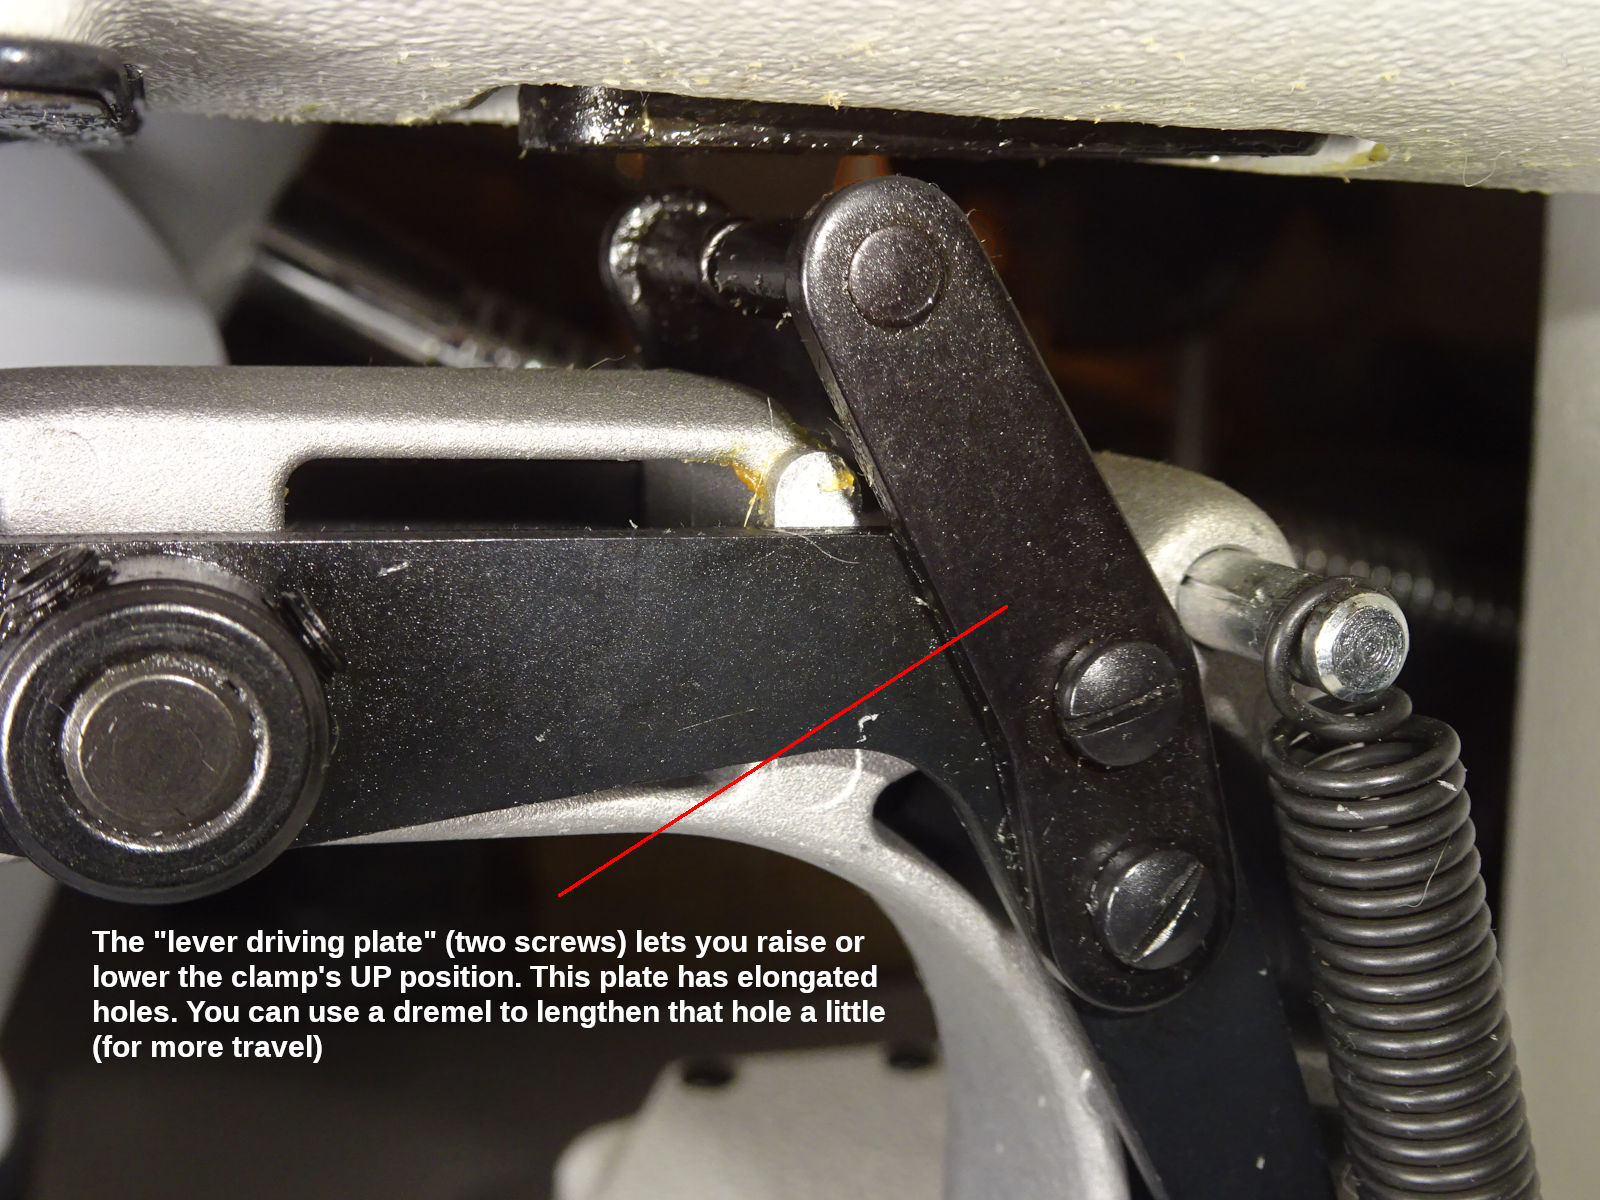
Those are screws I suggested having the seller loosen for you. Be aware: There is a real clamp-height adjustment under the machine's top cover (instruction manual pg 51). You shouldn't ever have to do that. These plates give you some overall height adjustment. You can use a dremel to elongate the holes even more than they already are (for more adjustment).
Changing work clamps
As mentioned above (work clamps & feed plates), you can use the factory 27mm clamp for everything. But, if you buy clamps to better fit the different collar sizes (box clamps are almost a necessity for the thinner leash webbing), you'll have to change the clamps. Your choices are:
Remove the faceplate
Remove the faceplate's 5 screws to swap clamps. With the power off, you can push the arch back (and left/right) for better access to those screws (WARNING: Shoving the arch around can result in the fingerguard hitting the needle. There's a way to do it.).
These are screws I suggested you ask the seller to break free for you (and apply some anti-seize compound). The first time you remove the faceplate, if those screws are hard to turn, don't try to do it on the machine. Remove the arch & follow the instructions I gave there. If you round one of these heads off, it will be a lot of work to fix.
A downside to changing clamps this way: It's messy & tedious. Replacing the screws with philips or hex heads would make it easier (use a magnetic-tip driver). It will still be messy. You'll need to occasionally add grease because you'll lose some each time you swap clamps.
Dedicated arch assemblies
You can buy additional arch assemblies (have one for each clamp you use). Juki doesn't sell the arch assembly. You have to buy the bare arch and all the parts that attach to it. The bare arch (#400-39013) costs $70 (Jan 2026. The other parts probably add $200-$300.). That would get expensive.
I found someone selling used arches on eBay[5] for $75 (2025 prices). These appear to be real Juki arches. At that price, it seemed reasonable to have a dedicated arch for each clamp. (I needed five: $375. But, the seller's price includes shipping. I was able to "make an offer" for combined shipping & quantity discount. Maybe $60-$70 would be fair.).
There are clone arch assemblies that aren't expensive (example: Amazon ASIN B0CZ9PZ2FN is $65 in 2025). I think some clone parts are a good value. But, I'd be nervous about the arch. Note: the linked one says its for models that aren't 1900-B or -BN. Remember: the "ball retainer" at the top is different for the -BN which has a sliding disk, not balls. (Be careful before buying a clone part.).
I started changing clamps this way (with dedicated arches). I'm happy. But, if I did this again I'd consider removing the face-plate to change clamps. I make more of one thing at a time. I don't change clamps as often as I thought I would. Doing it the face-plate way wouldn't be bad. I spent $300 for arches. It might not be worth it. It's less tedious; less messy. I think I jumped on it because I found these arches before I had my machine. I thought for $60-$70 each, I should grab those while I can (if the only option is $400 from Juki. It made sense then. But, now that I've used the machine for a couple years. Removing the faceplate wouldn't be much work.
Important note about re-installing the arch: There is a small slider part on top of the arch. It sits inside the elevated cup (the "ball retainer" - which got its name from older models of the machine that used ball bearings in a cup. The cups may not be the same between those models and this one.). Make sure that slider sits flat (and that you don't lose it). That slider can slip out a little, causing the arch to be cocked a little. If I'm careless and don't see it, then I notice it when tightening down the arch. Normally, the arch tightens suddenly. If the slider isn't flat, then tightening the arch will feel springy. You'll know it doesn't feel right. (It's probably not good for the arch, putting a stress on it to make it mate with the base it bolts onto.). It could be worthwhile to deliberately misalign the slider to feel it, so you'll recognize it.
Likewise, when removing the arch be aware that you can easily lose that slider. It will often stick to the plate above it (due to the grease, which you need to replenish over time). I worry it could fall and go inside the machine if the feed-plate is removed. I usually let the slider stay up there (I use the same slider for all the arches). But, I don't remove the feed plate until I reinstall the arch (or, I replace the feed-plate before removing the arch.).
"Simple work clamp kit"
The LK-1900BN brochure shows a "simple work clamp kit" (#400-57279). I've been told this costs $650 (Jan 2026), and that it's the entire arch assembly. (The brochure says it doesn't come with the lever driving plates. The photo suggests it doesn't come with the ball-retainer cup on top either.). The faceplate has its top cut off (so the clamp legs can lift up and out of the arch). The levers on each side allow their arms to retract out of the clamp legs. The arch has to be pushed to the rear for the clamp to slide up high enough to clear the faceplate. (The machine has to be powered off to do that.).
It's a good idea. Unfortunately, it's expensive for what you get. Still messy (the legs will be greasy; prone to getting dirty while out of the machine. You'll have to clean them before using again, and re-grease.).
Knurled-knob (finger-tight) faceplate screws
If I were starting again, I would pursue this idea. If the five faceplate screws were socket-head "cap screws" (the kind with the tall allen head, knurled around the side for easy finger-tightening) they'd be easier to work with. They'd probably need washers because of the faceplate's beveled hole. (The washers would probably have to be JB Welded onto the screw head so they're easier to work with, not lose.).
There's also specialty "knurled-head" screws. If the head were elevated by a shoulder (or, some of these have taller heads), they could be quickly finger tightened enough without using a tool.
The challenge is that the face-plate screws are 11/64" x 40 thread (8.7mm long). You probably won't find any of the above in that thread. But, you can buy a tap & die (ASIN: B09ZTTNP3Z). If you had a lathe, you could "turn" a larger screw down to the diameter necessary to use the die to cut new threads. (You'll need a "die stock wrench handle." The die linked above is 3/4" (20mm) diameter. You also need a "tap wrench handle" to use use the tap, for example: if you needed to "chase" the threads in the arch.).
You can also make something from threaded rod. 11/64" is 1/64" less than 3/16". Common #10-24 threaded rod is also called 3/16. I was able to cut good threads onto #10-24 threaded rod. The only problem is that this rod is a little larger than what you'd "turn" bar-stock down to (if you had a lathe). To use #10-24 threaded rod, you have to turn the die 1/4" turn (then back 1/4" turn to clear the teeth. Use thread-cutting oil to flush the chips out.). It goes slow. (But, you only need to cut a short length of threads.). If you try to go faster - turning the die further before reversing - the tap may not last long. (You don't need to buy real thread-cutting oil. Any oil should work. You're just flushing the chips out. I've read chainsaw "bar oil" is useful as a thread-cutting oil because it has high sulfur content which reduces binding.).
My idea was to thread a #10-24 knurled nut onto the threaded rod (the end with untouched threads, creating my own "knurled-knob" screw). Another idea: imagine bending one end of the threaded rod 45°, creating an L-shaped "lever." Cut one "wing" off a #10-24 wingnut. (Now you have two levers. One on the rod, and one that spins freely on the rod.). Screw the L-shaped rod into the arch. "Cinch" it tight using the one-wing wingnut. This design would let you easily adjust where the wingnut's wing stops so it's out of the way of moving parts. Screw the rod in a little further/less so the wing-lever stops in an optimum position (neither lever in the way of anything).
HINT: #8-32 threaded rod is a little too thin (like #10-24 is a little too thick). But, it works well enough to use for prototypes. It will thread and tighten (but the threads aren't as substantial). It's much easier to cut threads compared to #10-24. You just have to be careful to not cross-thread when starting to screw it into the arch. Don't overtighten. (It's a loose fit, but it works well enough to experiment with.). When you find something that works, spend more time making it with #10-24 threaded rod.
Note: #8 "bar stock" (plain rod, not threaded) might work better. I haven't tried it. #10 bar stock is too substantial to cut these threads onto. (The 10-24 threaded rod has some material removed, which makes it easier to cut new threads onto.). I assume #8 bar stock has more material than 8-32 treaded rod. But, 8-32 threaded rod would still be good for fast "proof of concept." The resulting threads work good enough for that. You can cut them much faster to try something first.
Fingerguards
The machine comes with a 74 x 59mm fingerguard (#135-48300). There's a smaller 64 x 56.5mm fingerguard (#135-33104. I found mine on eBay.). It better fits the smaller (20mm) bartack clamp.
Initially, I felt fingerguards were in the way. I removed mine. I re-installed them 2-3 months later after I was more acclimated. The work clamp's feet are a "guard" in a way (while in the up position). It's not completely unsafe to go without. But, you have to be more careful. When starting, you'll be uncoordinated with the foot pedal. (You can reduce the risk of accidentally starting the machine by changing memory switches K021 & 23.).
For leashes (box clamps), I haven't tried the fingerguards yet. I believe those rectangular guards will work with the square clamps. Positioning the leash doesn't involve putting your fingers as close to the needle as the collars.
If you use one arch (change clamps), then you may need to change the fingerguard with the clamps (if you want to use the smaller fingerguard, or remove it for the box clamps). Remember, those setscrews are tiny & hard to turn. Review how to loosen them the first time. After that's done once, they're easy.
Hint: the fingerguard can strike the needle when manually moving the arch to its furthest limit of travel. I.e., there will be times you need to move the arch for better access to something, like the faceplate screws. When the power is off, you can push the arch around within the full sewing field. If the fingerguard is installed low enough, it will go under the needle. But, you may want the fingerguard higher for larger collars (for the tri-glide to fit under). You should develop a habit of pushing the arch using both hands. Opposing force gives you some braking control. When the arch starts moving it has some inertia to keep moving. Using one hand, you can't get it close to the needle without hitting it (if it's going to hit it. Even if you know it won't, it's better to develope the two-handed habit.).
Making collars
The machine comes with 50 "standard" patterns (shown in the brochure). I use those for collars. The following are the details I use:
| Webbing | Pattern Key | Std Pattern | Stitches | Scale % | Speed | Thread tension | |
|---|---|---|---|---|---|---|---|
| x | y | ||||||
| 3/8" | P1 | 12 | 28 | 92 | 80, 90 & 105* | 800 | 70-80 |
| 5/8" | P2 | 08 | 36 | 65 | 94 & 100† | 900 | 64-74 |
| 3/4" | P3 | 03 | 42 | 95 | 110 | 1100 | 65-80 |
| 1" | P4 | 09 | 56 | 79 | 92 | 1100 | 72-82 |
| 1-1/2" | P5 | 37 | 90 | 140 | 100 | 1100 | 75-87 |
The instruction manual (pg 27) explains how to register a standard pattern to a "pattern key." While doing that, you'll notice the menu option "standard pattern select." That lets you hide all the standard patterns you don't intend to use. That's useful, reduces unnecessary information/choices.
Thread tension
My exact thread tension probably won't work for you. The tension you use will depend on a few things:
The tack next to the melted ends requires a higher thread tension. (The heat changes the material's hardness?).
If your bobbin tension is higher, then your needle tension will be too (for "balanced" stitches - so the white thread doesn't pull through to the black side).
Note: if you have higher thread tension (because the bobbin tension is higher), it will be harder to rip the stitching (with a thread-ripping tool). When I started, I made a lot of mistakes (forgetting the D-ring, etc.). A looser thread tension is easier to rip. I set my bobbin tension lower (which necessitated a lower needle tension for balanced stitches). After a few months I made fewer mistakes. I increased the bobbin tension (which necessitated higher needle tension). I think that works better now. I had some bobbin-feeding problems when I had lower tension. I think I get better cut thread now too. (It's hard to say. I changed a couple other things at the same time. Be aware that there may be a "too low" tension.).
Each webbing (width, thickness) requires its own thread tension. There may even be variations between rolls (batches) of the same product.
For any buckle-end tacks: if I run out of bobbin thread, I increase the tension 20% when I sew over that partial tack. Sewing over a partial tack can cause the white thread to pull through to the visible side. More tension reduces that. (You may still need to use a Sharpie pen to blacken any white thread so it doesn't show).
The same can happen with the tri-glide end (if I run out of bobbin thread sewing those tacks). But, it doesn't show (that side faces the dog).
When you start using the machine, you'll make one collar at a time. At some point, you should shift to sewing all the tri-glide tack(s) first. Then install all the loops & male buckles. Then, sew all the buckle ends (the tack nearest all the buckle first; then all the melted ends. Finally both sides of the D-ring at the same time.). That goes faster than making one at a time. You won't change the tension as often.
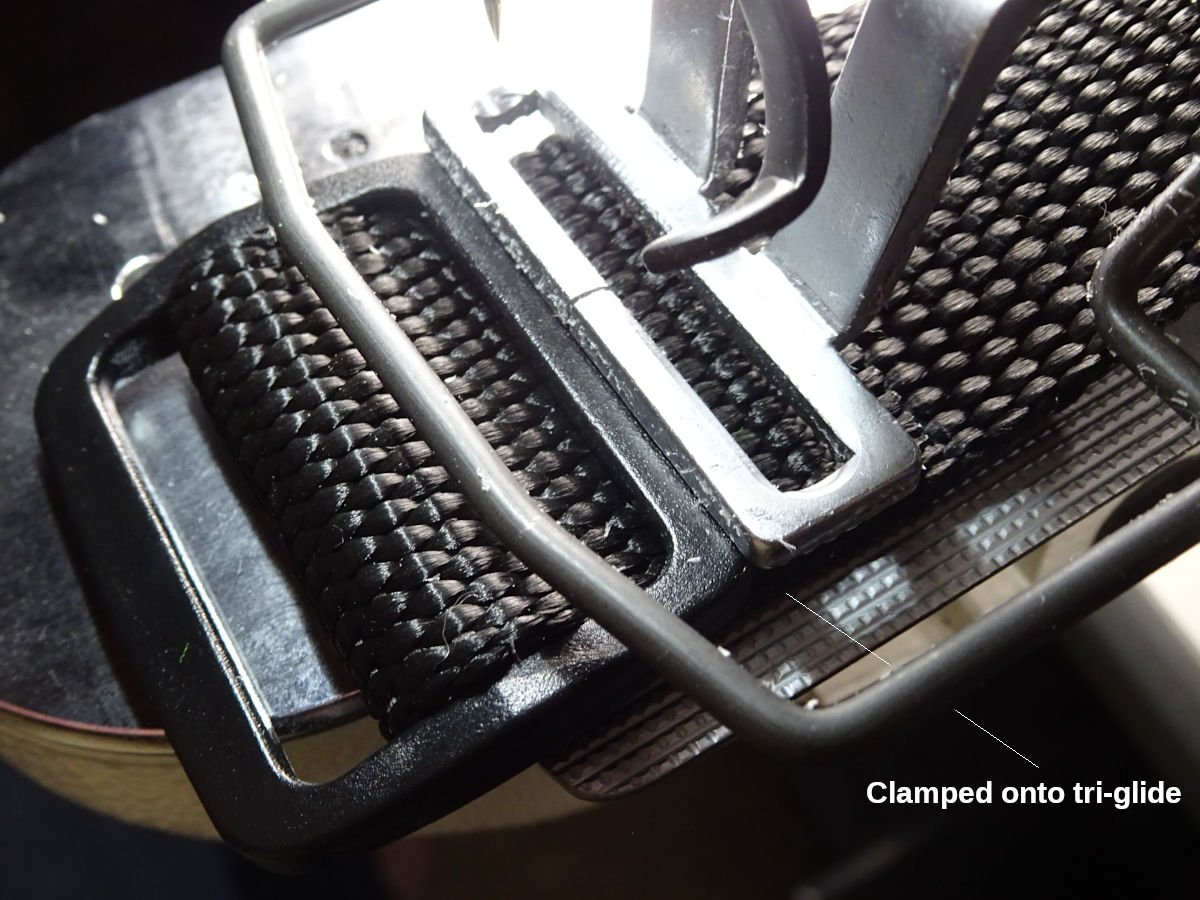
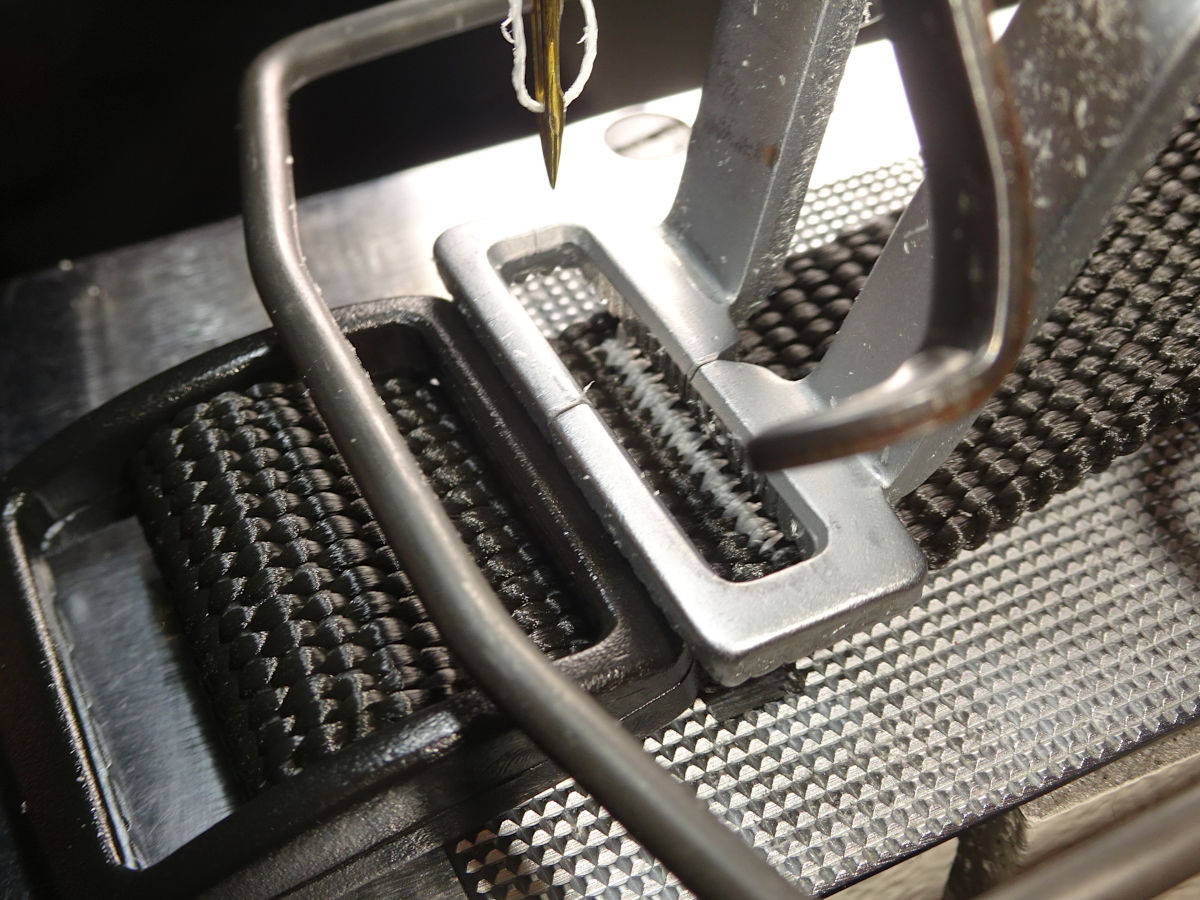
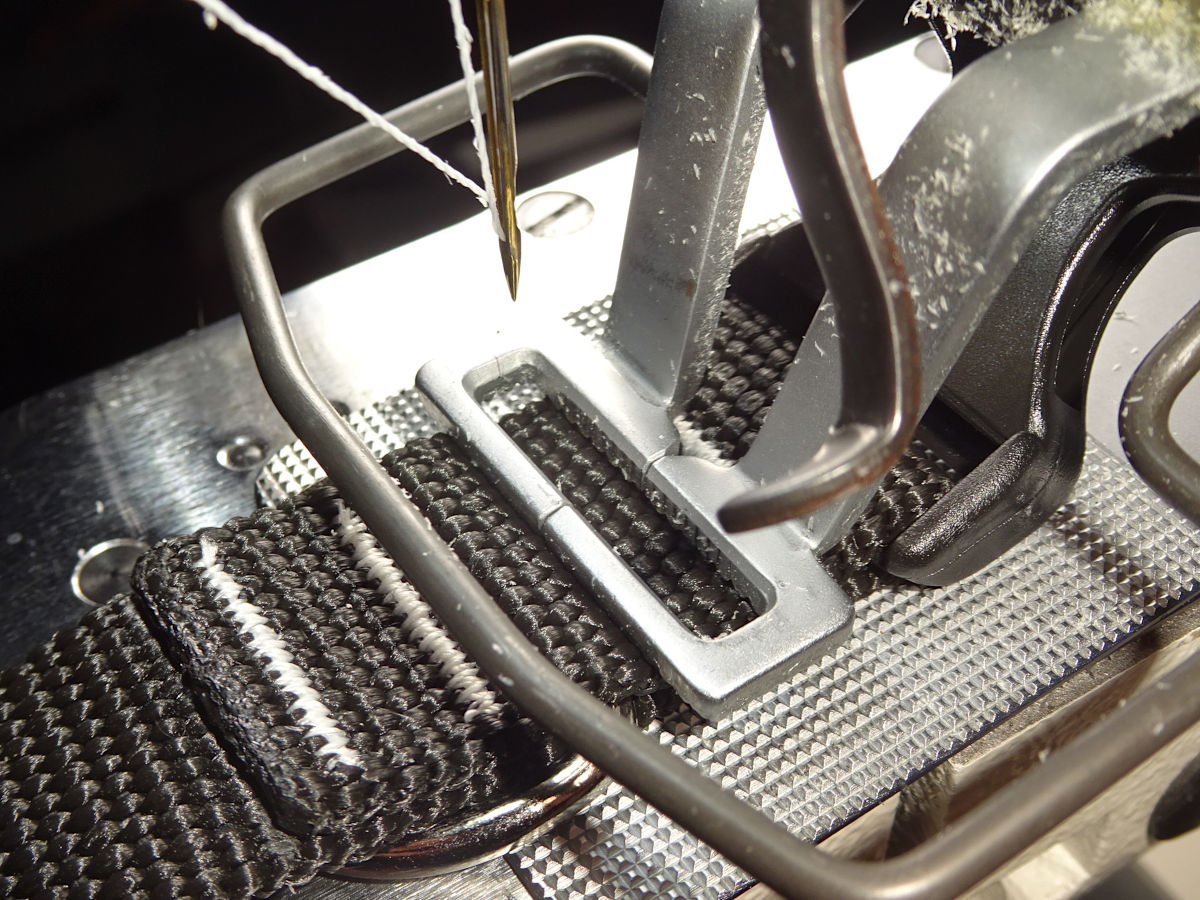
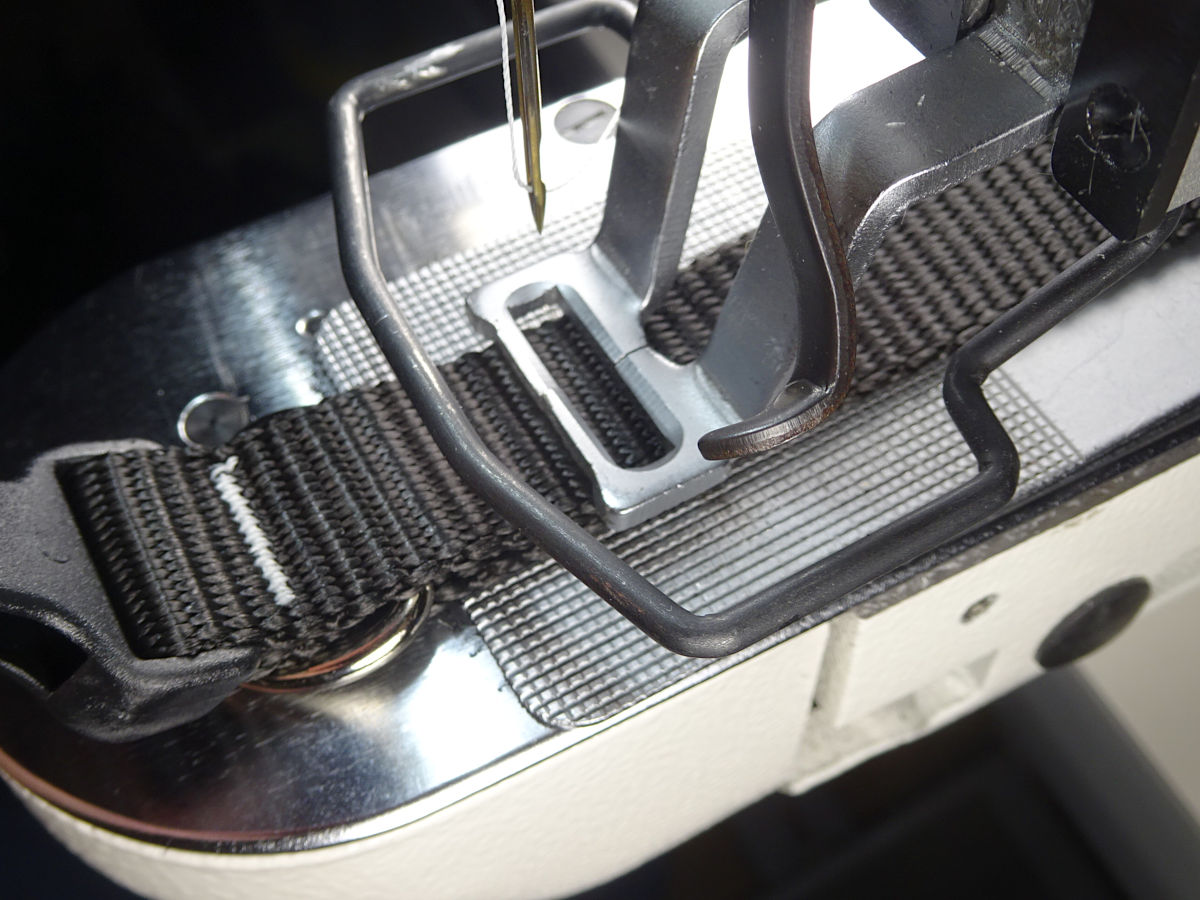
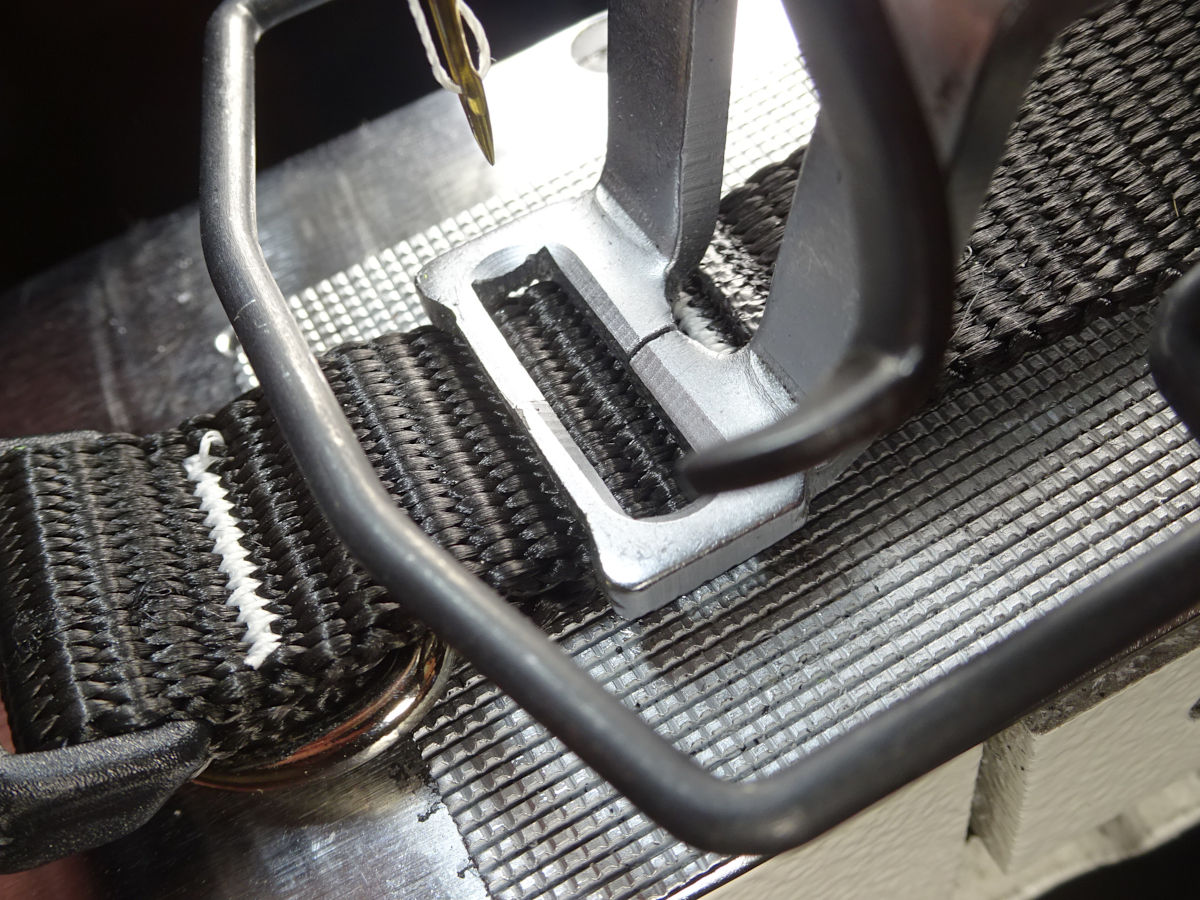
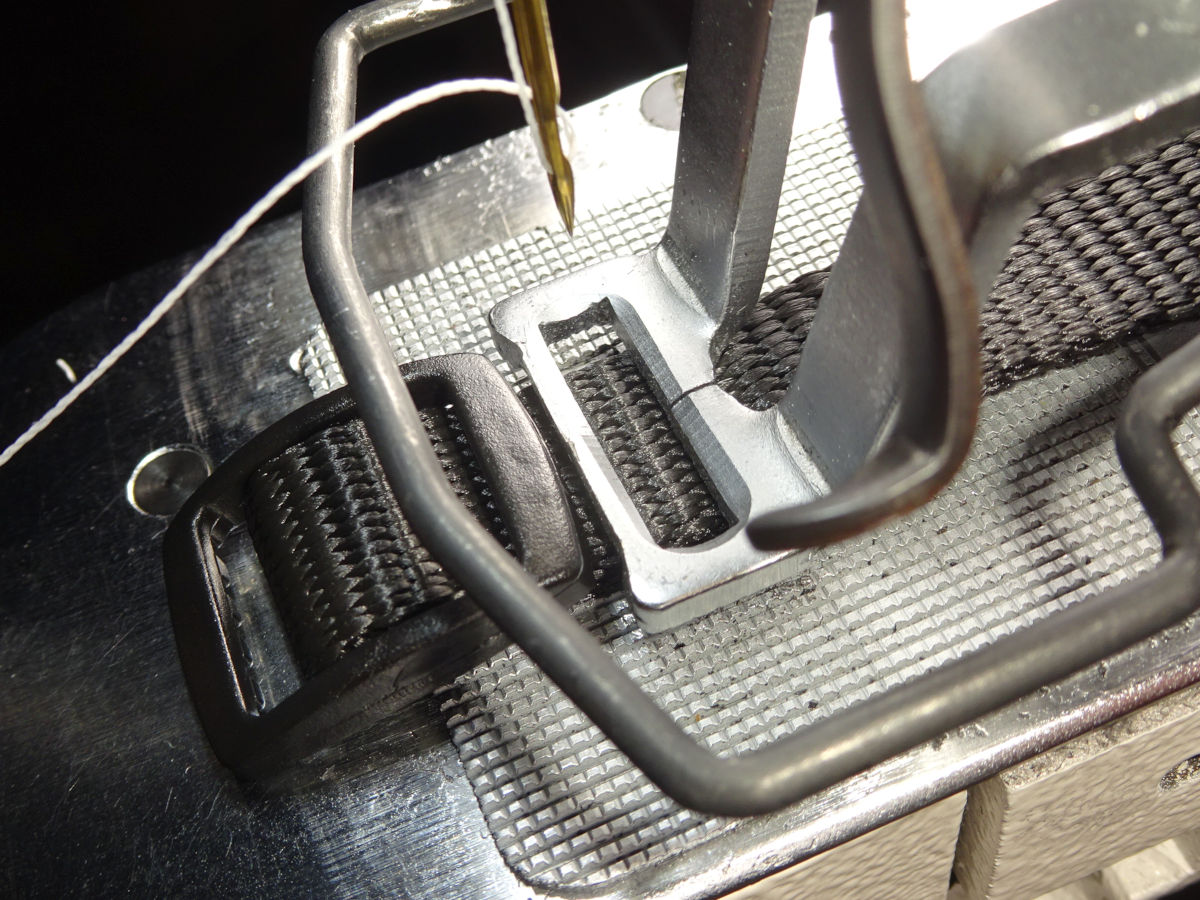
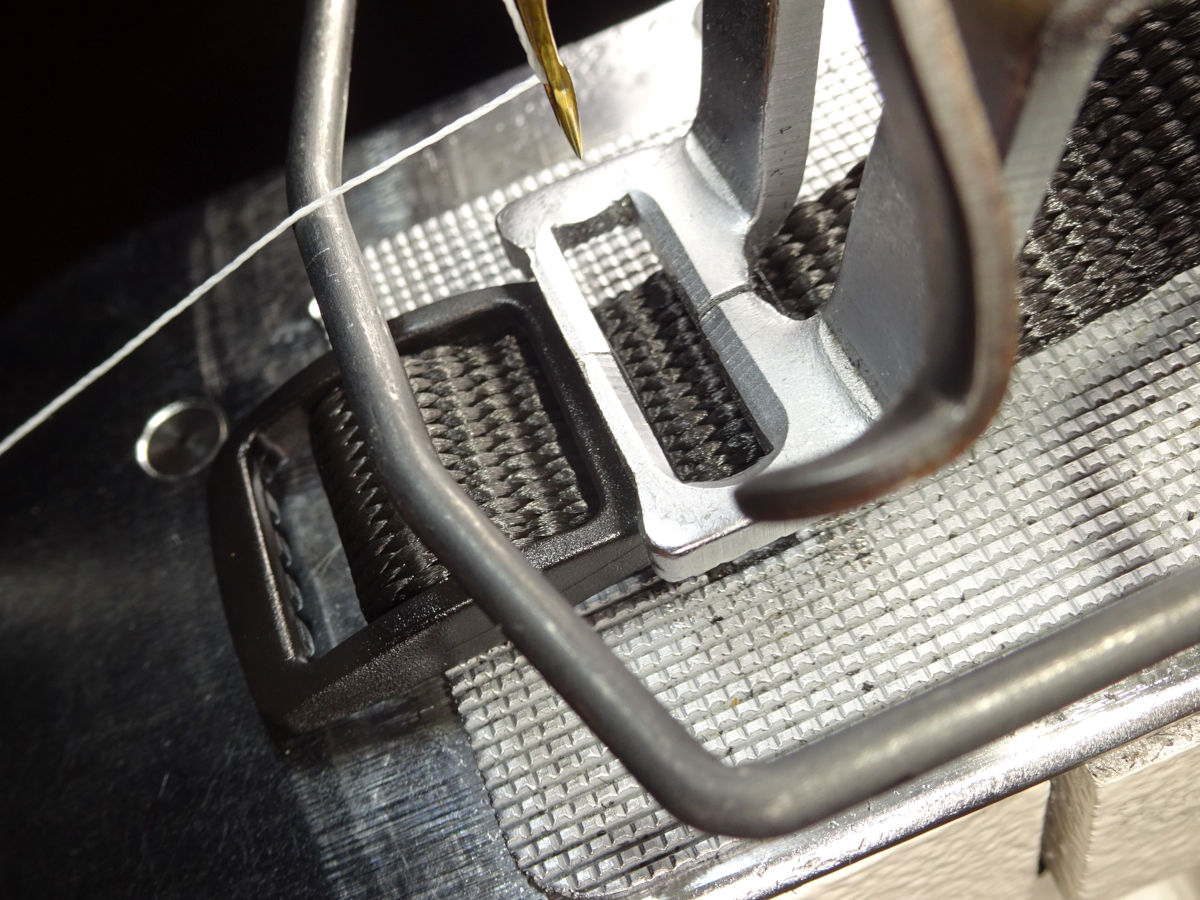
Clamping onto the tri-glide
For the bartack closest to the tri-glide: you'll see that I drop the clamp onto the tri-glide. You shouldn't start this way. Add 1/4" to the cut length (give that to the tri-glide overlap). Then just sew with the clamp on the webbing. Your finished collar's adjustable range will be a little less. But, much easier to sew.
Clamping onto the tri-glide caused me a lot of trouble (for a long time). I still do it because I found a technique.[6] You might want to try it eventually, but it's not worth the trouble when learning to use the machine.
The following sections show what the different sizes of collars look like (with their clamps). I discuss more topics along the way:
1-1/2"

Material moves under clamp
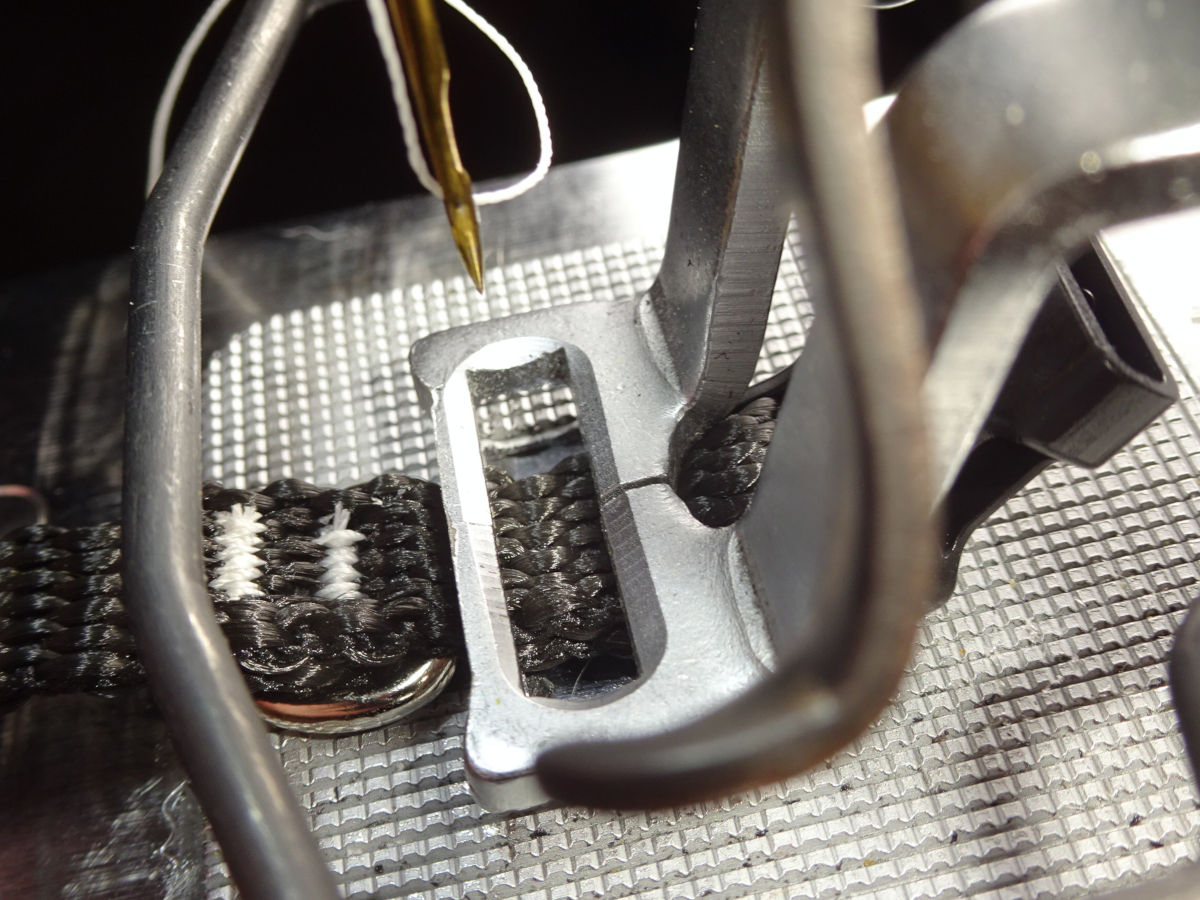
This topic applies the most to the 1-1/2" collar due to its weight. What I found is that pinning the webbing against the feedplate screw solves the problem. I provided more info about this technique in the footnote to clamping onto the tri-glide. It makes the webbing rigidly part of the moving feedplate & arch. I don't have to do it with everything. It helps with the larger & stiffer collars.
For smaller collars, I might push down on the plate (not the screw). They don't need as much help (they don't vibrate as much). Or, I might suspend the webbing lightly in my hand, trying not to add any tension or drag to what's under the clamp.
The last tack requires the webbing point towards you. Just lightly suspend that, giving it a lot of slack so the clamp can move around without the material resisting. You can do the same thing when the material points to the rear. But, for some things it works better to hold it down tight on the plate - even better against the screw.).
Other factors:
I mentioned in the clamp-fitment section that the clamp's I bought were a little "toe-up". I wouldn't have noticed if I didn't have some slippage causing me to examine everything more closely. I removed the feet from the arch, put them in a vise (using wood not to mar the feet) & tapped with a hammer (very little) to change the angle. Go slow, put them back in the arch and check. It's tedious. But, I think this helped. (You can tap the "shin" or the "thigh" of the clamp. The shin makes the foot go back when becoming level. The thigh causes the foot to go down as part of becoming level. A little of both may be best.).
The zig-zag width (y-scale) of the bartack can make it worse (more front/back movement). Also, stitch speed can "resonate" with (amplify) the machine's movement. A slower or faster speed can help. For the larger collars, letting the end of the collar hang off the table can amplify the vibration. It helps to lay the end on the table.
When sewing the buckle end, it's possible to clamp too high up against the buckle (or on the D-ring). When sewing starts, it will slip down (revealing the straight basting stitches which should be covered by the zig-zag). Wag the webbing side-to-side a little to let the clamp settle if it needs to. If you want the clamp to ride higher, locking the webbing against the feedplate screw can prevent it from slipping in that direction.
That last point (clamping too close to the buckle or ring) caused me to grind some of the front off the 3/4" clamp (shown below) so I can clamp closer to the buckle & ring. I'm tempted to do that with this 1-1/2" clamp (and 1" too). It could be better. The clamps I bought were inexpensive. It wouldn't be risky to try. (I wouldn't do this with the 1" clamp the machine comes with. Original Juki parts are expensive. I'd buy an aftermarket 1" clamp to experiment with.).
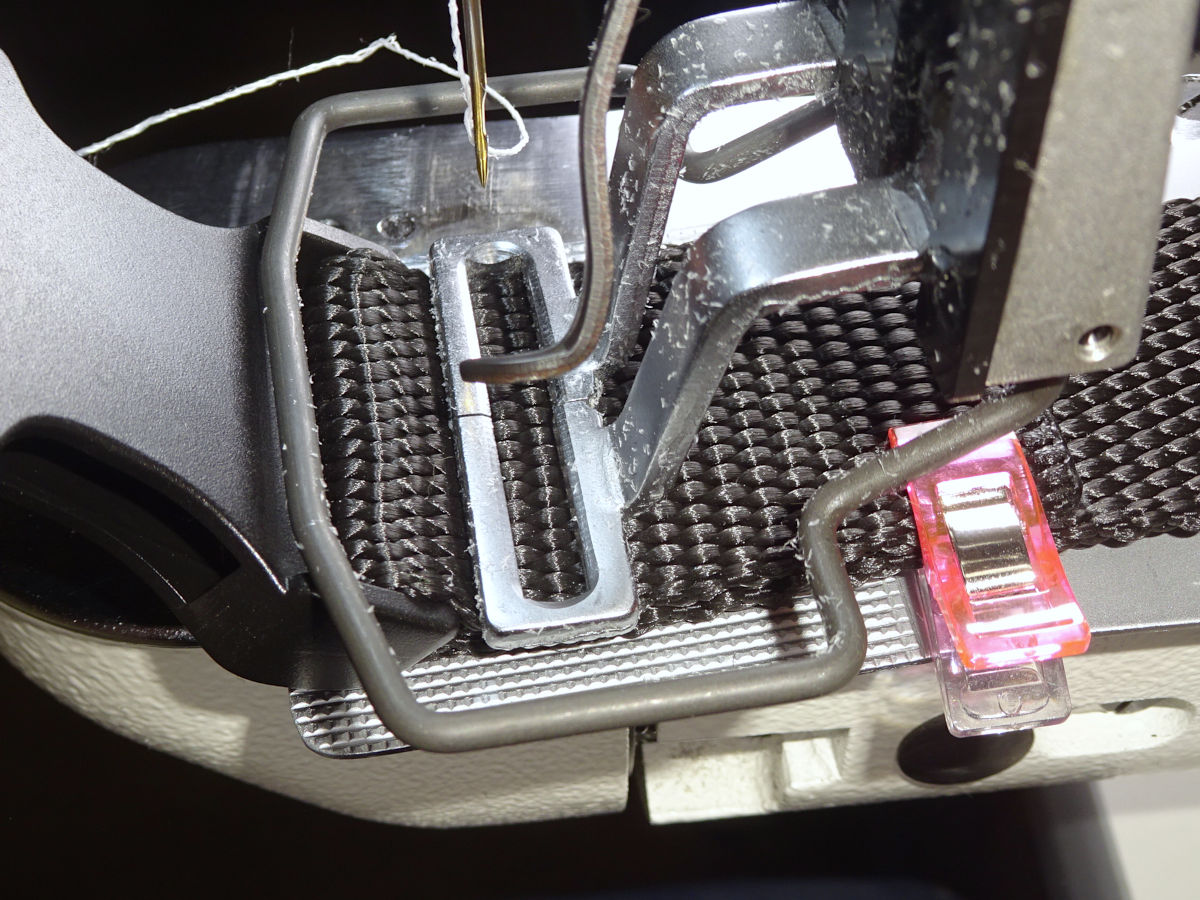
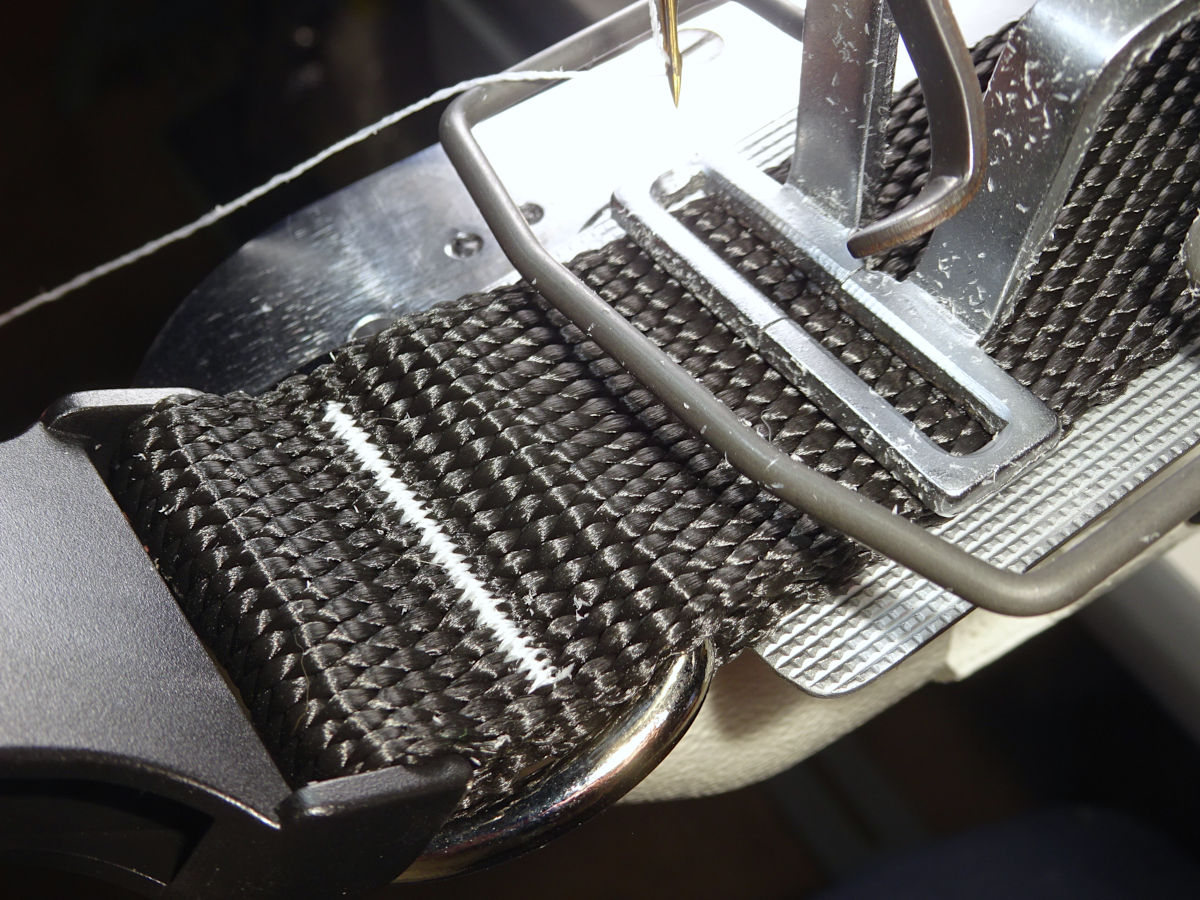
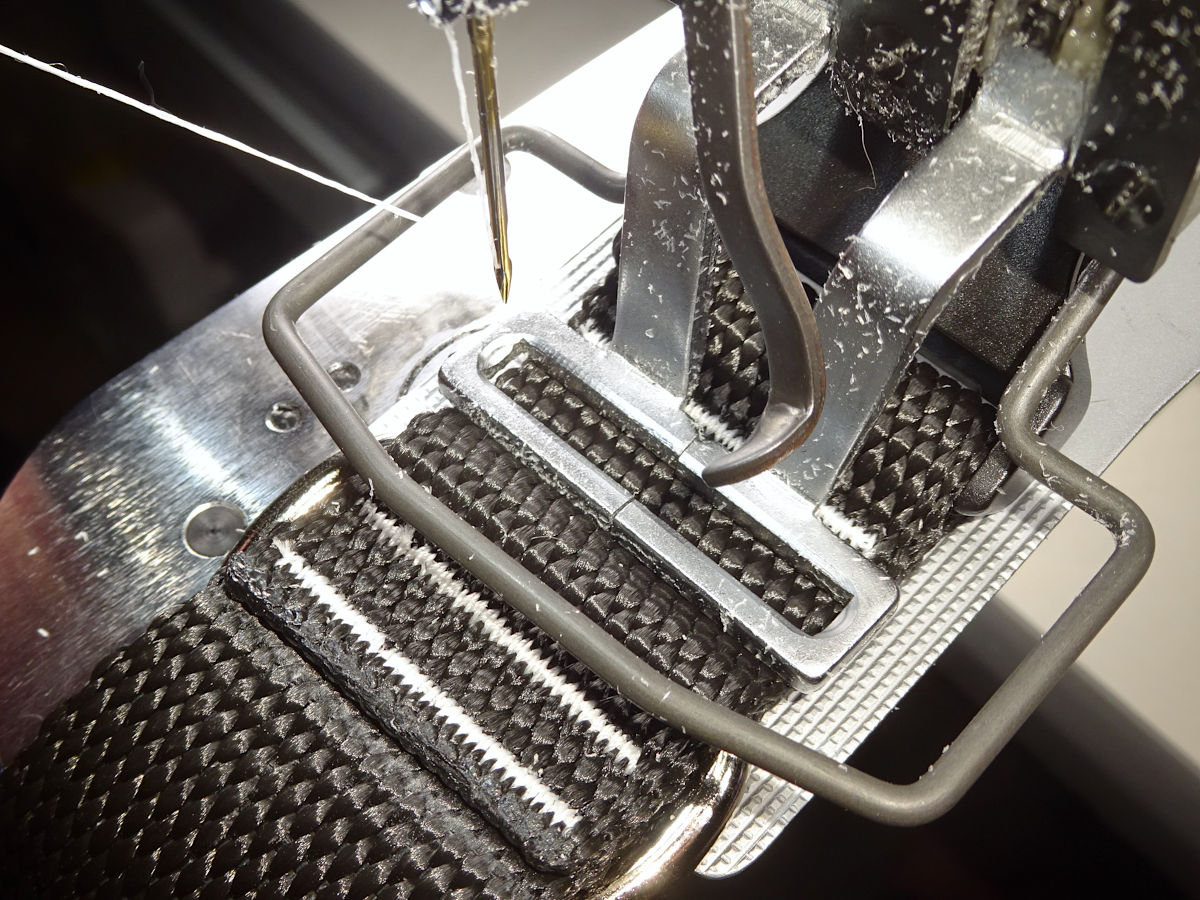
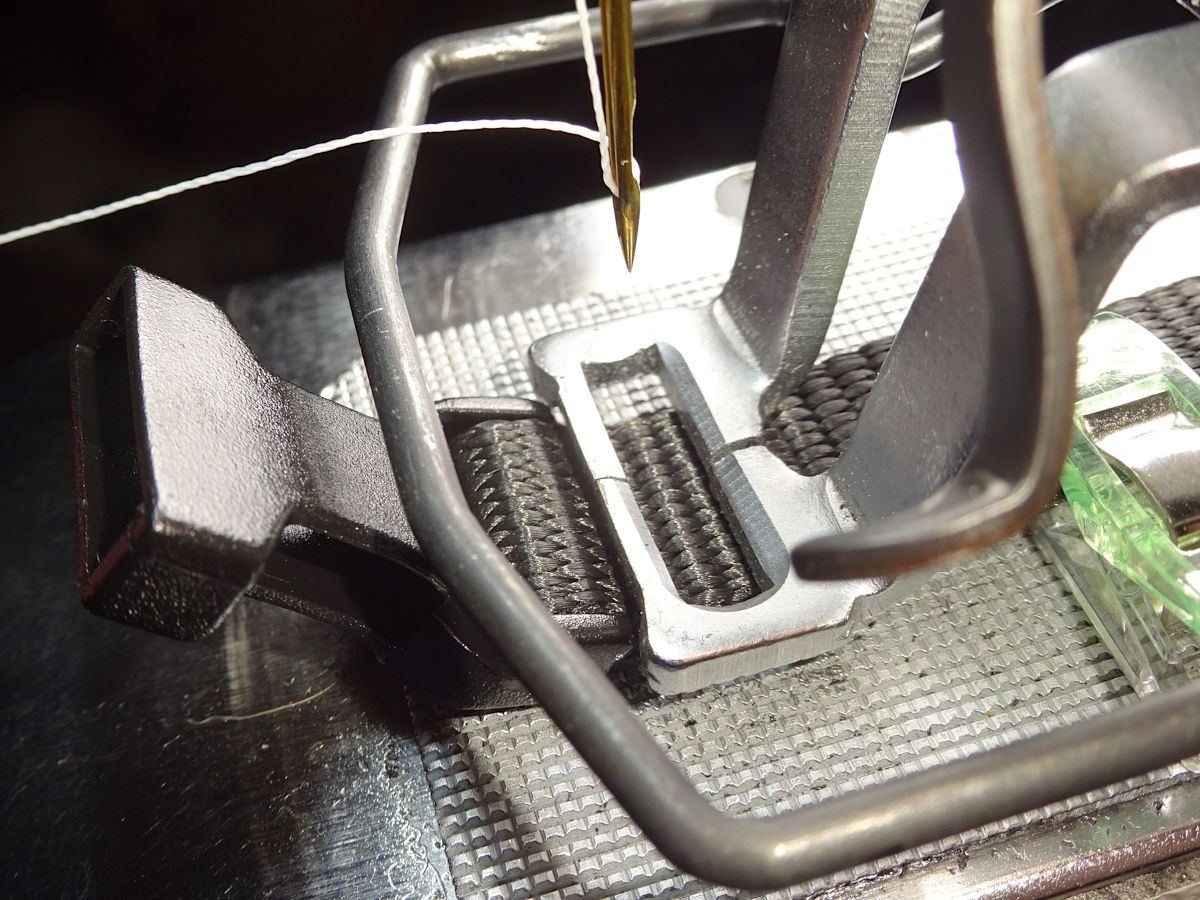
1"
This uses the clamp & plate the machine came with. The photos are in the order of operations: 1) Tack the tail of the tri-glide end. 2) Tack next to the triglide (I clamp onto the triglide itself. You can see the first tack through the opening because the foot is elevated. Remember: I urged you not to start this way.). 3) At the other end: tack closest to the buckle. Then, 4) the tail, 5) the tail-side of the D-ring, and 6) the other (buckle) side of the D-ring:

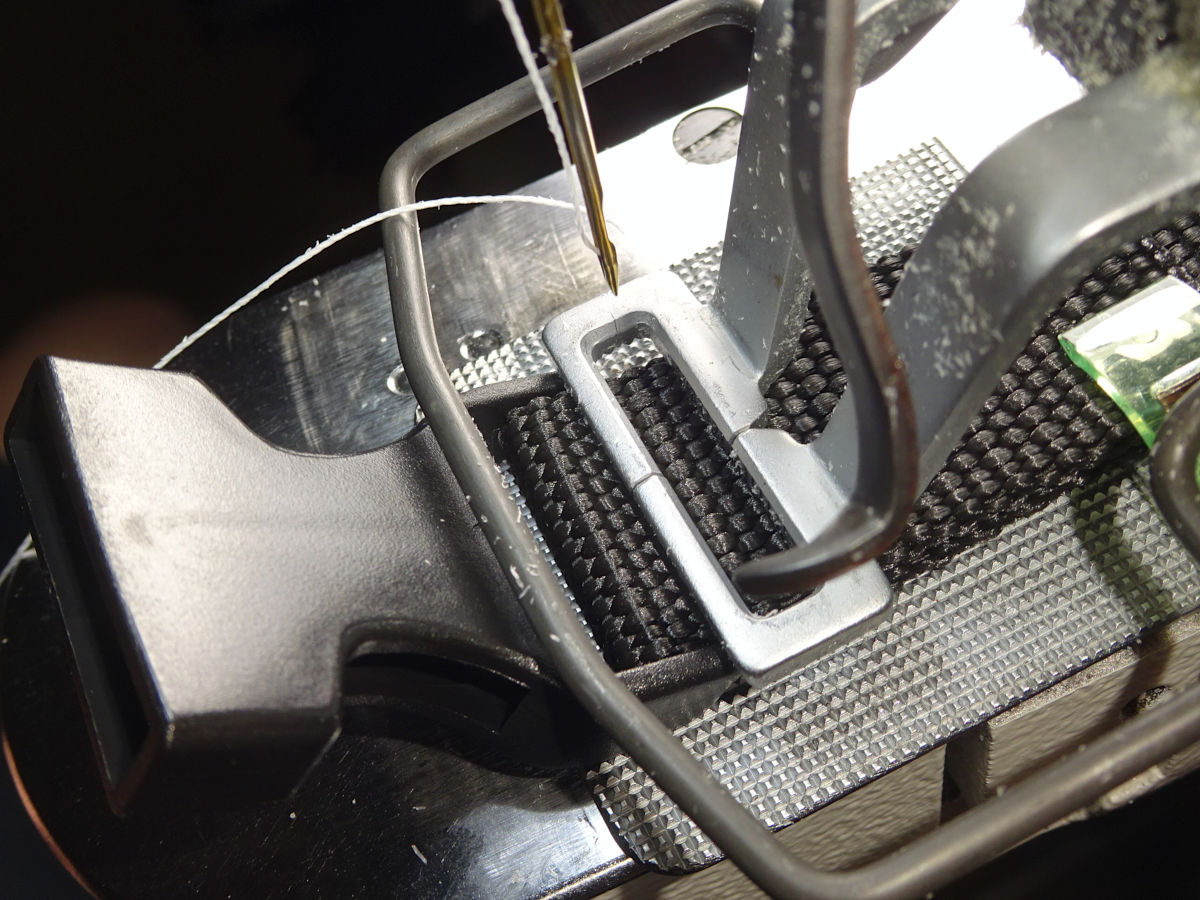
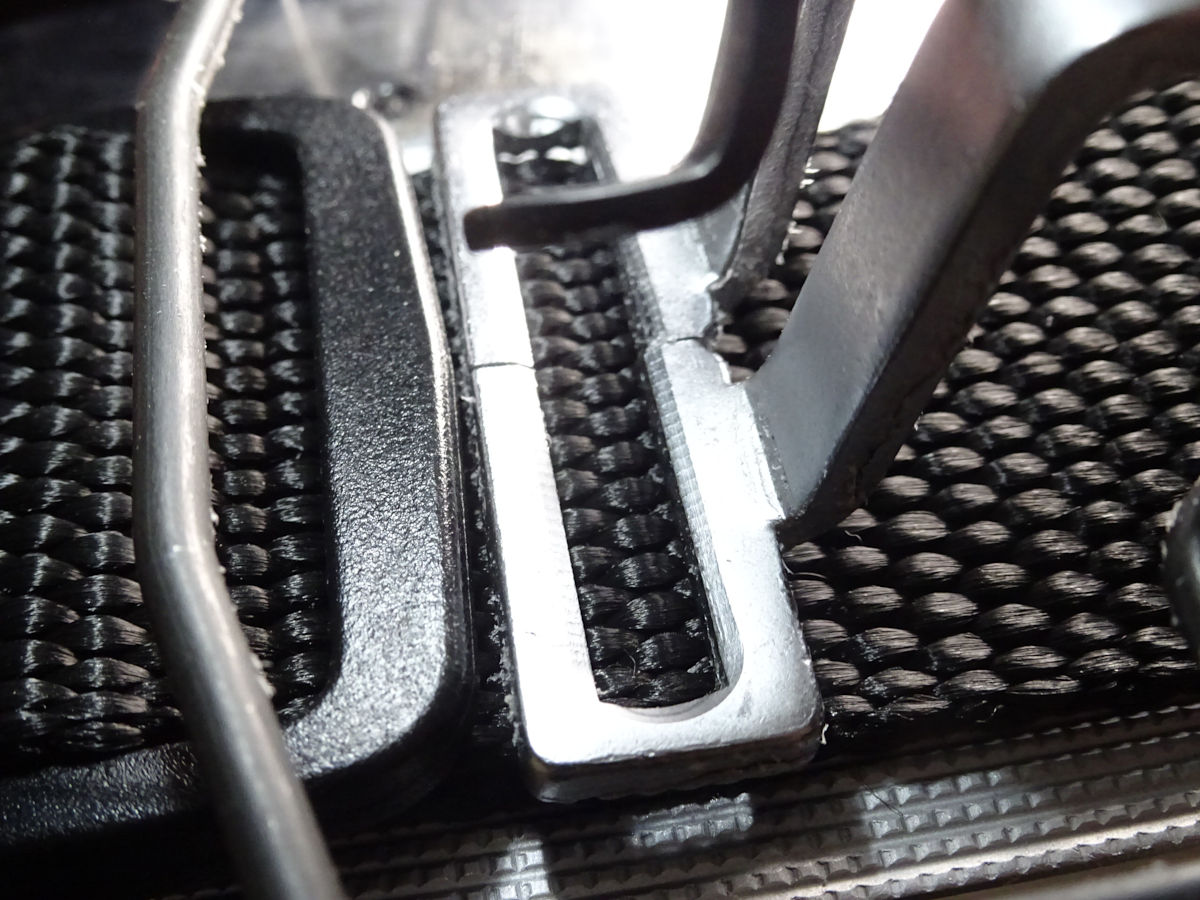
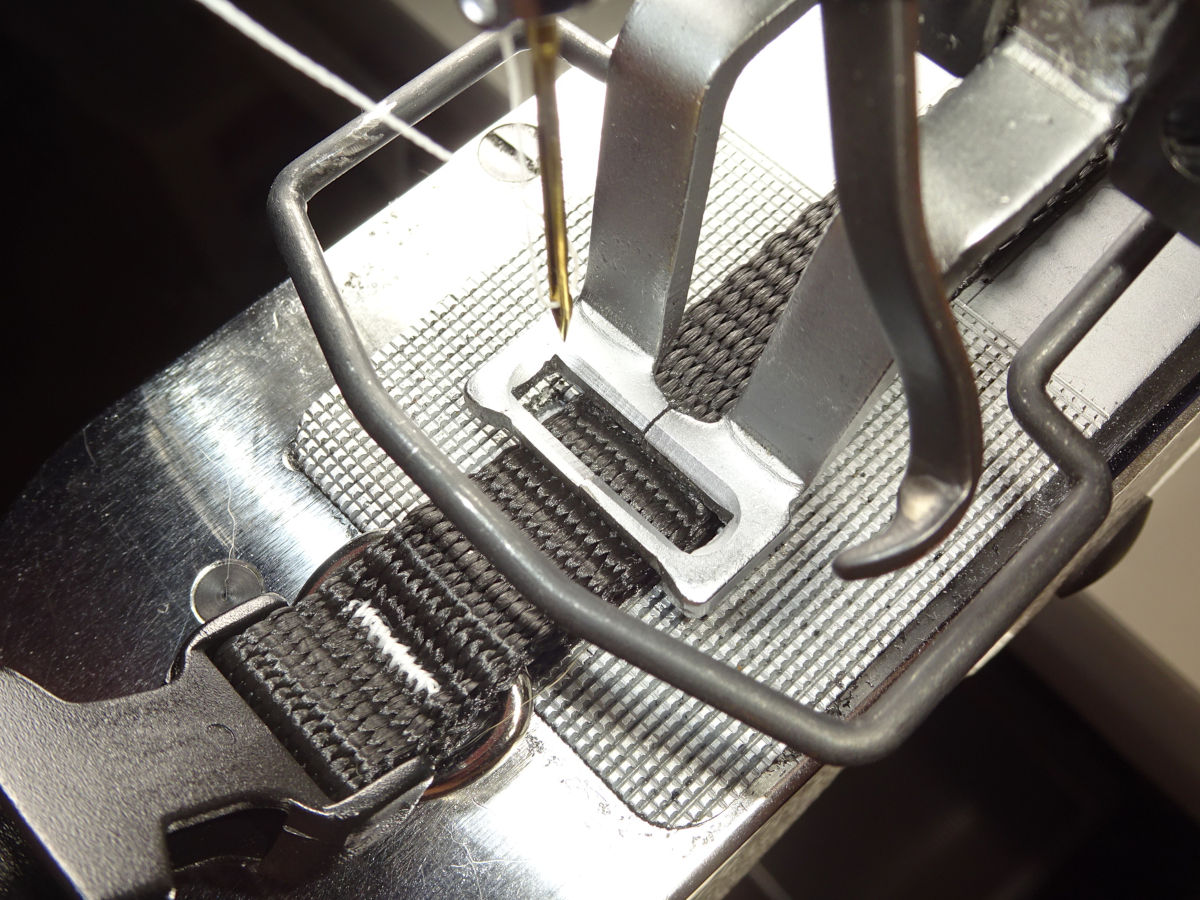
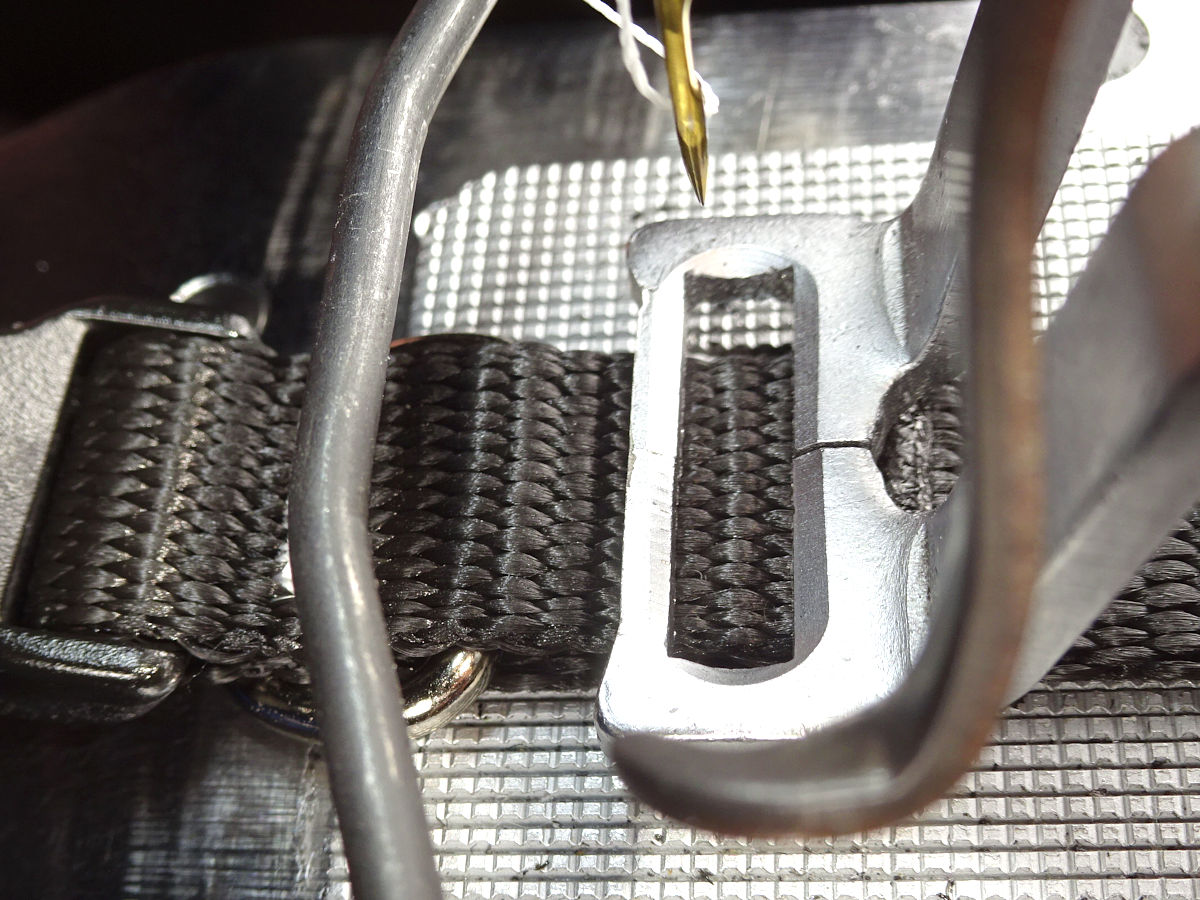
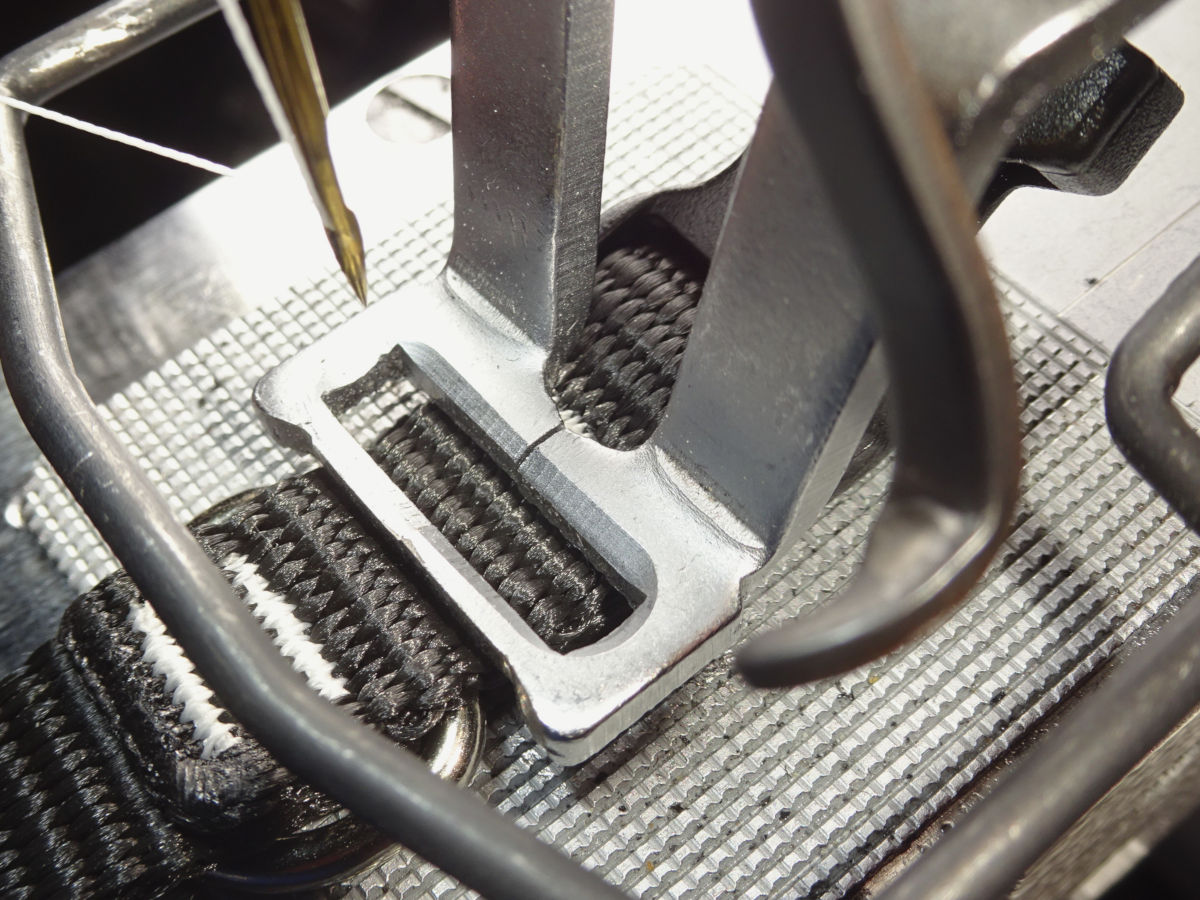
3/4"
Notice I ground off some of the front of the 20 x 4.8mm clamp I bought on eBay:
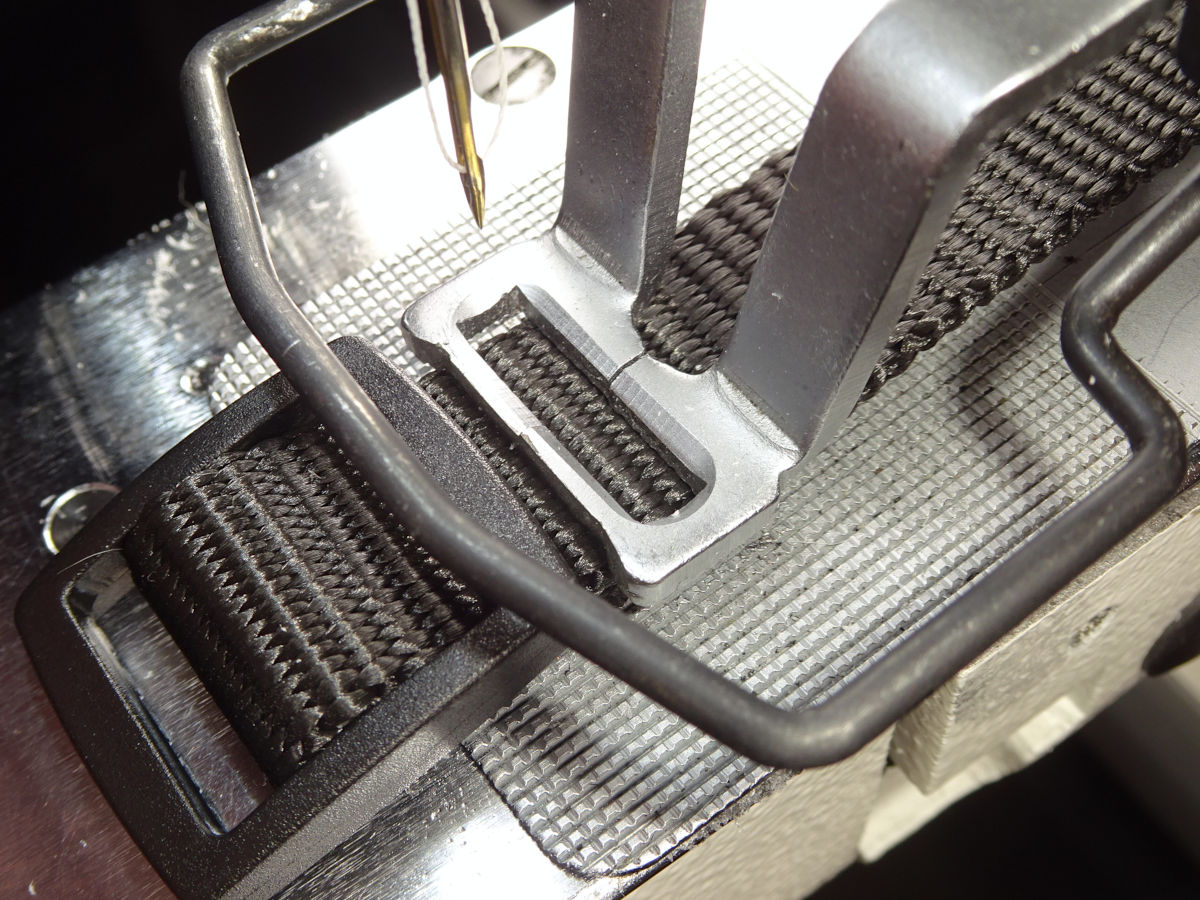
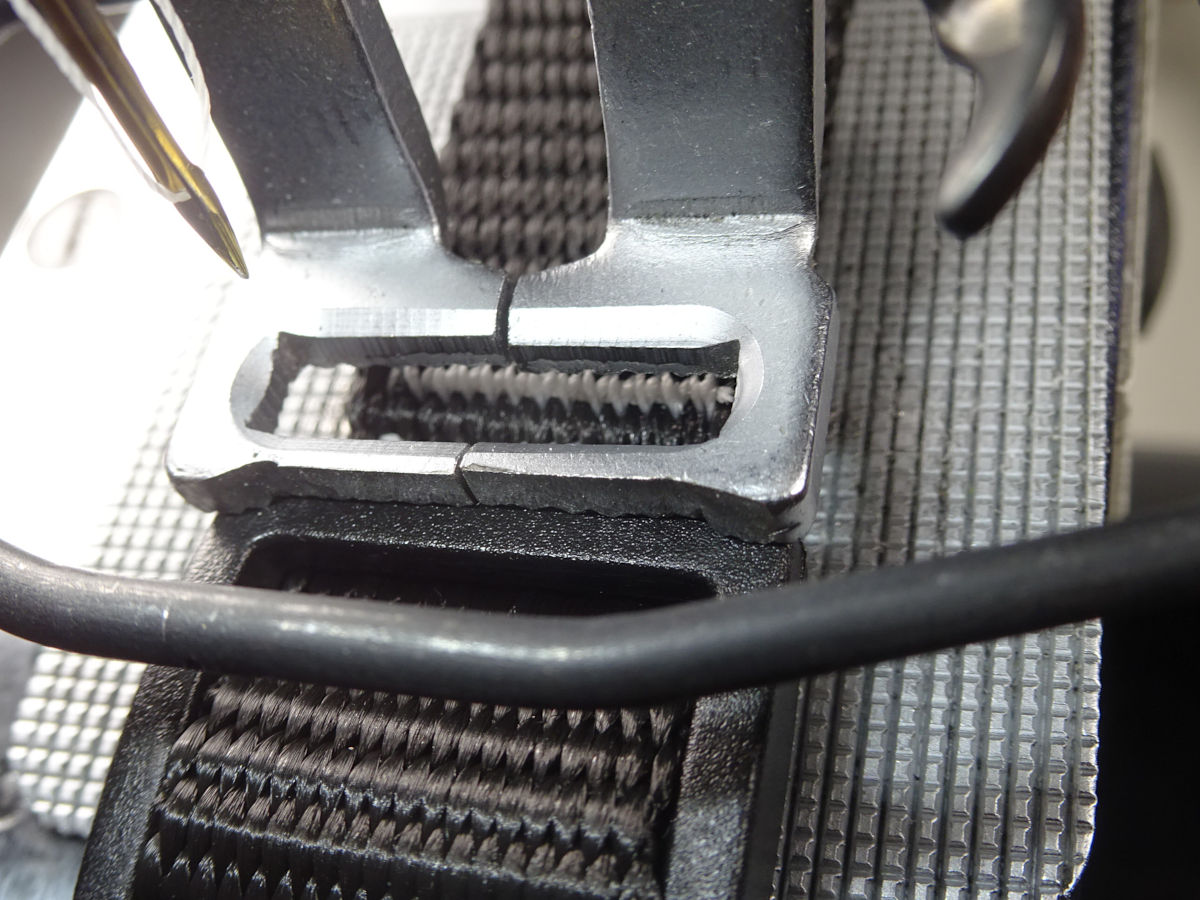

I used a dremel with a "cutting wheel" (lightly going back/forth against that surface, taking the material down to what you see. These wheels are made for cutting through things, not grinding. They're very delicate and break easily. You have to lightly drag the edge of the wheel along that surface. It goes slow. Be focused on getting a straight edge and not going too far.).
When I started, this was the clamp for the 5/8" & 3/8" collars (so I could get the stitching into a smaller space). But, I found that this clamp works better for the 3/4" too. Especially for photo #2 (clamping down onto the tri-glide - which I've already explained you shouldn't do.). The unaltered 20mm clamp didn't work well on top of the tri-glide. This one grips better.
If you ever try clamping down on the tri-glide, this collar is the last one I'd recommend (gave me the most trouble).
5/8"
The -Short collar has only one bartack at the tri-glide. Skip the first photo (which shows the -Long collar which gets two. The first one can be done clamped on the webbing.).
If you ever try clamping onto the tri-glide, this collar is the easiest. The -Long is easier than -Short because, with the -Short you have to clamp on the tri-glide to sew the first (tail-end) bartack. It's a little harder the get the overlap straight when the first tack is done clamped onto the tri-glide. You have to not only get it clamped on just so, but also get the overlap lined up with itself. That's easier to do with the -Long where you can clamp on the webbing to sew the tail first. Then. when you sew the 2nd tack clamped onto the tri-glide, you have less to deal with.
Short
I sew just one bartack at the -Short's tri-glide. I increase the zig-zag height (y-scale) to 100% compared to 94% for the Long's two tacks (and all the buckle-end tacks). Enlarging the zig-zag seems like a good idea (to use more of that space). But, don't forget that it could cause the needle to strike the feedplate. (Be sure to double-check how the pattern fits the feedplate's cutout. See instruction manual pg 21, "Checking the contour of a sewing pattern."). If you clamp onto the tri-glide the way I do: a larger zig-zag increases the chance of the needle striking the tri-glide. (Also, more travel can mean more vibration - which increases the risk of the tri-glide slipping under the clamp. It can slip & be struck by the needle. Or, the foot can slip entirely off the tri-glide.).
Note: My choice to start sewing 2 tacks at the tri-glide (starting at the 5/8"-Long) was completely arbitrary. I've mentioned elsewhere that two tacks is probably overkill even for the 1-1/2" collars. Almost no force reaches those stitches. (Think about how the webbing loops through the tri-glide like a pulley. There's much less force reaching those stitches compared to the D-ring's stitches (which are directly pulled against). Plus, the stitches aren't exposed to external abrasion (they're covered on top, and face the dog underneath.).
I like the security (redundancy) of two tacks starting here (5/8"-Long). The 3/4"-Short could be a good choice instead. At some point one tack seems cheap. It should be more than strong enough for even the 1-1/2" collar. I feel better making it stronger with redundancy. I feel ok with the 5/8"-Short not having that. The dogs that collar would fit can't pull that hard. I don't feel like redundancy's needed at that size. Then it's a question where to start?
3/8"
Both the -Long & -Short collars use just one bartack at the tri-glide (like the 5/8"-Short above):
I increase the zig-zag height (y-scale) to 105% for this stitch. My comments about the 5/8"-Short's single-tack tri-glide apply to this too (it seems better to grab more webbing material, use more of the available space. Check your needle position after scaling up, that it will clear the feedplate.).
If you ever try clamping down on the tri-glides, The 3/8" is easier like the 5/8"-Long is. But, as I mentioned with the 5/8"-Short: sewing just one tack makes it a little harder (because you also have to get the overlap aligned. It's more to deal with compared to sewing the tail first (by clamping onto it) and then only having to clamp onto the tri-glide for the 2nd tack (not having to align the webbing too).
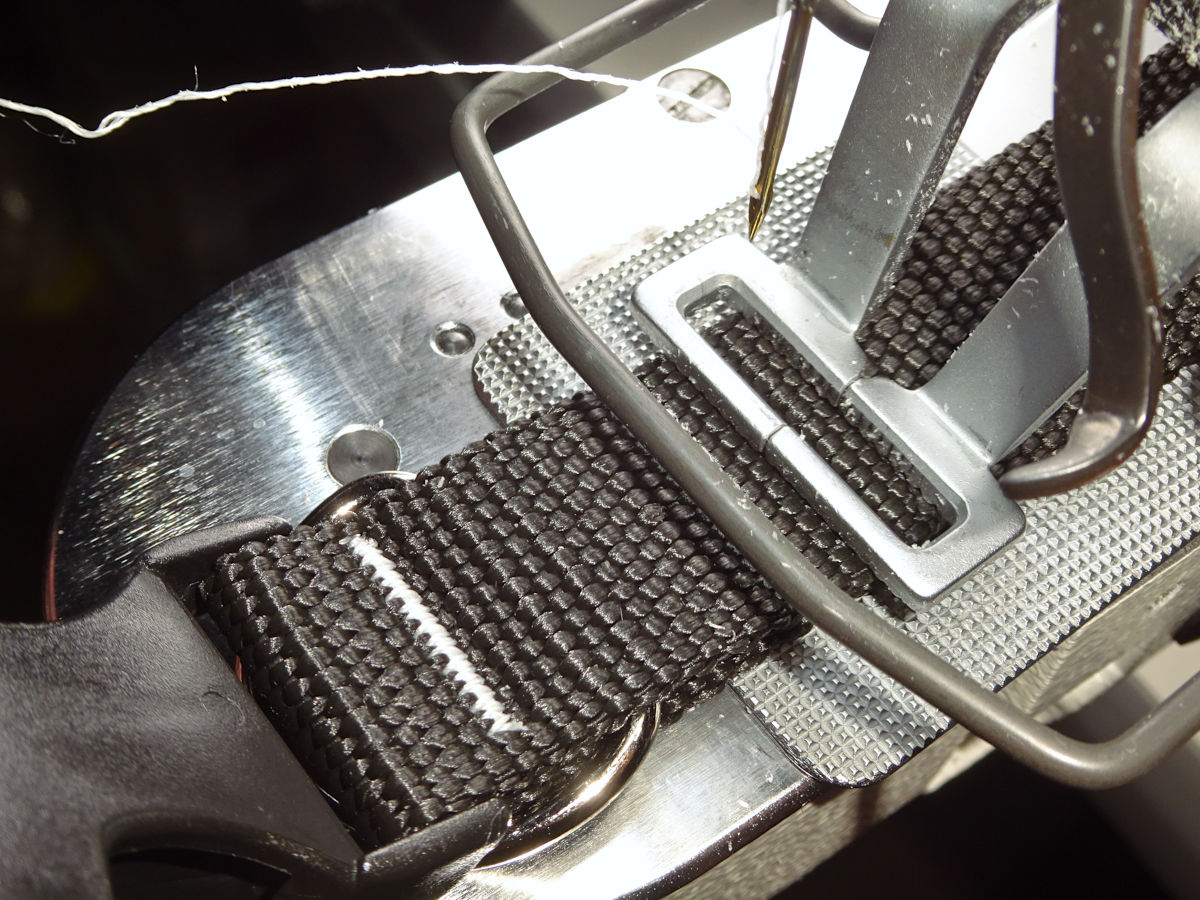
Long
The -Long collar has two bartacks each side of the ring (like the larger collars):
I use set the zig-zag (y-scale) to 80% for those.
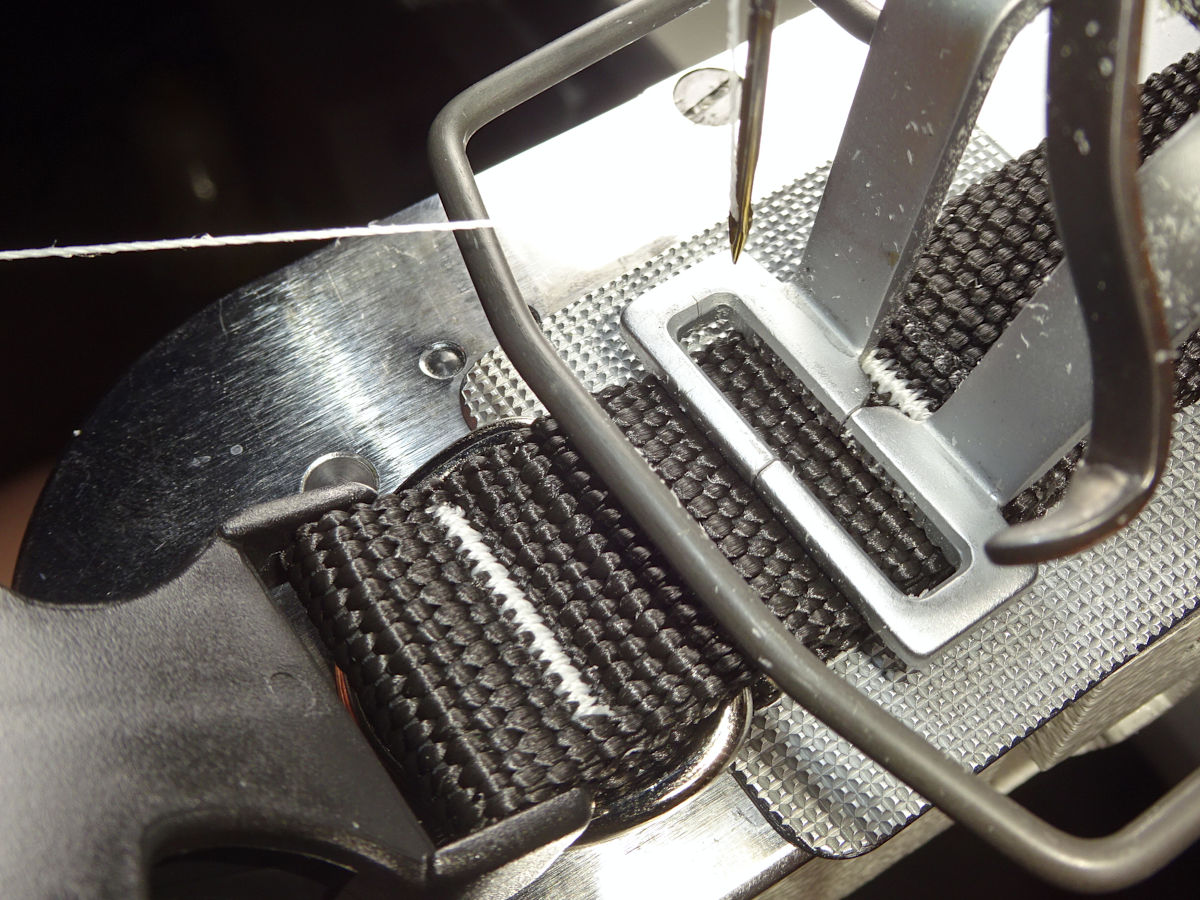
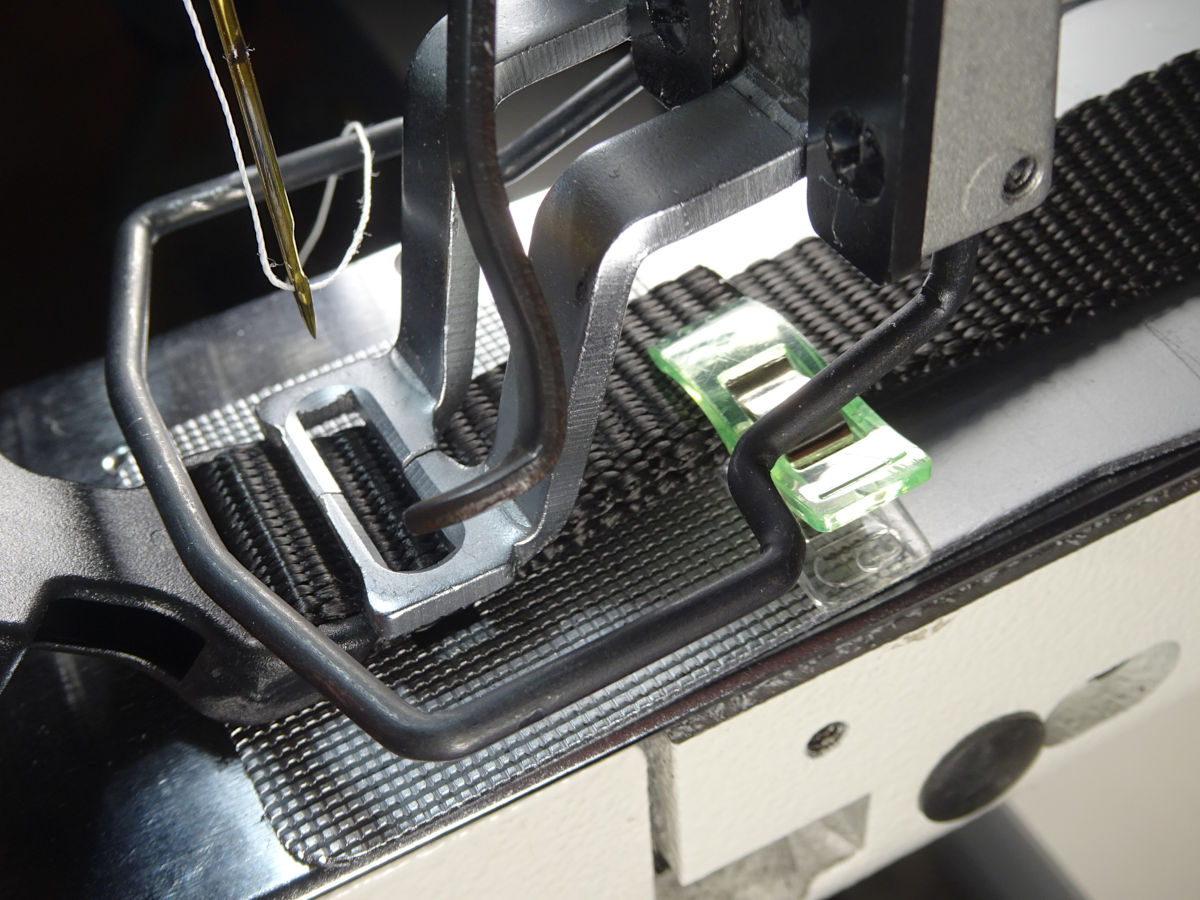
Short
The -Short collar uses just one bartack each side of the ring (at the buckle first, then the tail):

Like the single-tack tri-glide: I increase the zig-zag (y-scale) of this single-tack to 90% (compared to the -Long's two tacks each side of the ring).
Notice that I use a smaller clip to hold the tail (when sewing the first tack at the buckle). That's a very tight fit to get an ordinary plastic sewing clip into that space behind the work clamp. These clips are called "Mini Alligator Clips" (I bought Amazon ASIN: B0F2T9YJH6.). The ones I bought have a silicon mouth (insert) inside the metal clamp. Some of the other sellers seemed to show a photo of a clamp without that insert. I think the silicon grips better. (These might even work better than the common plastic clips. Those clips stress from repeated use, and break after some use. They're cheap; it doesn't matter.).
Making leashes
| Webbing | Pattern Key | User Pattern | Stitches | Scale % | Speed | Thread tension | |
|---|---|---|---|---|---|---|---|
| x | y | ||||||
| 3/8" | P1* | (std pattern) 12 | 28 | 92 | 120 | 800 | 66 |
| 5/8" | P7 (P1+P3) | 153 | 67 | 77 | 78 | 900 | 54 |
| 3/4" | P8 (P1+P4) | 154 | 84 | 78 | 79 | 900 | 51 |
| 1" | P9 (P1+P5) | 155 | 110 | 79 | 82 | 1100 | 66 |
Box-x patterns
The machine doesn't come with any box-x patterns. This zip file contains the patterns I use. You can put them on a USB, then copy them into your control panel (the numbers 153-155 are the pattern numbers where mine are stored). The instruction manual (pgs 42 & 43) explains about how to do this. (Ask the seller of your machine to do this for you.).
The zip file contains patterns for sewing the webbing oriented horizontally or vertically (see the README file). When I started, I sewed horizontally. But, that's awkward because you have to crane your head to the left to see the webbing's alignment & centering. I changed to vertically. It's much easier to align & center. (I think horizontal would be better if you had a custom work clamp/plate, and could slide the webbing into position, didn't have to look at it. If you have to look at it, vertical is better.).
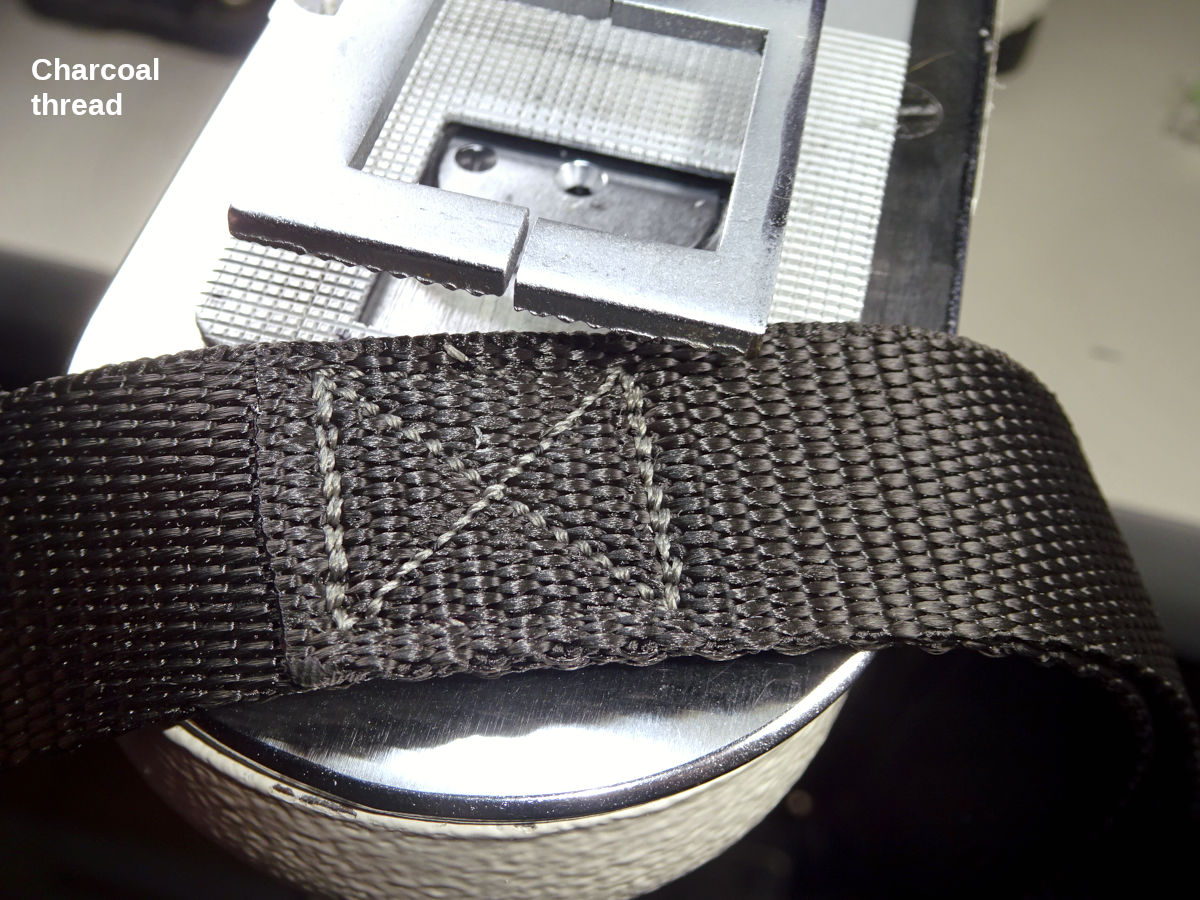
The collar's thread-tension topics apply here too. The only difference is that I use gray & charcoal thread instead of white. If the thread isn't balanced, it's not as visible as the collar's white thread.
The only risk to the material moving (as it can when making collars) is if I clamp so close to the bolt-snap that the clamp's actually riding high, and will settle down as the machine moves. (That can be a problem because of the way the tail is pinned so close to the stitches. The pin could be pulled into the sewing field, struck by the needle.).
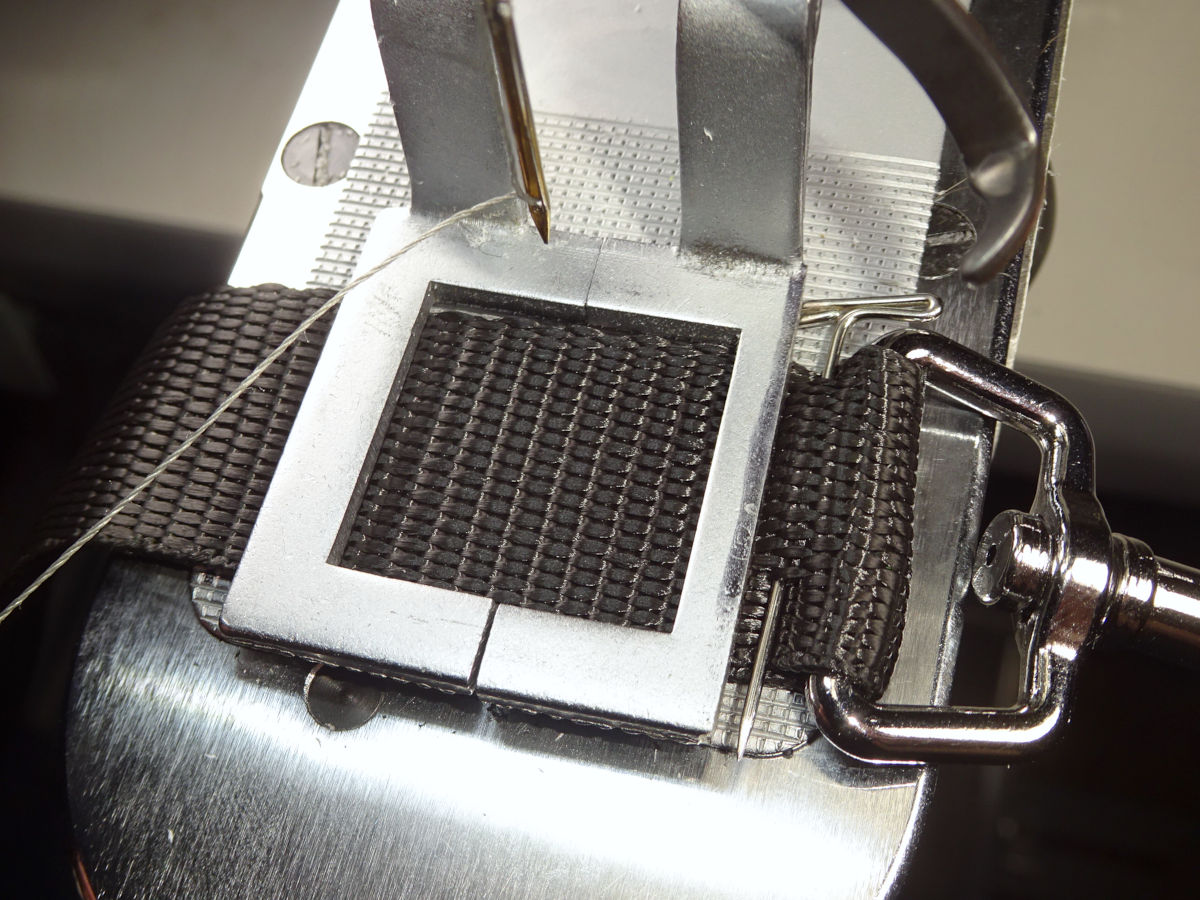
1"
The following shows the Heavy leash (ocher thread denoting a heavier snap. I also make a Regular version with charcoal thread like the other leashes):
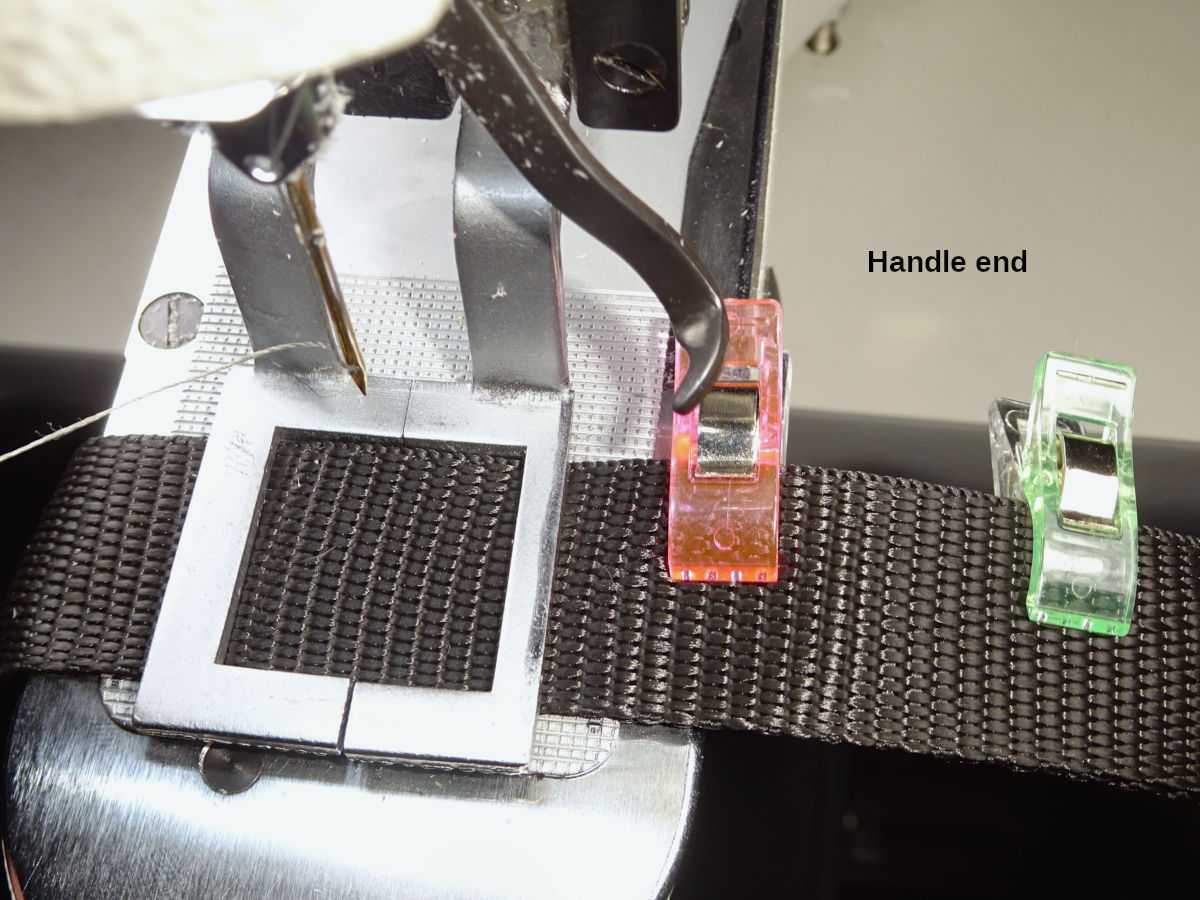

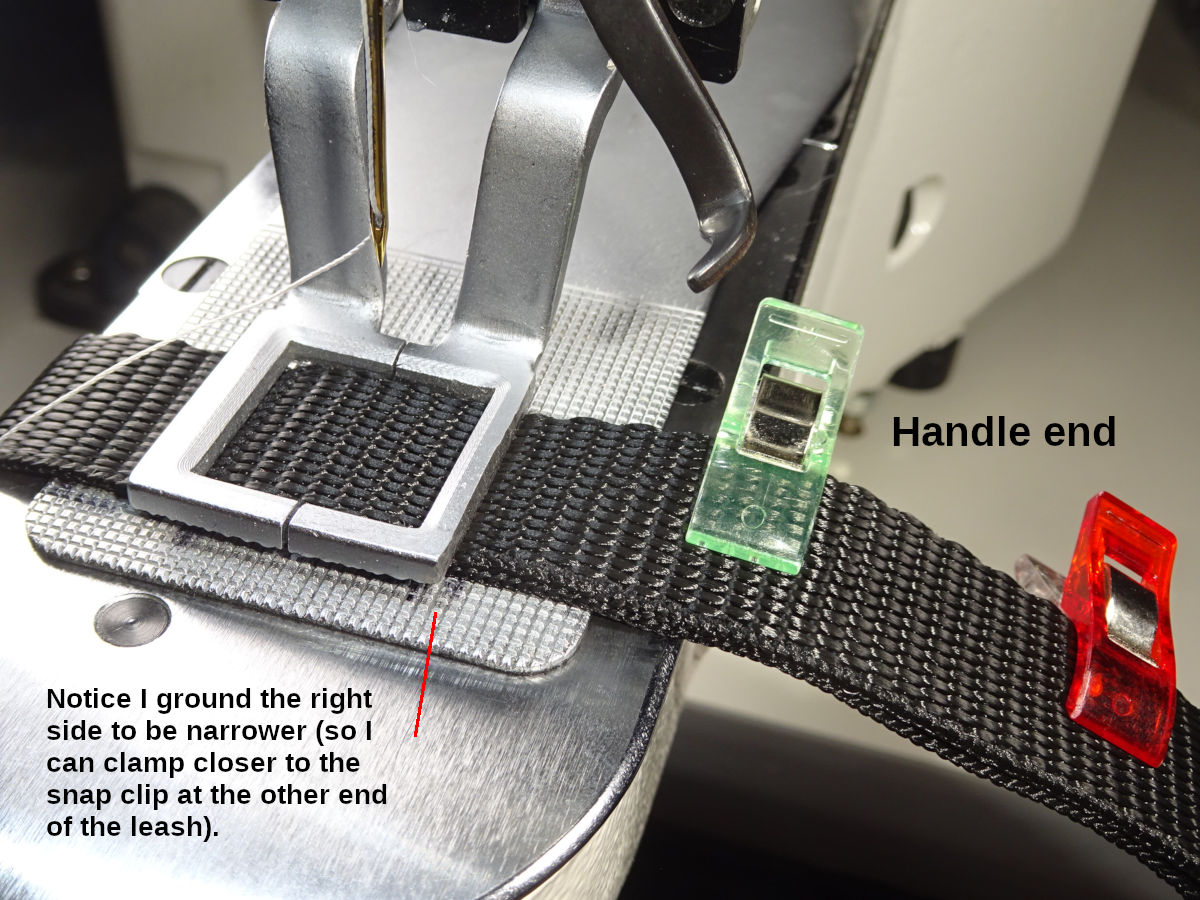
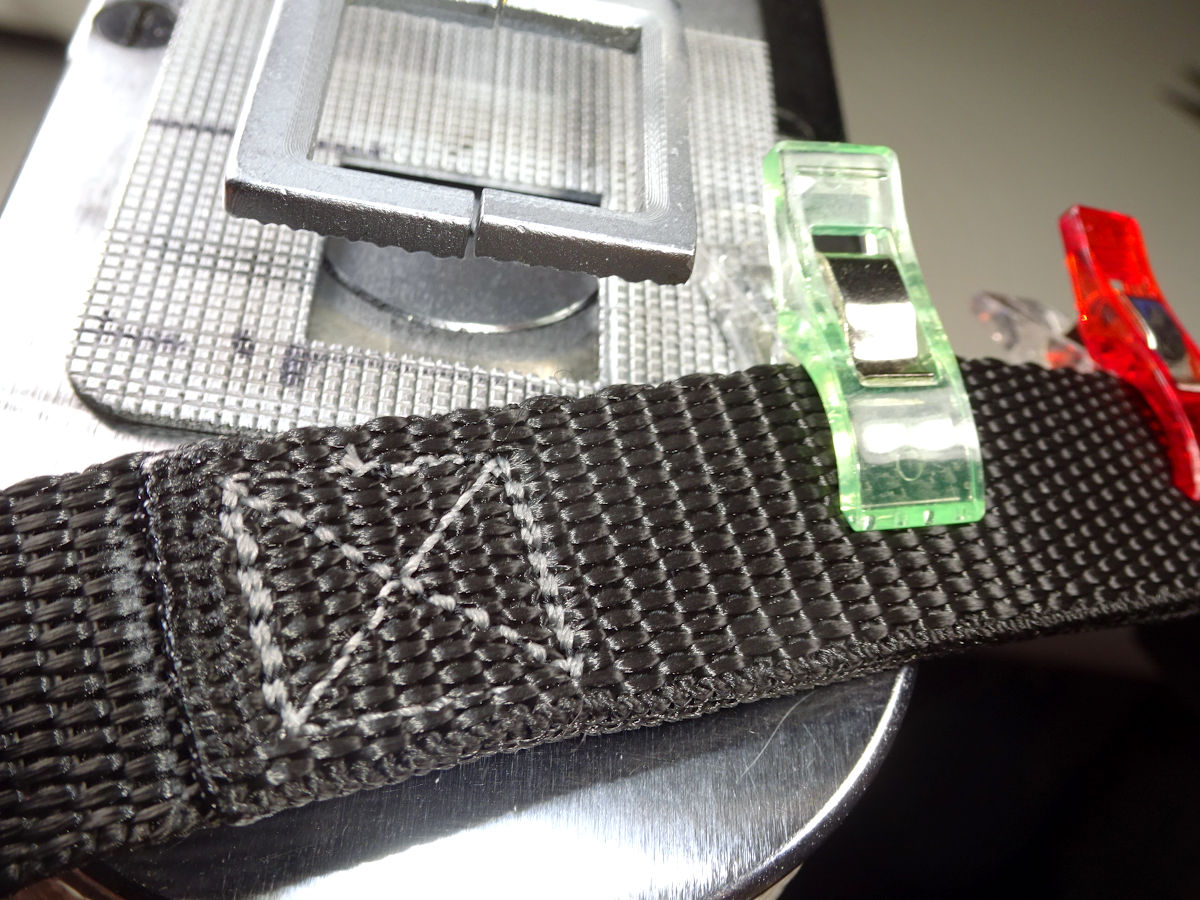
Handle end: a couple clips keep the overlapped webbing aligned. I use the smaller clip (introduced with the 3/8"-Short collar) which allows being closer to the clamp, holds the overlapped webbing's alignment better because the overlap is a little shorter. That clip also serves as a guardrail for where I put my thumb. (I hold the webbing back there with my right hand. It's easy to not notice my thumb's under the clamp, will be pinched when the clamp comes down. Not a serious injury, but you'll feel it for awhile. I'm in the habit of positioning my thumb inline with that clip.).
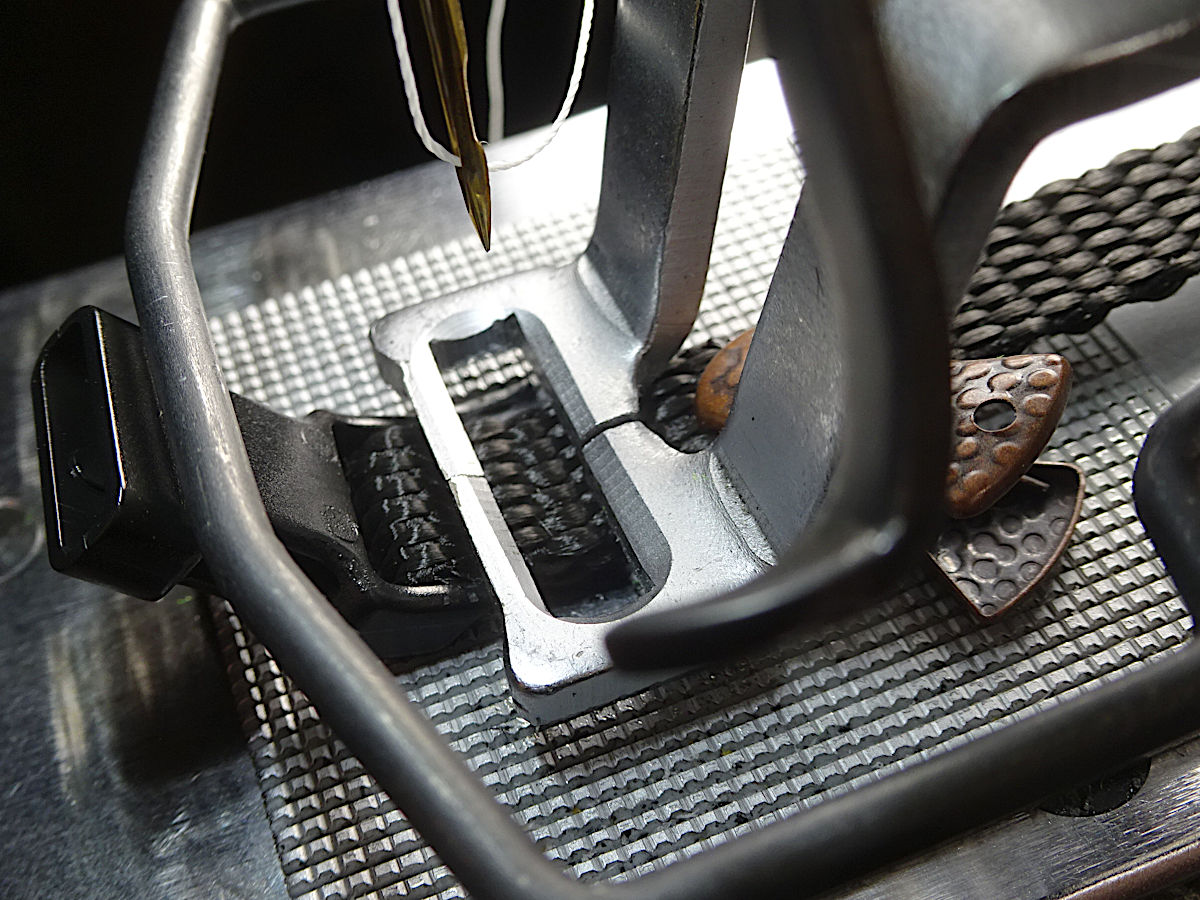
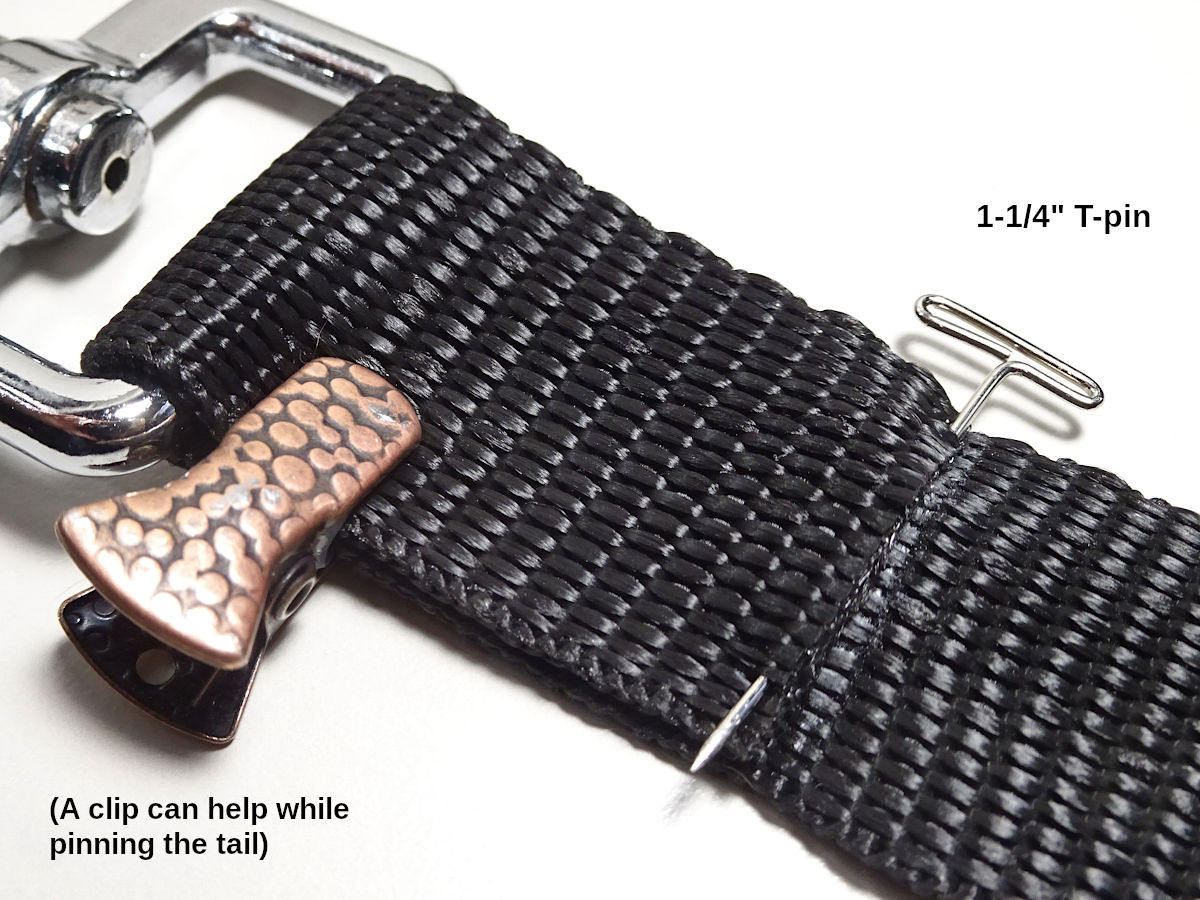
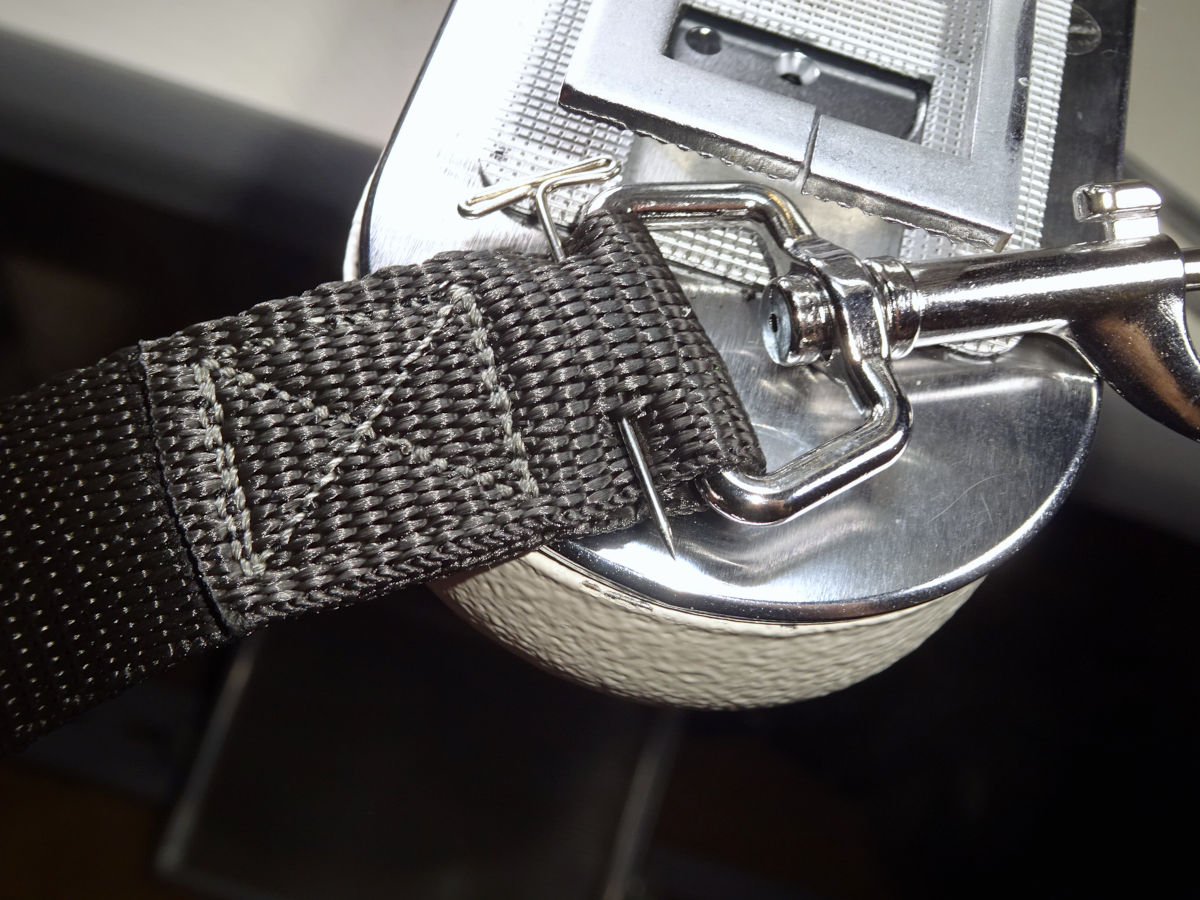
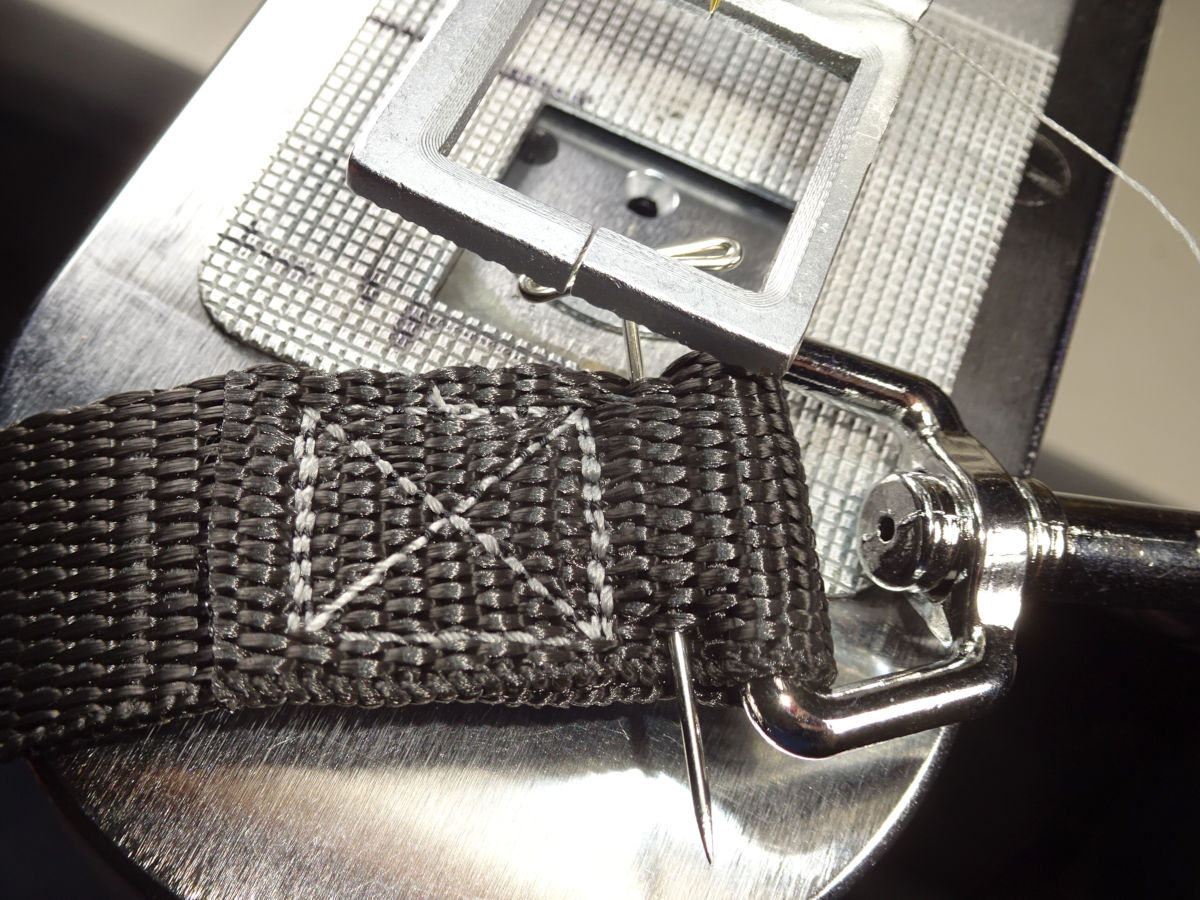
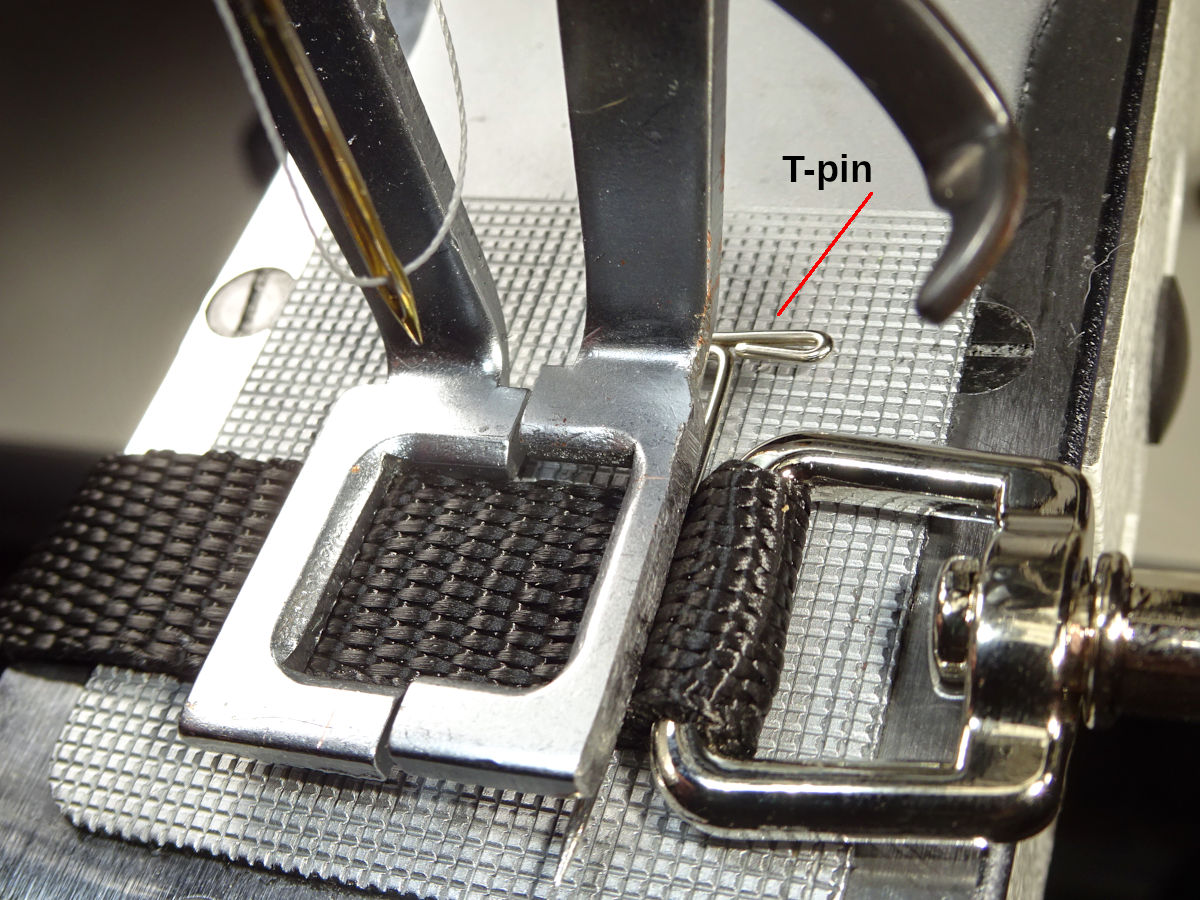
Snap end: I use a "T-pin" (1-1/4" long). I also use the small clip just to hold the overlap together while I pin it. (After you get used to doing this, you don't need the clip. It helps in the beginning.). You can find assorted t-pin sizes. A smaller diameter works better. (The 1-1/2" is a larger diameter, doesn't work as well for this. You need to pin very close to the tail of the webbing. Thinner is better.). This pin must be under the clamp so the needle won't hit it. (But, not too far under the clamp or you'll have too much excess webbing past the stitching. It won't look right.). If the pin is exposed within the box, it could break the needle. (It would probably deflect the needle causing it to strike the needle-hole guide. When that happens, you must inspect the needle-hole guide. Its job is to protect the needle-plate (which is expensive to replace). Strikes can crack the guide. If you continue using a visibly damaged (weakened) guide, the next strike could damage the needle plate.).
The snap end requires more attention than the handle end. 1) You want the snap as close to the stitches as possible (it won't look right if there's a large gap). 2) You want the tail reasonably close to the stitches too (a large flap won't look right). 3) You have to pin the tail close enough to the melted end that it can be under the clamp and not create too much excess past the stitches. 4) The overlap length has to be just right (within 1/8") for all the above to come together. 5) If the overlap is too short, you'll be tempted to pull the webbing toward the rear so the pin is under the clamp. But, that can cause clamp tp down higher up the side of the clamp, prone to slipping out from under the clamp - pulling the pin into the sewing field, likely causing a needle strike.). You can firmly press the webbing against the feed-plate's screw (just in front of the arch's base). That locks the webbing in place as discussed for collars. But, it's still risky in this case (because of the pin which can end up in the sewing field). I wouldn't try this with leashes until I've done it with collars for a long time. I would err on the side of excess overlap.
Alignment of the overlapped layers & centering in the sewing field: I lean back and tilt my head a little to each side to see how it looks. It's tempting to lean forward and look down on the material, and lean side to side to see it from above. I don't get as good of results doing that. Something about the "parallax" from that perspective causes it to look aligned & centered when it's not. I definitely get better results leaning back, seeing it from that perspective, lengthwise. (It may be possible to "JB Weld" small steel bar stock onto the feed plate, creating a guide. I'll try that someday. With guides, sewing the webbing oriented horizontally might be better. Without guides, vertically is definitely better.).
Notice I ground off some of the clamp's front edge so it would fit closer to the snap. (I could grind a little more off.). I also ground some off the sides so I don't have to shift my head as far to either side to see how the webbing is lined up with the plate's cutout. (The dark edge along the right edge is the remnant of Sharpie black ink. Marking the edge can help you gauge how much you've ground off as you go.).
Sewing horizontally
Before sewing the webbing oriented vertically, I did it laying across the arm. That worked, but was harder because I had to crane my head to the left to see the alignment & centering. I get better results doing it vertically. Leaning back to see the alignment is easier too.
The following shows how I sewed horizontally. This is the Regular leash (with charcoal thread, normal snap):


You might want to start horizontally. I was pretty rattled in the beginning (everything happening at once; a lot to pay attention to). Having both hands at the sides might've been easier than holding the webbing behind the clamp (can't see it as easily; there's a pinch hazard back there). If you try to sew horizontally, use the horizontal box-x pattern. It matters because two sides of the box have two complete rows of stitching. They need to go across the webbing.
For the snap end: I used a "T-pin" (1-1/2" long) as shown. If I did this again, I would pin the tail like you see in the vertical photos. For that, the 1-1/2" t-pin is too thick, doesn't work well pinning along the melted edge of the webbing.
Notice that I ground some material off the clamp's right side to make it narrower. (I used a Sharpie to mark the edge so I could see how much I ground off as I did it. You can see that mark.). That let me sew a little closer to the snap (allowing the overlap to be a little less). When I switched to vertical, I ground the front so the snap would be closer to the stitches. (I also ground the left side so I wouldn't have to lean over as far to see it. It was handy to already have the right side ground. That's how I noticed I had to lean further to the left.).
3/4"
[update: I sew these vertically like the 1" leash. The photos show horizontal.]
Notice I ground down the right side of the 3/4" clamp too:

I draw better Sharpie lines now. I use a "fine-tip" Sharpie which will fits the groove, will draw the line in the groove. I draw them following the groove all the way to the edge. They stand out very well, and are very precise markers for aligning. I started with an ordinary fat Sharpie. It's hard to get an accurate mark.
5/8"
[update: I sew these vertically like the 1" leash. The photos show horizontal.]


3/8"
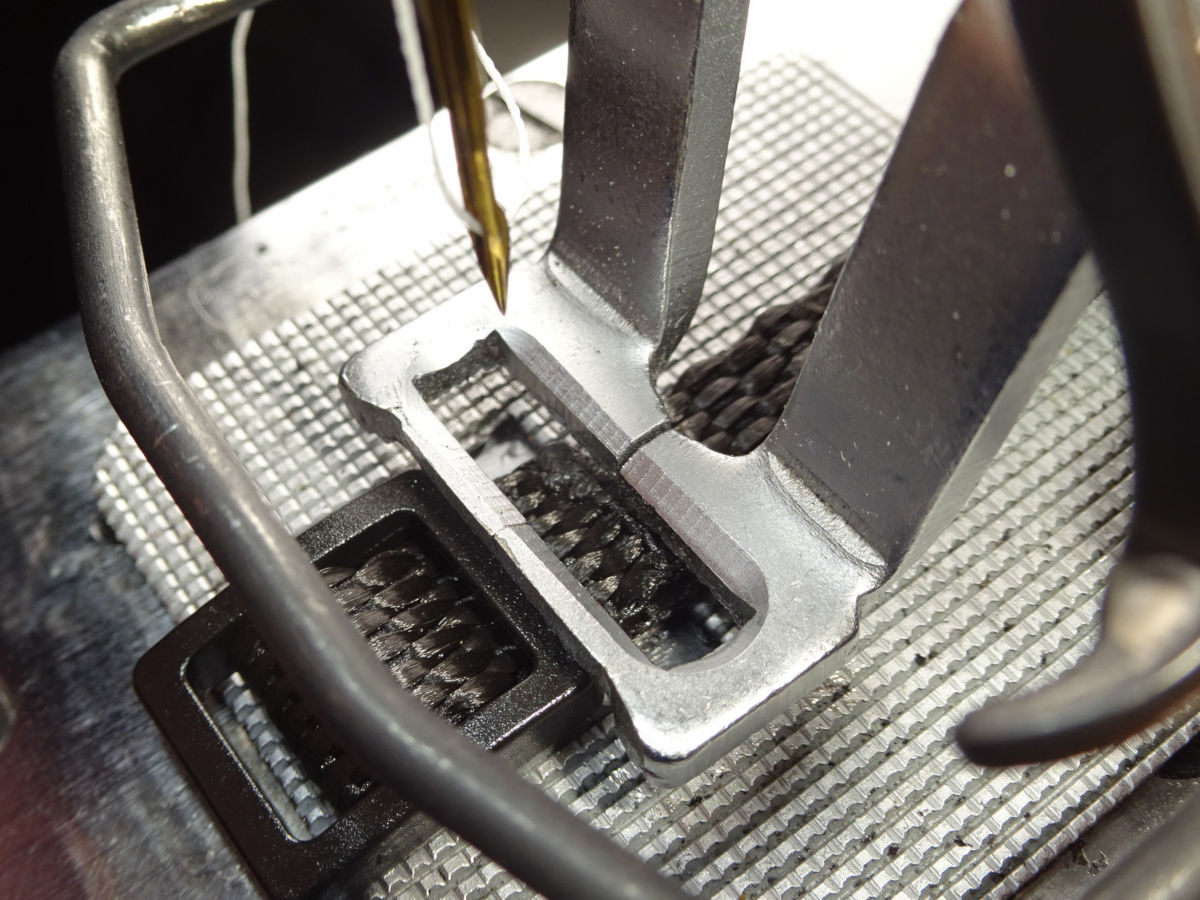
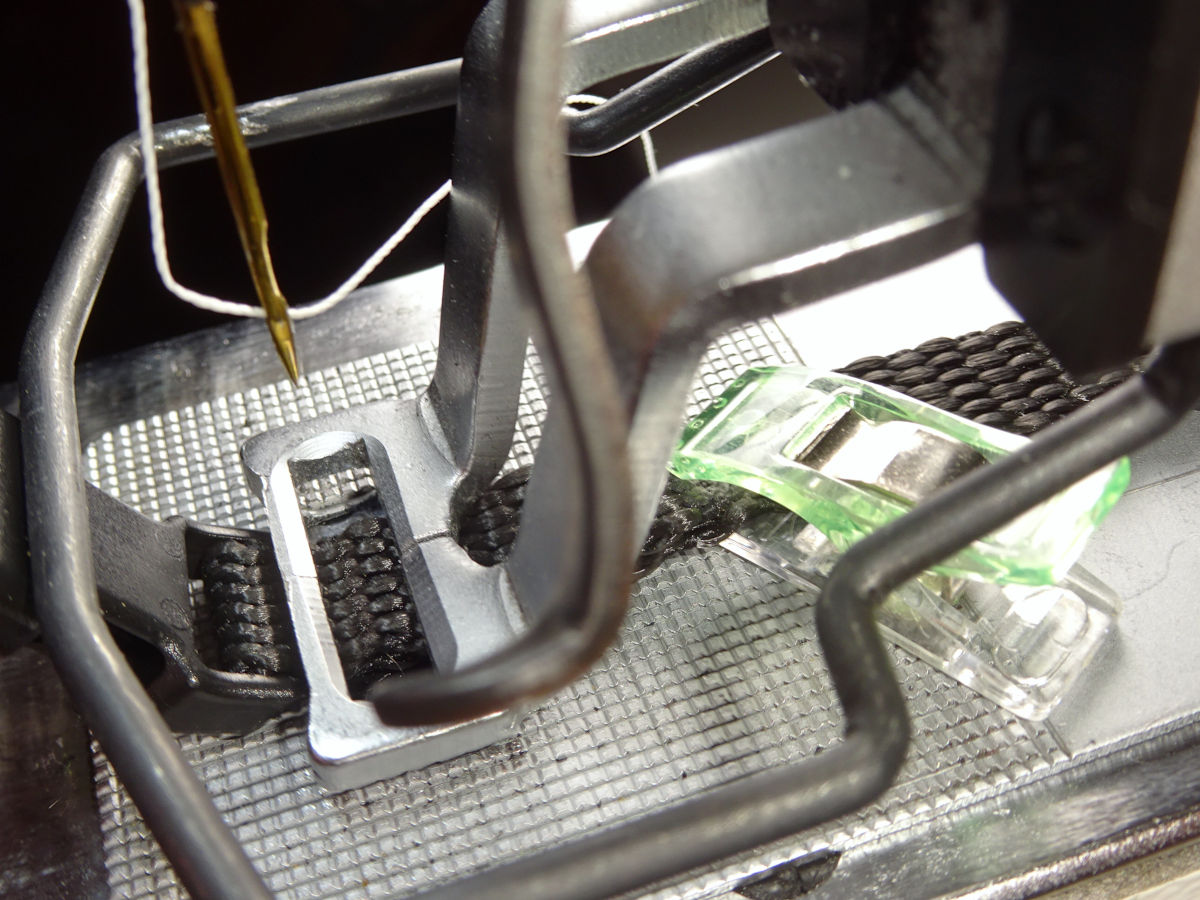
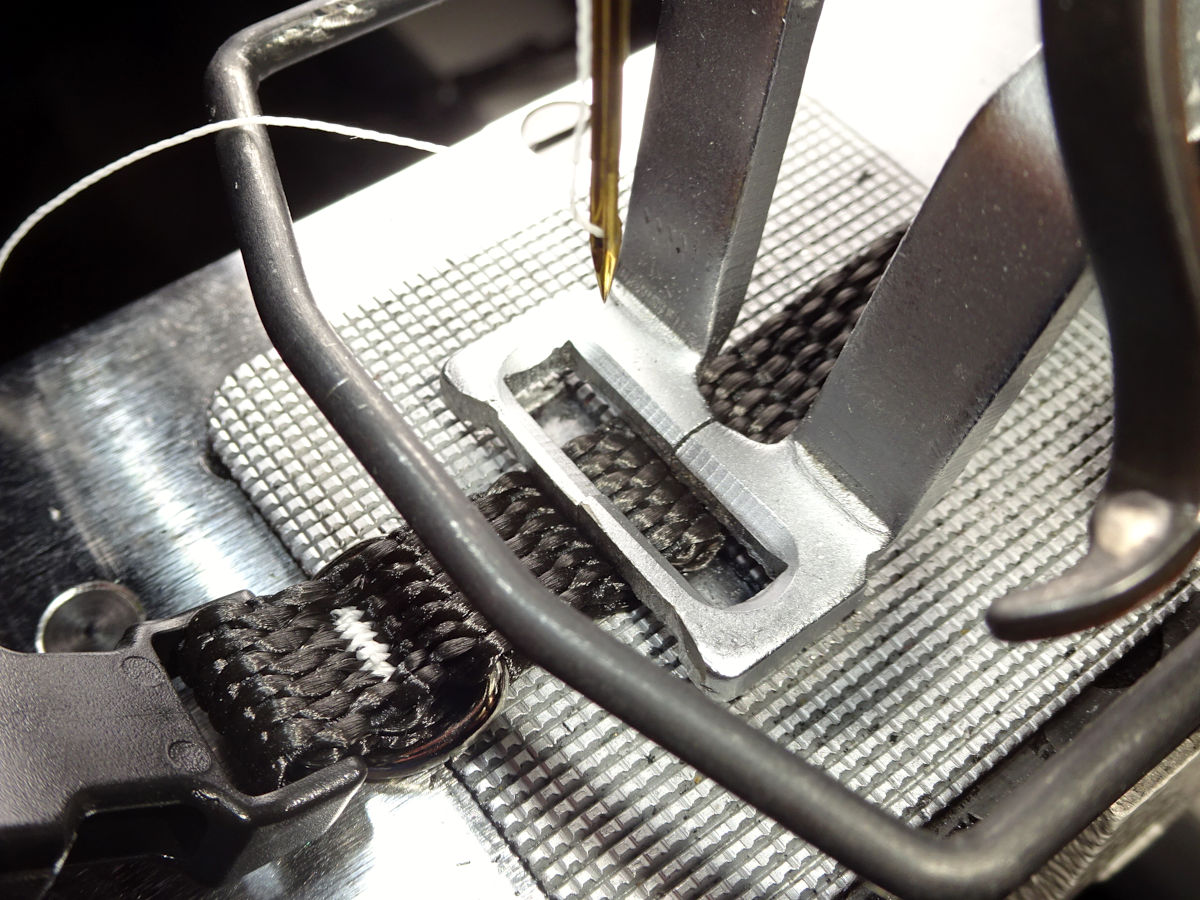
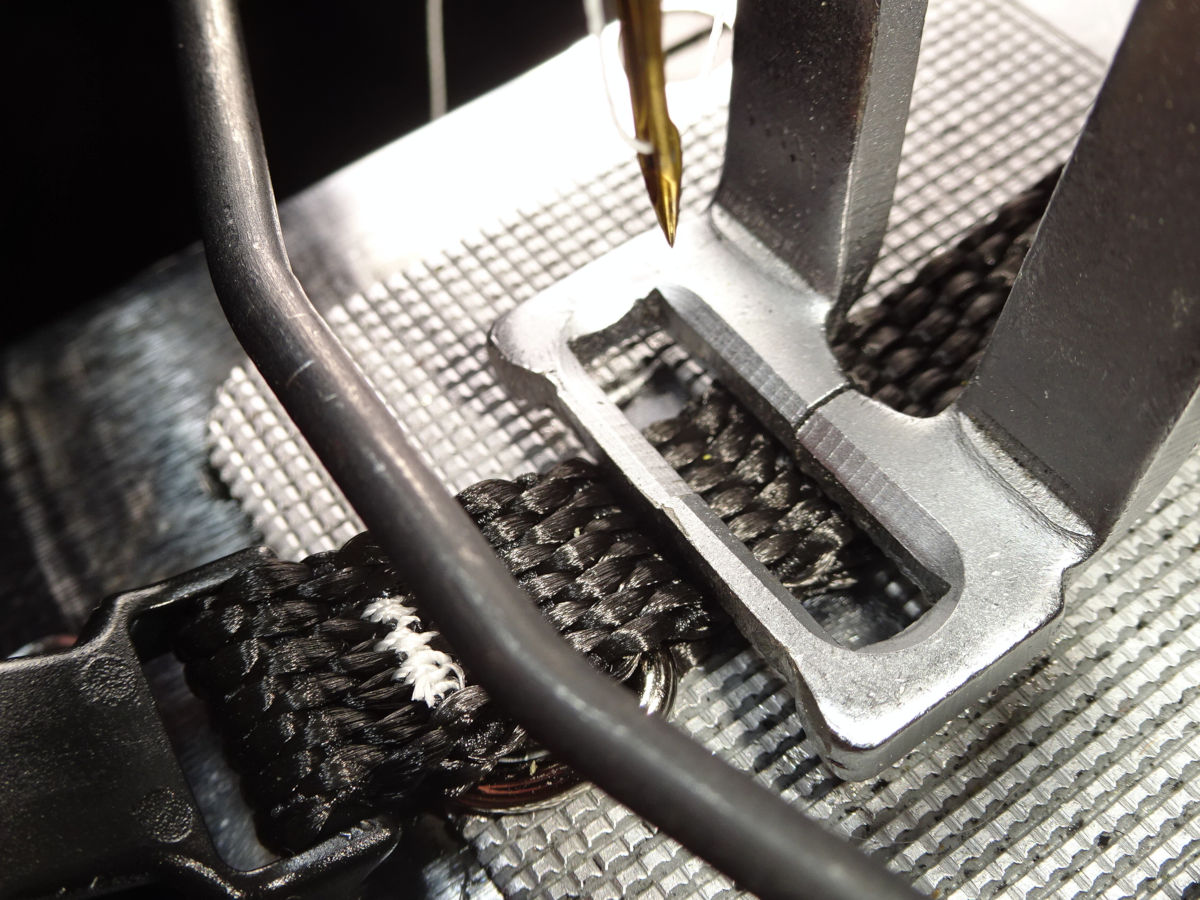
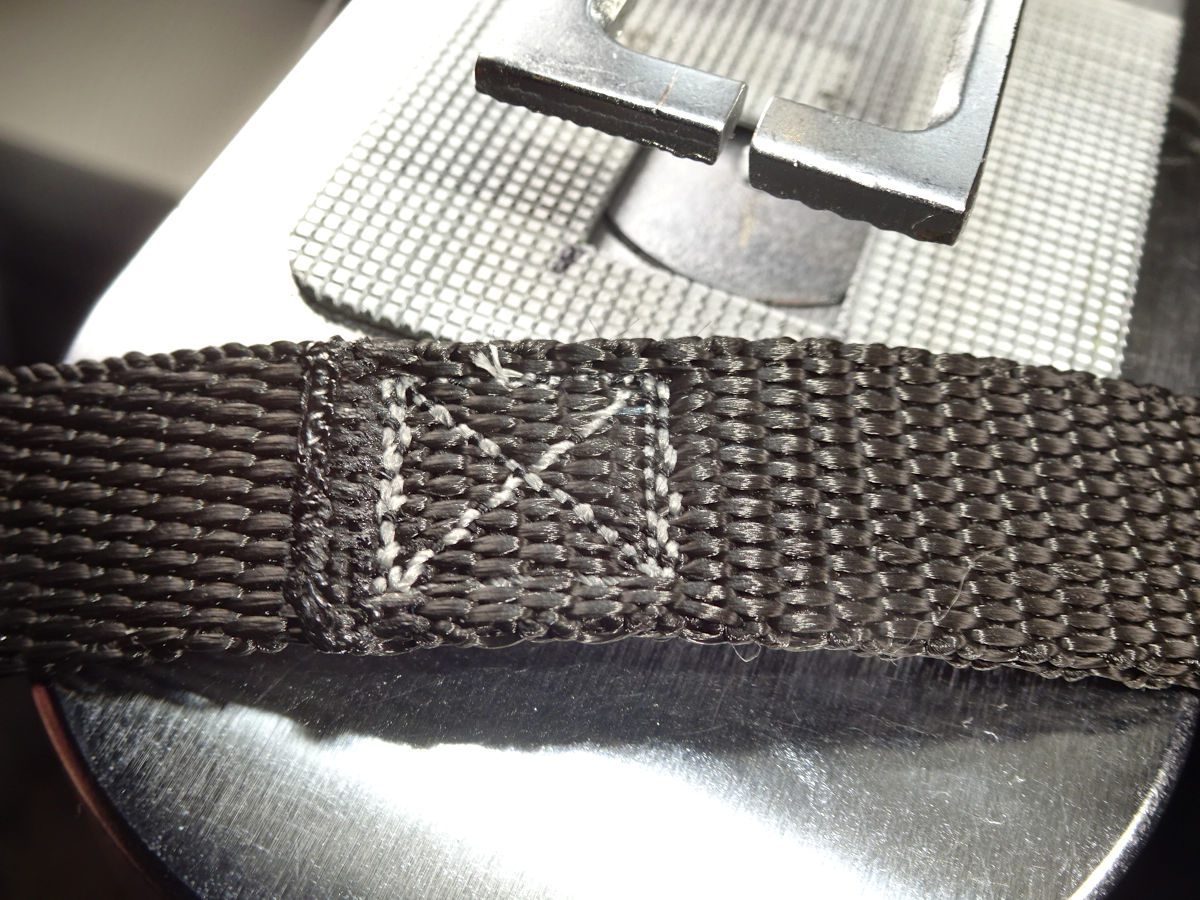
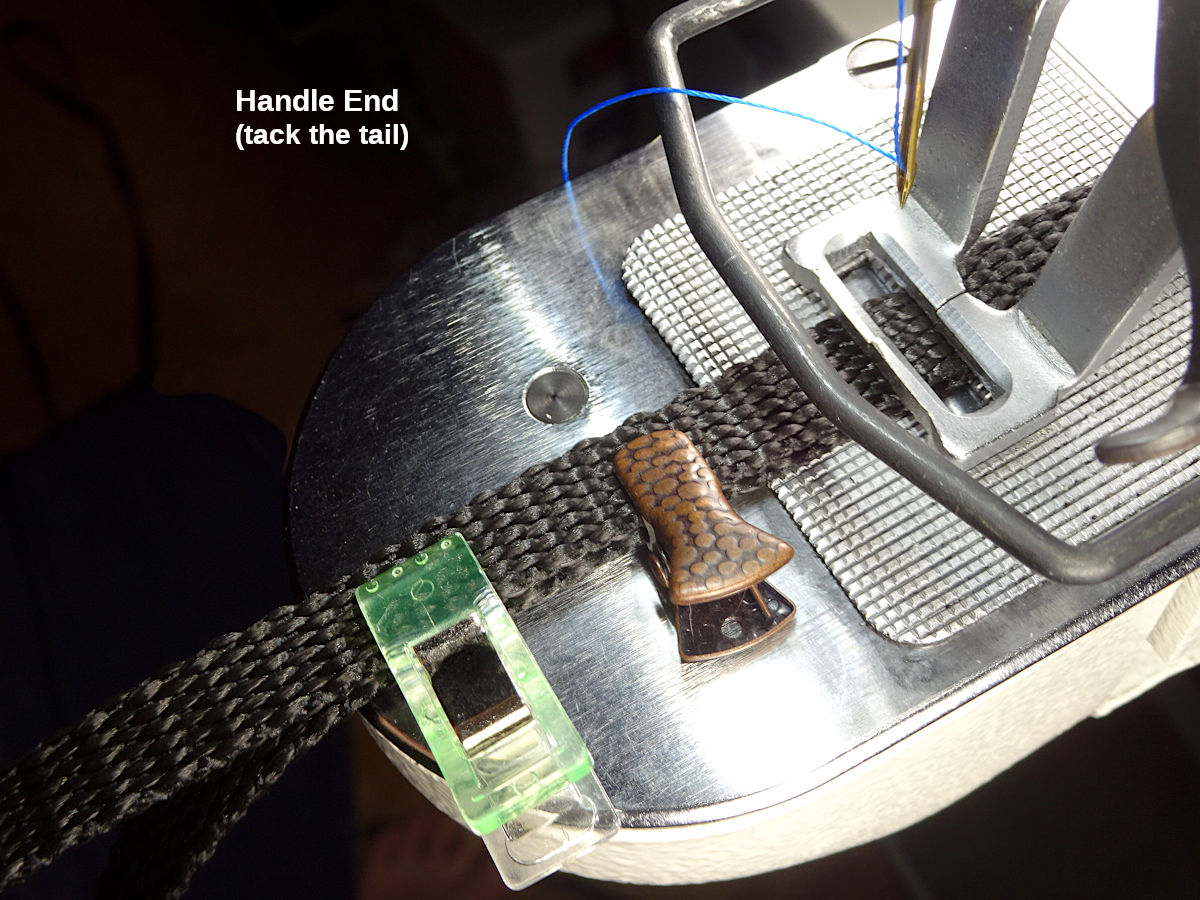
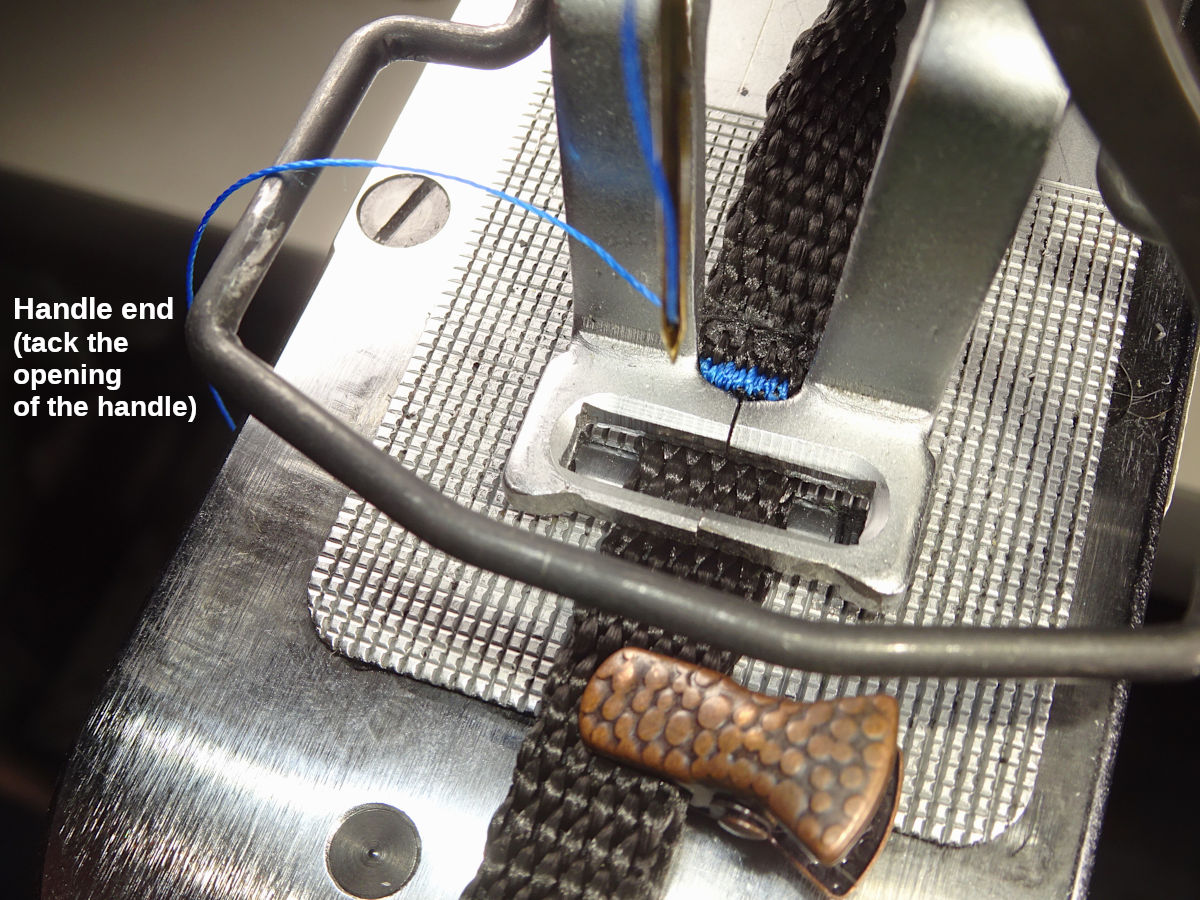
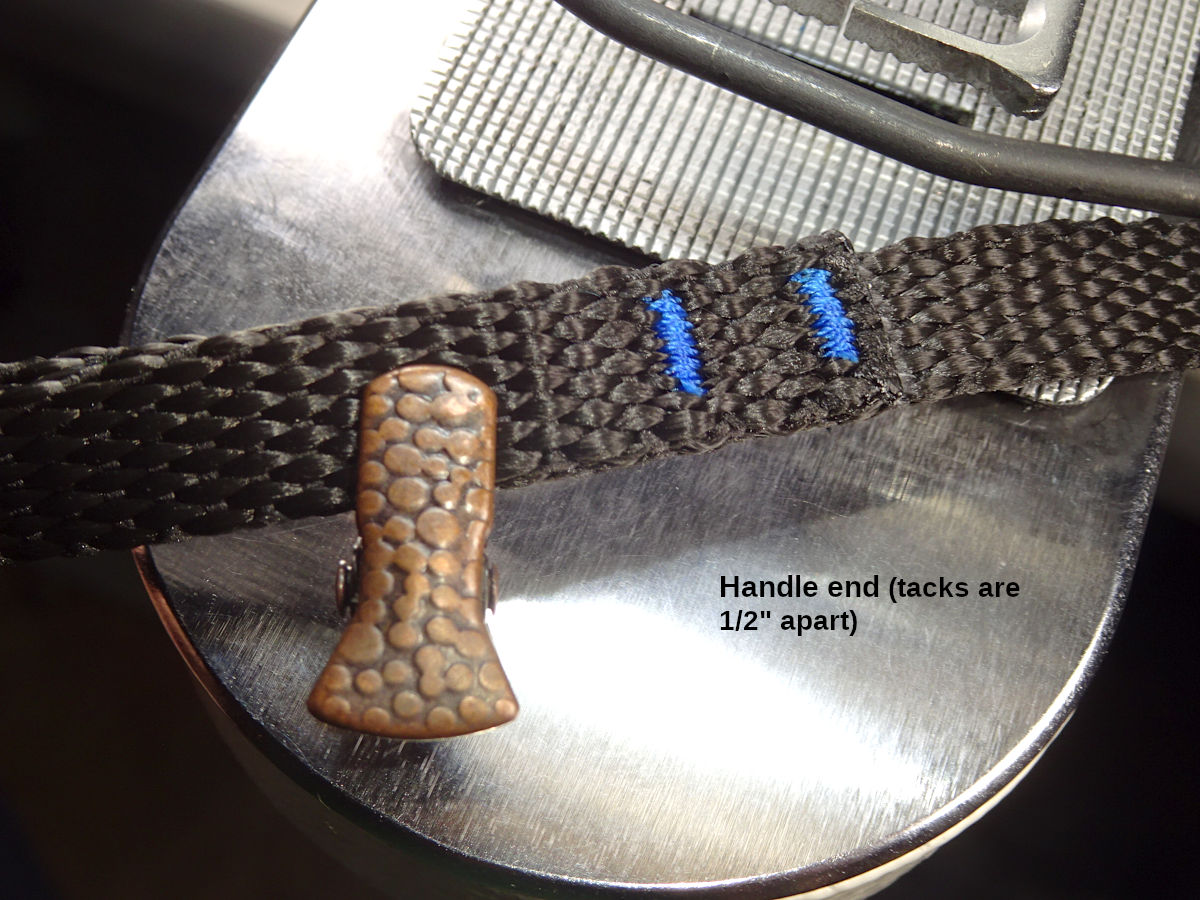
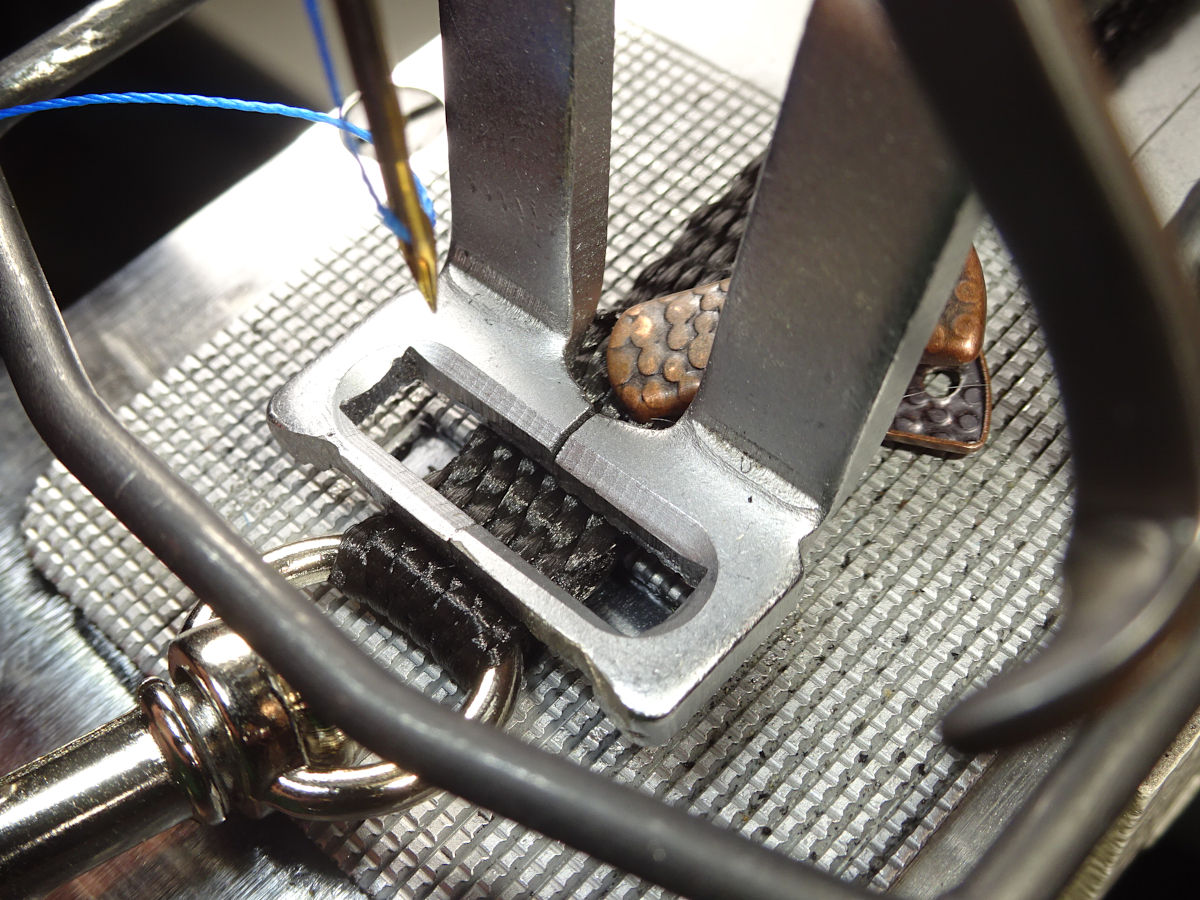
I sew the 3/8" leash like I do the 3/8" collar (with bartacks). The same webbing is used for both. (I think it would be hard to sew a box-x this small.). I start with the handle end, tacking the tail first, then the handle opening. I try to space the tacks 1/2" apart:
The snap end is similar, but I sew the tack closest to the snap first (with the webbing tail clipped in place. Then I sew the tail:
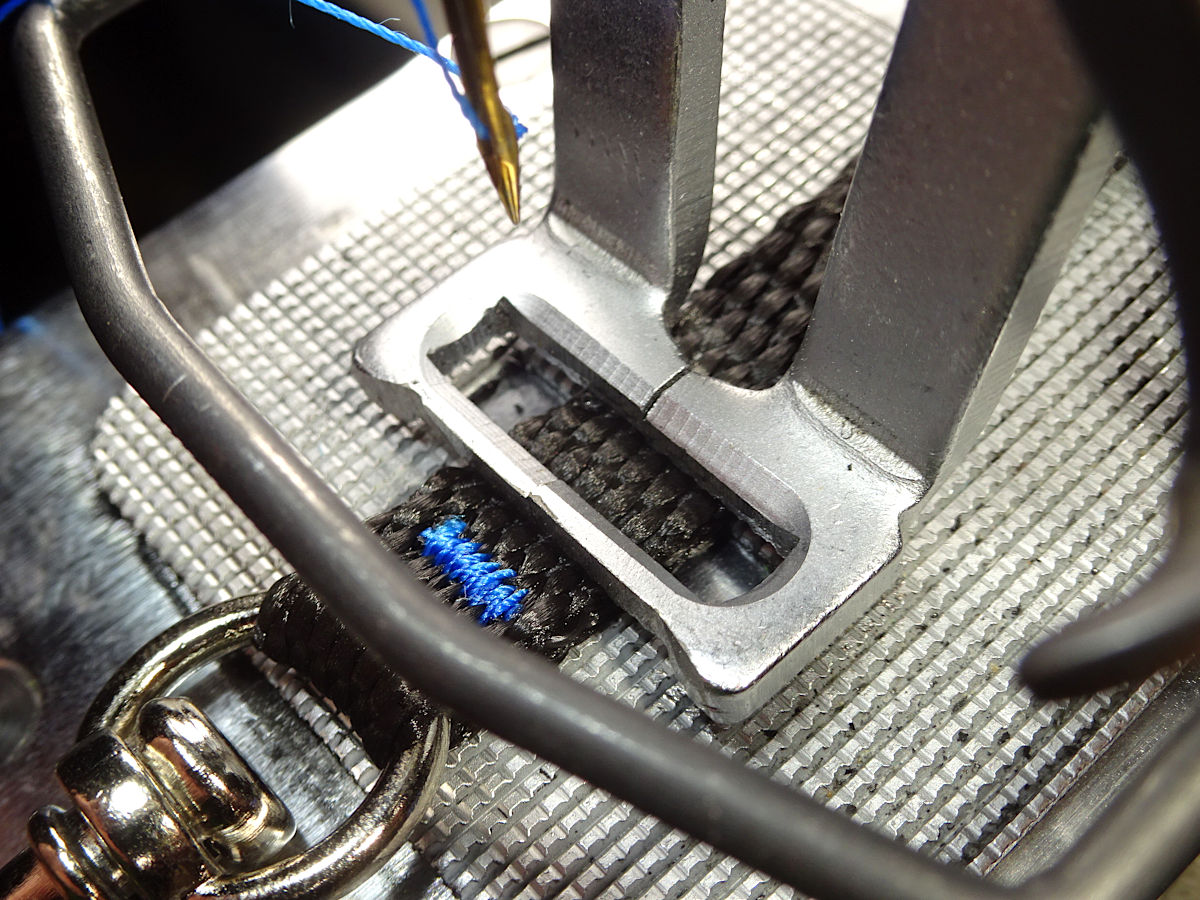
That small clip barely fits behind the clamp. I provided more info about that clip in the 3/8"-Short collar section above.
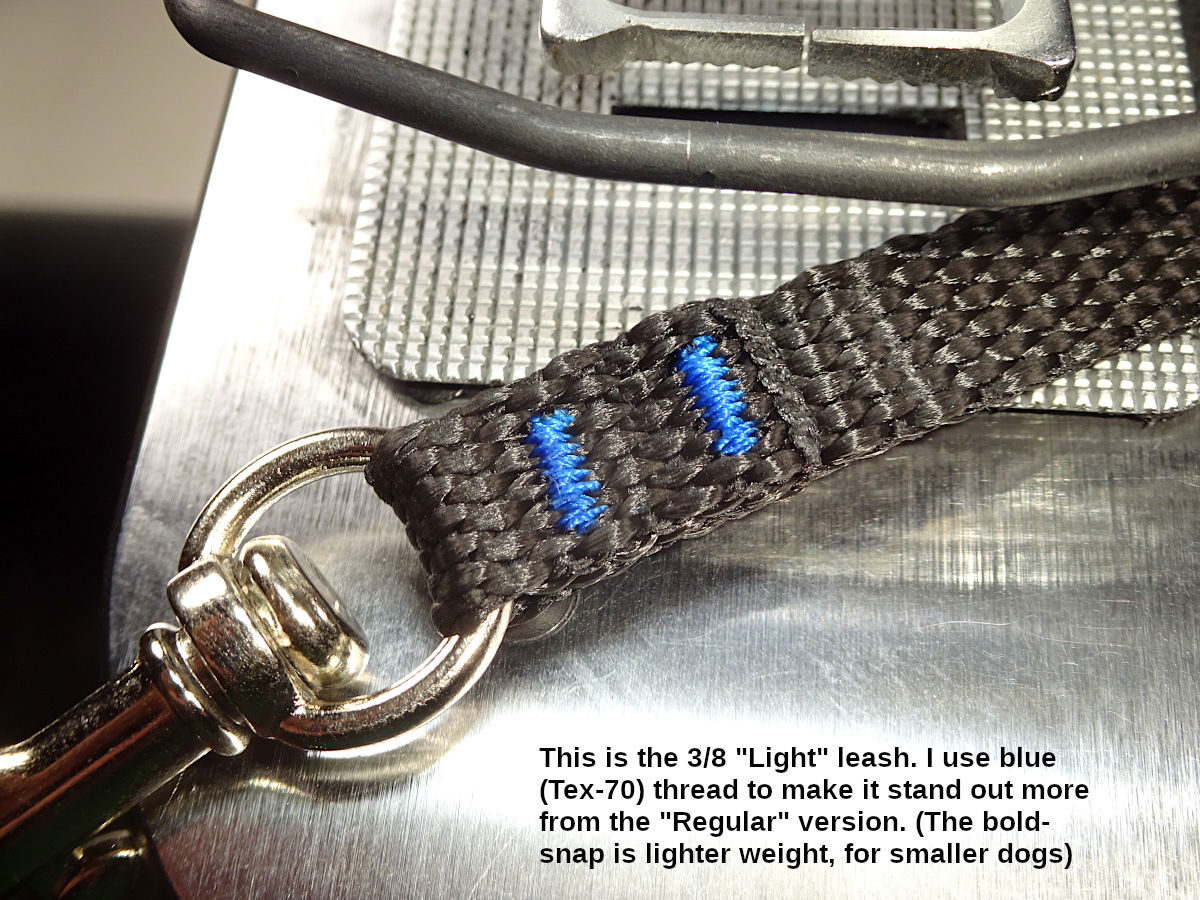
These photos show the Light version (using blue tex-70 thread signifying a lighter-weight bolt-snap). I make a Regular version using "shark gray" thread (to denote a stronger bolt-snap.).